Introduction
Yes! It’s true. I’m still leveraging Task Sequences and Configuration Manager to upgrade Windows 10.
I’m also Co-managing my devices and deploy regular updates via Windows Update for Business. Just not feature updates. I fancy the full-control approach, taking the opportunity to update BIOS and drivers while at it. Everything works directly over the Internet via the Cloud Management Gateway. No hard requirements in being on-premises or on VPN.
I have previously shared my precache and in-place upgrade task sequences. A lot have happened since then, and I wanted to take the opportunity to share my updated approach in details.
I’m covering each and every step, just like I did in my previous blog posts. Some steps are exactly the same, but in order to fully supersede the old posts, I’m covering everything in details here.
Now, I can’t go over explaining my WaaS process without mentioning THE OSD experts Gary Blok, Mike Terrill. They are tirelessly sharing their approach as well. If you are looking for a WaaS solution on steroids, I suggest you head over to garytown.com and miketerrill.net for inspiration.
If you are looking for something less advanced, then you are at the right place. With that being said, some of the stuff I do, is done with inspiration from what Gary is sharing at garytown.com – just without the steroids. 😛
And yes! The task sequence will be available for download in the very end of the post!
Let’s get to it. 🙂
Part 1: Windows as a Service: Sharing my PreCache and In-Place Upgrade Task Sequences – 20H2 edition, part 1
In-Place Upgrade Task Sequence
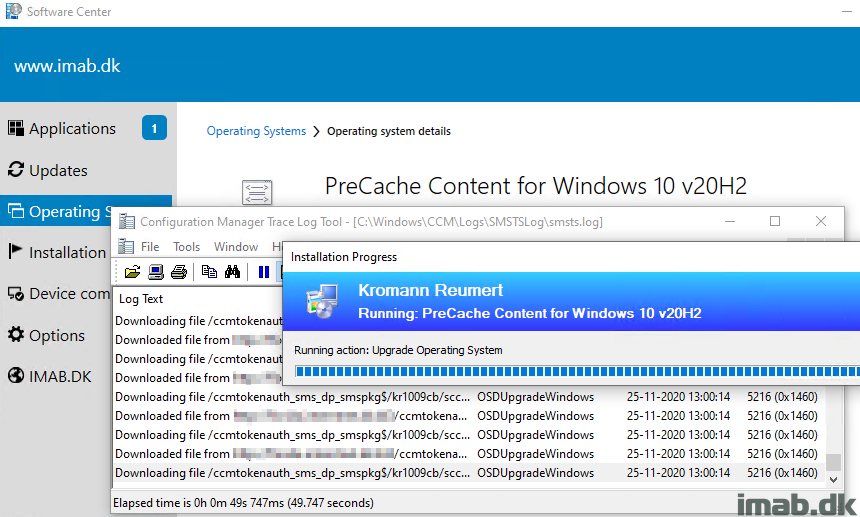
This is where the actual upgrade takes place, following some other actions like flashing the BIOS etc. With my previous post, we made sure that all the content referenced by this very task sequence, already exists in the Configuration Manager cache. By doing so, we cut down the time the end user has to wait dramatically. Also, this enables us to allow the task sequence to be run from VPN or over the Internet through our CMG, without the need to download any content while being remote. Sweet! 🙂
This is my task sequence in details step-by-step. Some of the steps are explained in the PreCache post and some of them are self-explanatory. If they are, I’m not going to cover them again – apologies.
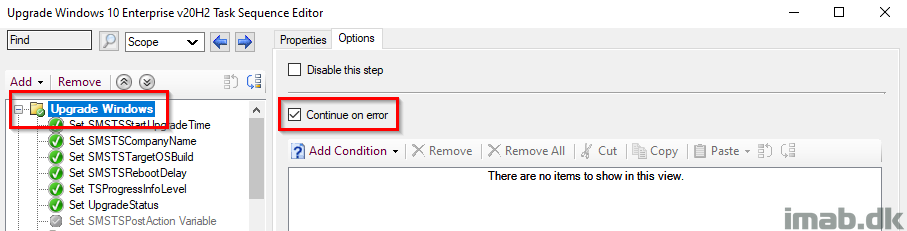
Upgrade Windows
This is the parent group for the entire IPU TS (In-Place Upgrade Task Sequence). This is configured with ‘Continue on error’, as error handling is done in the very end in the task sequence.
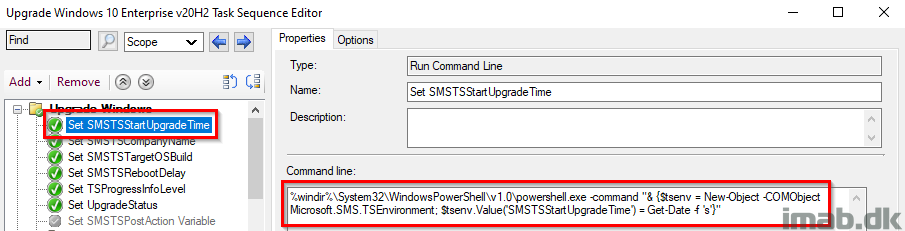
Set SMSTSStartUpgradeTime
This step records the date and time of when the In-Place Upgrade Task Sequence was started. The date and time is later picked up by a PowerShell script, and written into registry to be inventoried.
%windir%\System32\WindowsPowerShell\v1.0\powershell.exe -command "& {$tsenv = New-Object -COMObject Microsoft.SMS.TSEnvironment; $tsenv.Value('SMSTSStartUpgradeTime') = Get-Date -f 's'}"
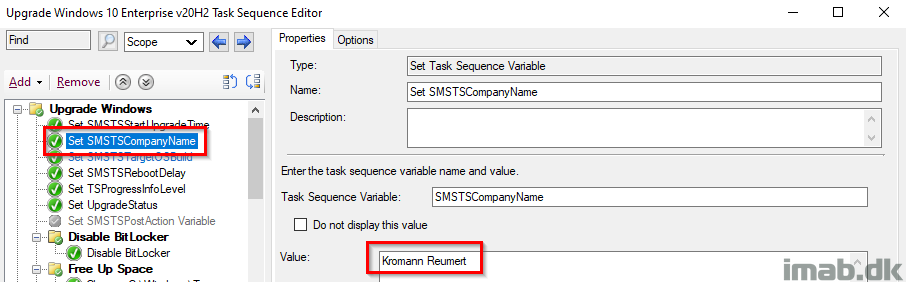
Set SMSTSCompanyName
This step is used to create the relevant structure in registry, as well as locally in C:\ProgramData.
- Example1: HKLM\Software\CompanyName\WaaS\2009
- Example2: C:\ProgramData\CompanyName\WaaS\2009
NOTE: This should make it fairly easy to modify the entire task sequence to use with your process. Changing the value here, will change the value everywhere throughout the task sequence.
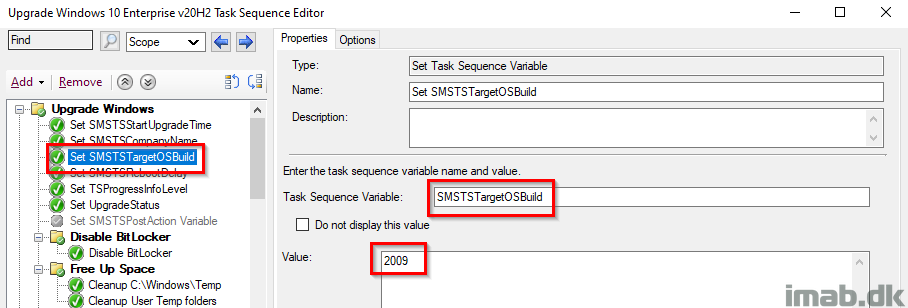
Set SMSTSTargetOSBuild
This step is used to create the relevant structure in registry, as well as locally in C:\ProgramData.
- Example1: HKLM\Software\CompanyName\WaaS\TargetOSBuild
- Example2: C:\ProgramData\CompanyName\WaaS\TargetOSBuild
NOTE: This should make it fairly easy to modify the entire task sequence to use with your own process. Changing the value here, will change the value everywhere throughout the task sequence.
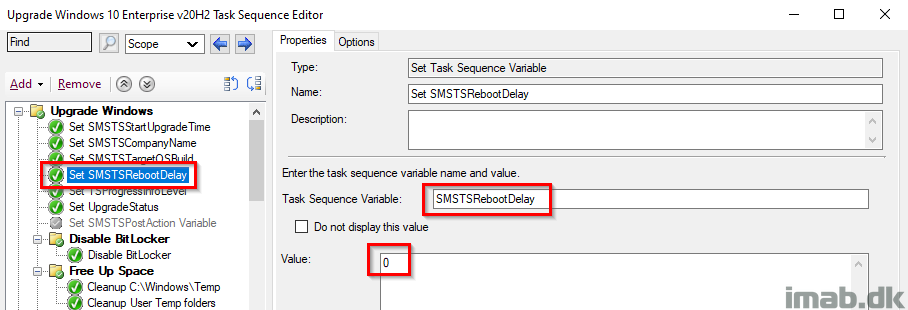
Set SMSTSRebootDelay
This step removes the unnecessary delay when rebooting the computer. By default, this is set to 30 seconds.
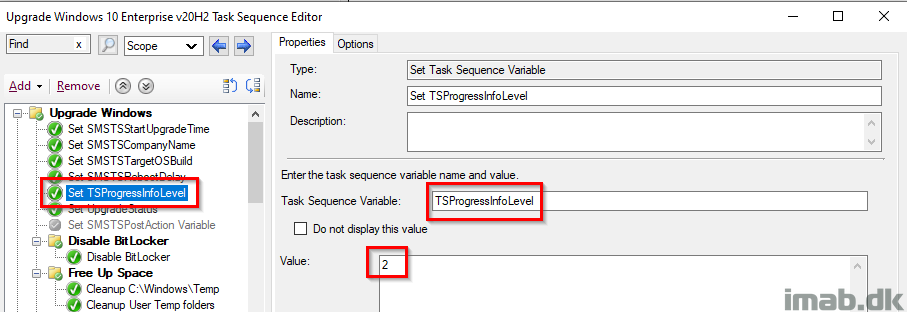
Set TSProgressInfoLevel
This step and variable, defines the type of information that the task sequence progress window displays. More info here: Task sequence variable reference – Configuration Manager | Microsoft Docs
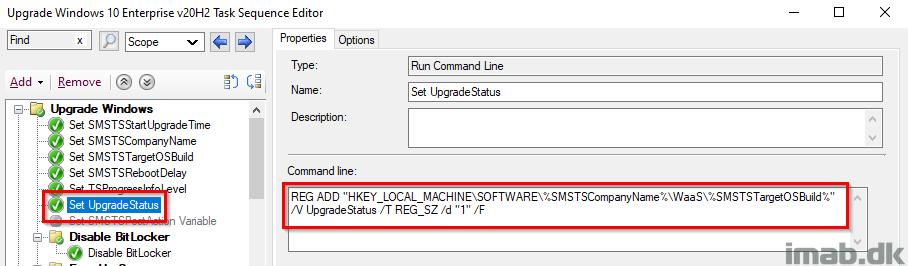
Set UpgradeStatus
This step sets the initial UpgradeStatus registry key to 1, indicating a failure. This is supposed to be updated later on, when everything succeeds and we have verified that Windows 10 is now 20H2 (or whatever version of Windows you are deploying). The idea is, that the upgrade is considered a failure until this key has been updated. More on this later on. Also, this is being picked up by hardware inventory for use with collections.
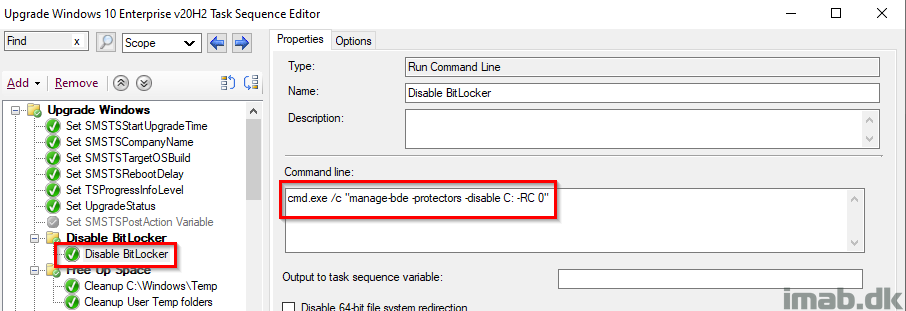
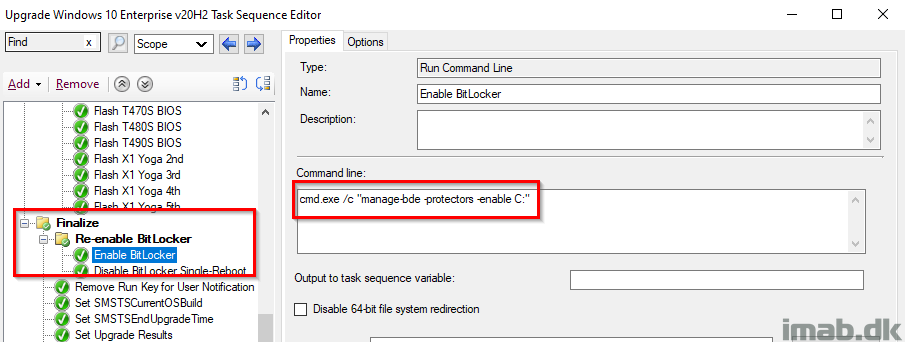
Disable BitLocker
This is probably controversial and some would argue it’s not required and that the Windows setup does this automatically, BUT I have still seen devices prompting for BitLocker PIN (Yes, we have devices with BL PINs 🙁 ) during the reboot, so I took the consequence of disabling BitLocker manually. Notice this is not done with the built-in step, but rather done with manage-bde and RC 0 (Restart Count) which disables BitLocker infinitely regardless of how many reboots.
Free Up Space, Prepare for Upgrade, Readiness Success
All of these steps are exactly identical to the steps in the PreCache Task Sequence, with the exception of manually failing the TS if the Readiness Check is failing. I’ll elaborate further in the next section.
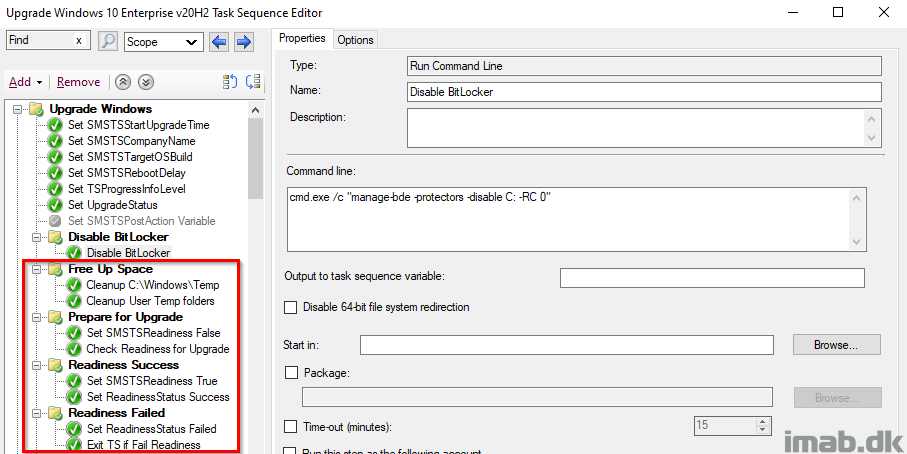
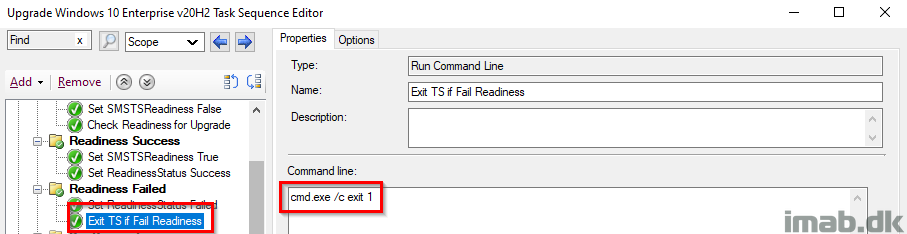
Readiness Failed
The group Prepare for Upgrade, containing the actual Readiness Check, has ‘Continue on error’ set, as we want the TS to continue on to the next steps, for proper registry tattooing for success or failure. That’s why we need to ‘manually’ fail the task sequence, forcing the TS to fail and move all the way to our error handling in the end.
Configure User Notification
This step is essentially done with inspiration from Jason Sandy’s post on Per User Login Message: https://home.configmgrftw.com/per-user-login-message/. Difference is that I’m not using UI++, but Powershell App Deployment Toolkit for the notification. My users are used to seeing PSADT, so I figured I would use something they would easily recognize.
I promised to make the binaries used available for download. So here goes: Upgrade-StillRunning-v2009.zip (22397 downloads )
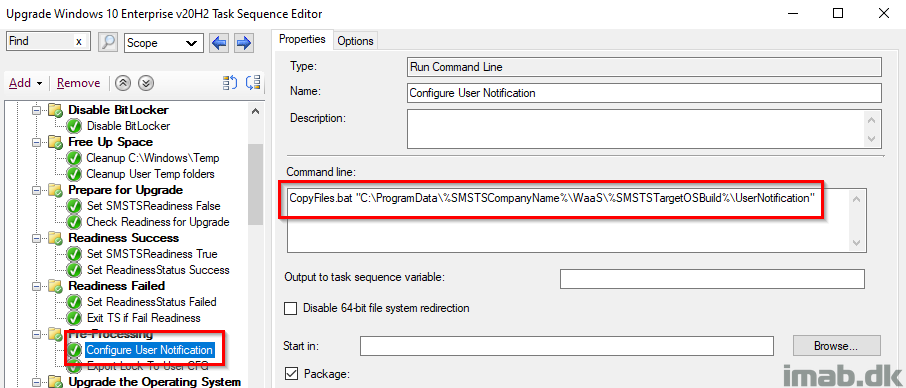
For your convenience, this is the message that is being displayed, if the user logs on while the upgrade is still running:

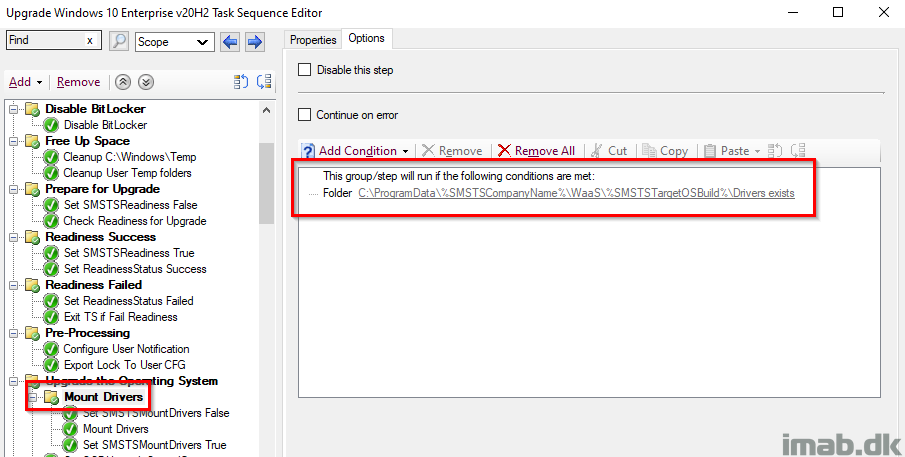
Mount Drivers
I’m upgrading the drivers in the process, and I do it, in a not so typical fashion with WIM files. The process is explained in more detail here: Precache and update drivers as WIM during In-Place Upgrade Task Sequences with Configuration Manager
The process has been updated slightly, to honor the variables SMSTSTargetOSBuild and SMSTSCompanyName.
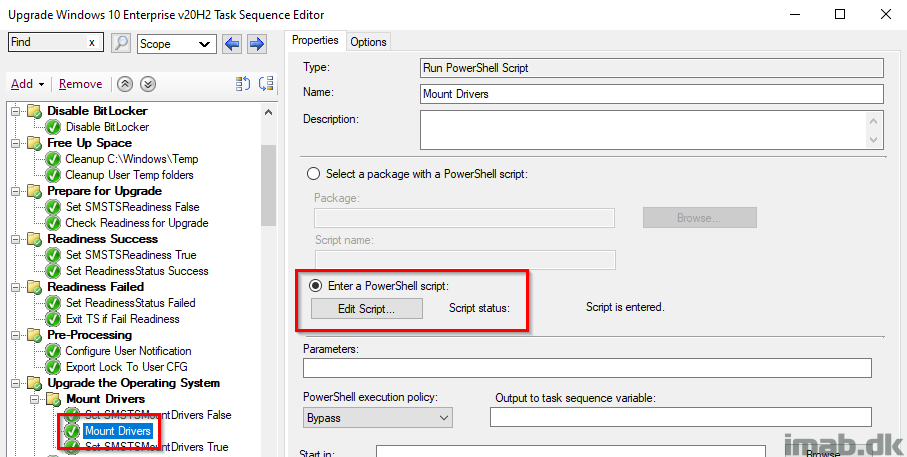
Mount Drivers PowerShell Script
Mounting of the WIM file containing the drivers, is happening with a PowerShell script. This script has also been updated to honor the variables SMSTSTargetOSBuild and SMSTSCompanyName.
The script used can be found here on my GitHub page: WaaS/Mount-Drivers.ps1 at main · imabdk/WaaS
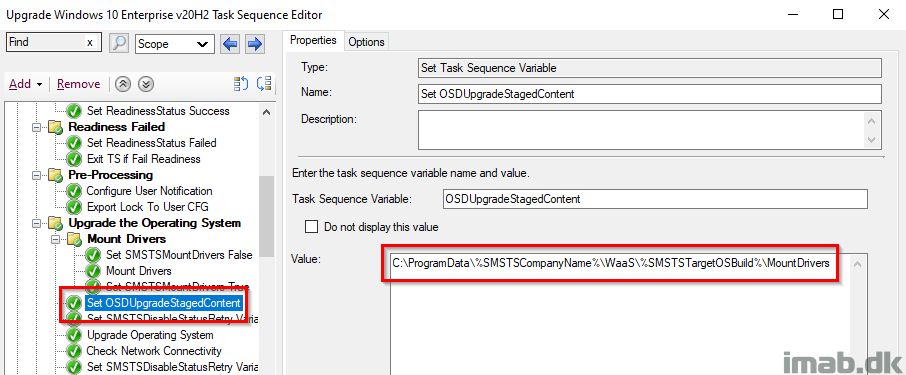
Set OSDUpgradeStagedContent
Here I’m leveraging a task sequence variable called OSDUpgradeStagedContent, which essentially instructs the Windows setup to use the drivers that I have mounted via the WIM file.
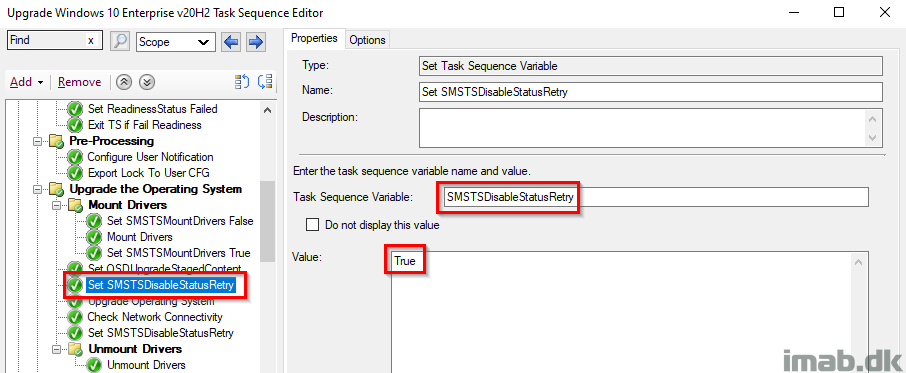
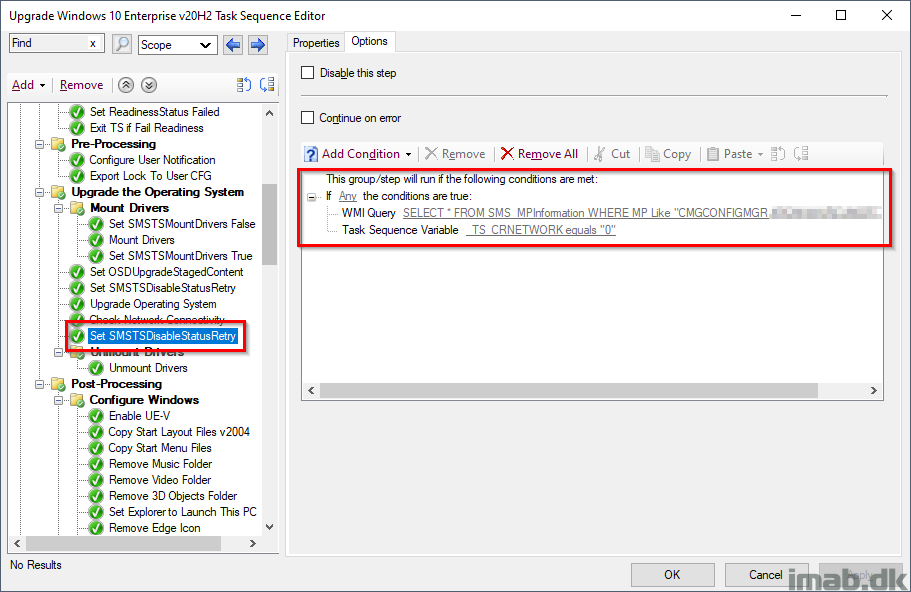
Set SMSTSDisableStatusRetry
This might cause some wondering for some, but in my scenario, I initially and possibly have a user-centric Always On VPN tunnel active, which is being disconnected during the reboot of the Windows setup. From there the Configuration Manager client switches to Currently Internet and connects to the Cloud Management Gateway, and I’ve seen some waiting here and there for status messages to be sent back to the CMG.
Check Network Connectivity
What I do next, POST the Windows 10 setup, is to check for network connectivity. I have seen scenarios, where devices connected via Wi-Fi, being remote or in office, simply fails to reconnect to the network.
In case of no network connectivity, I want to make sure that status messages are not being retried, making the task sequence run for a very long time.

Set SMSTSDisableStatusRetry
Setting SMSTSDisableStatusRetry again, but conditionally and only if the device is either on the Internet with my CMG as management point, or if the device simply is offline at this stage.
_TS_CRNETWORK 0 indicates that a network adapter is not connected, thus disabling status messages moving forward.
Unmount Drivers Group
This group makes sure, that the subsequent step is only run, if there indeed was downloaded and mounted any drivers. This is to prevent, that the unmounting is happening with no drivers present, as this would cause the step to fail.
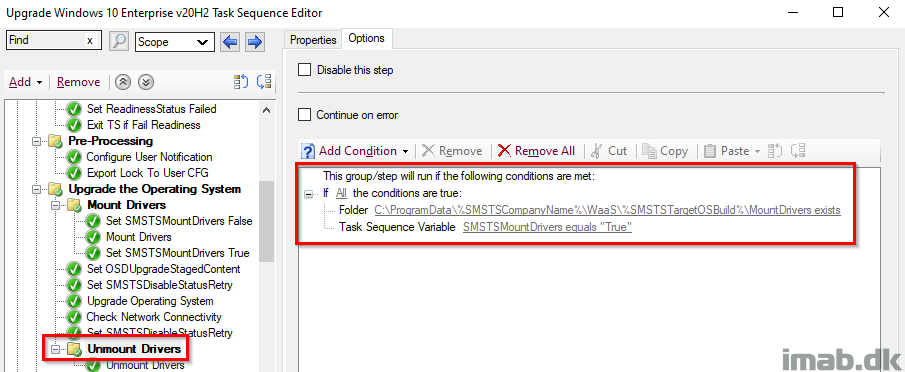
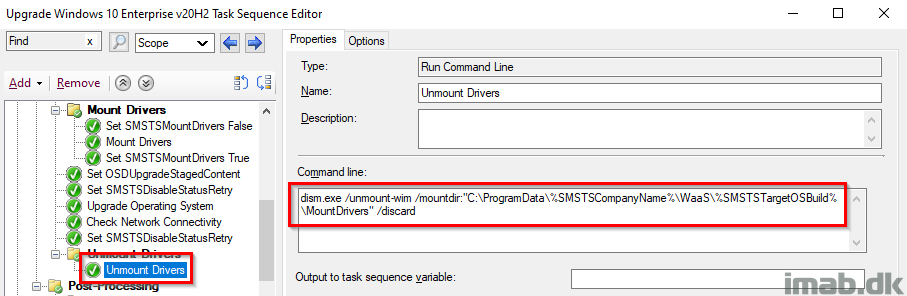
Unmount Drivers
This step unmounts the WIM containing the drivers again, freeing up the space used.
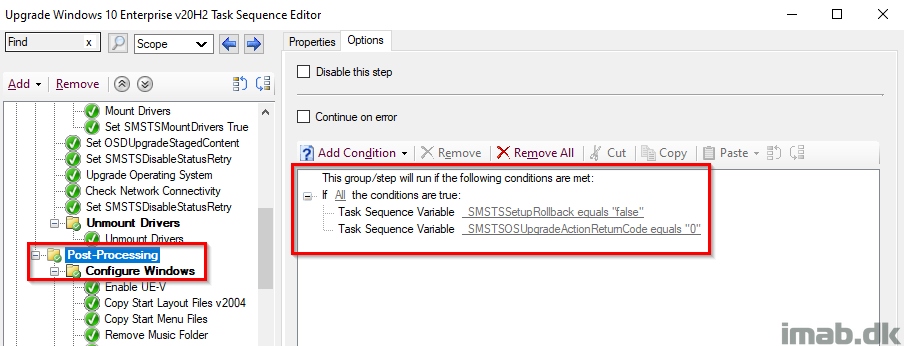
Post-Processing and Configure Windows
This is just me doing all sorts of configuring of Windows and updating of applications POST upgrade. This group only runs if _SMSTSSetupRollback equals False AND _SMSTSOSUpgradeActionReturnCode equals 0.
Finalize and Re-enable BitLocker
Finalize is a sub-group to Post-processing, and thus only runs if everything ran without issues during the actual upgrade. I also re-enable BitLocker at this stage following the next reboot (I enable AND disable BitLocker but without -RC 0 which will enable BitLocker at next reboot).
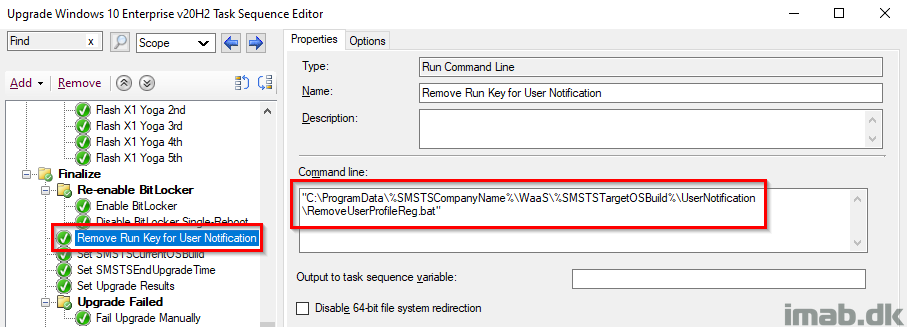
Remove Run Key for User Notification
Removing the run key once again for the user’s profile, so the user no longer sees the message in Powershell App Deployment Toolkit.
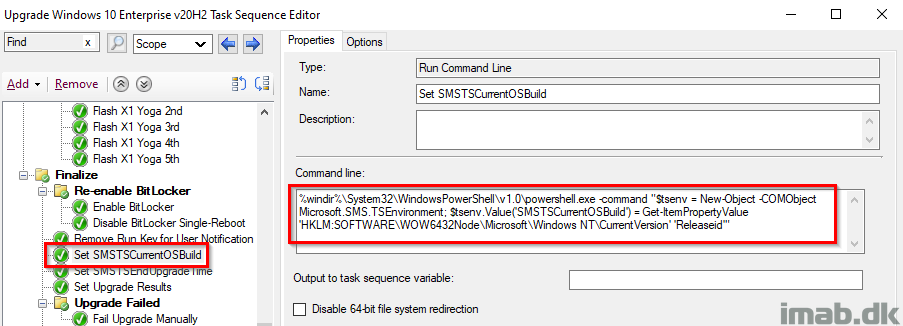
Set SMSTSCurrentOSBuild
Retrieving the actual Windows build number from the registry, and store it into the SMSTSCurrentOSBuild variable. At this point, we would expect this to be 2009 and can take actions accordingly based on that.
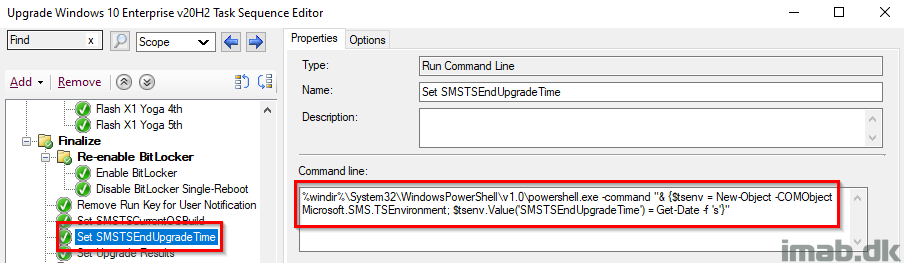
Set SMSTSEndUpgradeTime
This step records the date and time, of when the In-Place Upgrade Task Sequence is done running. The date and time is later picked up by a PowerShell script, and written into registry to be inventoried.
%windir%\System32\WindowsPowerShell\v1.0\powershell.exe -command "& {$tsenv = New-Object -COMObject Microsoft.SMS.TSEnvironment; $tsenv.Value('SMSTSEndUpgradeTime') = Get-Date -f 's'}"
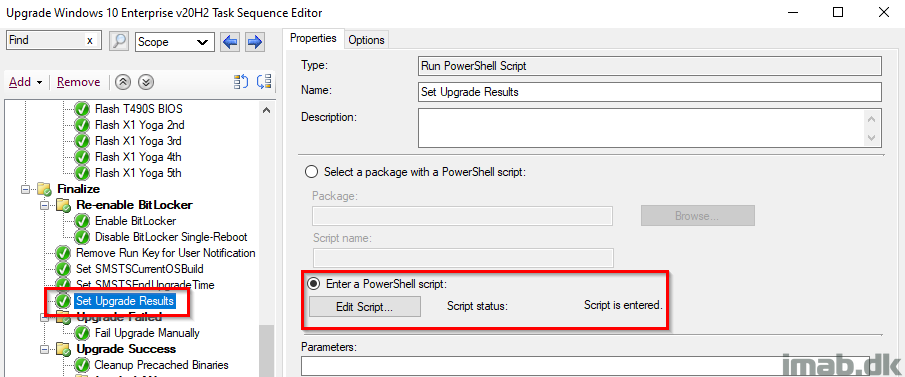
Set Upgrade Results
This step is the final piece of the puzzle, running a PowerShell script, which will tattoo the complete upgrade status into the registry.
The PowerShell script can be found here on my GitHub page: WaaS/SetUpgradeResults.ps1 at main · imabdk/WaaS
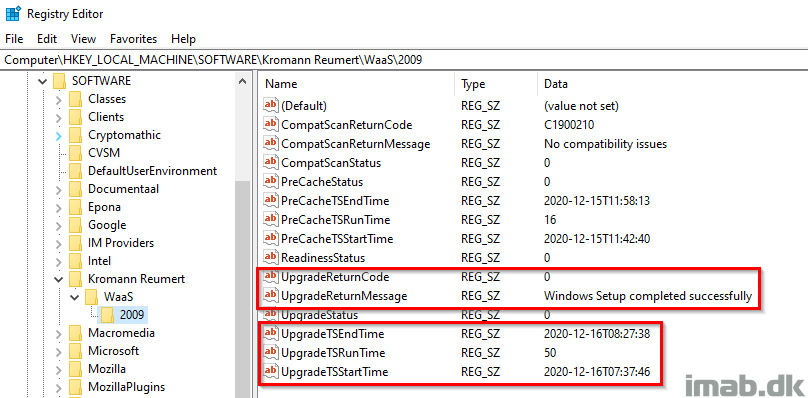
The registry at this point, will hopefully look somewhat similar to below illustration. In this scenario, everything completed successfully.
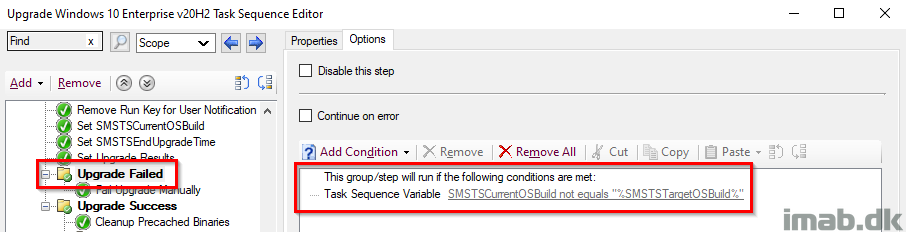
Upgrade Failed
This combined with the previous step, is an additional check on whether the upgrade indeed was successful and the build is now 2009. This group will run, if the current OS build is NOT equal to what we initially set in the task sequence.
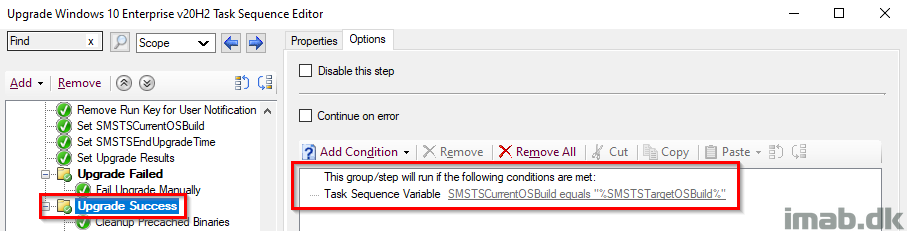
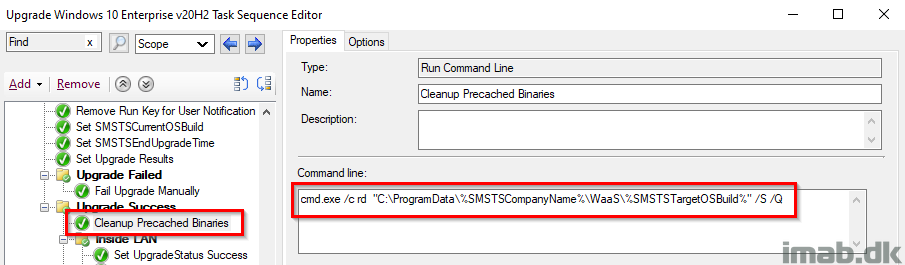
Upgrade Success
This entire group will run, if the Windows build turns out as expected, and thus enables us to run some additional actions. This is paired with its parent group, which together indicates both a SUCCESS on the actual upgrade AND the correct build number retrieved live from the registry.
Cleanup Precached Binaries
If everything completed successfully, I’m going to clean up everything that was precached in the custom folder in C:\ProgramData. This is happening conditionally and only if the folder exists.
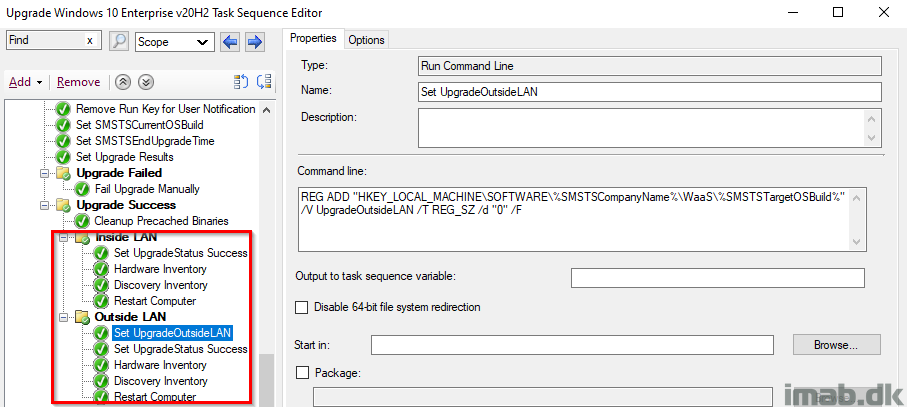
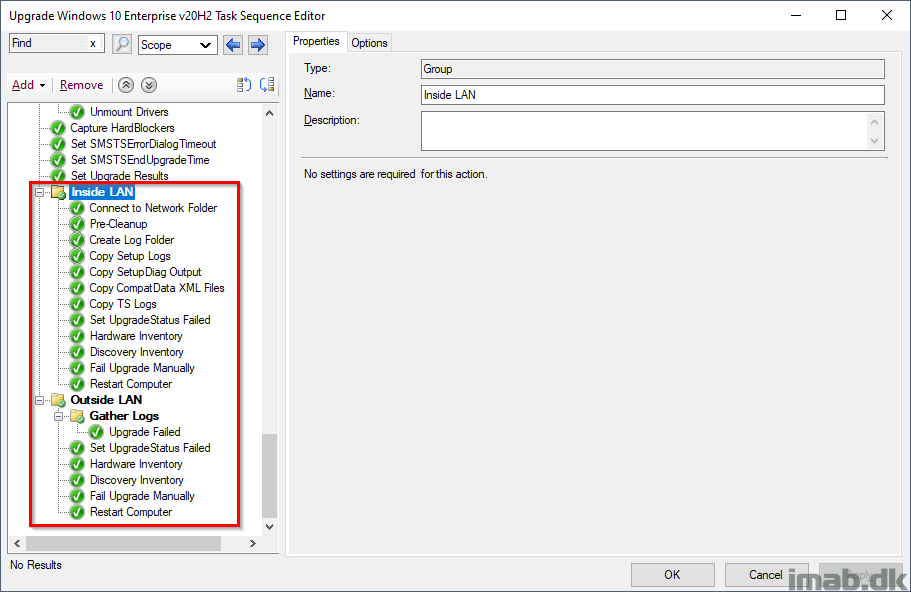
Inside or Outside LAN
While everything is successful at this stage, I’m doing something extra in case the upgrade happened from the Internet. This is solely done for reporting purposes.
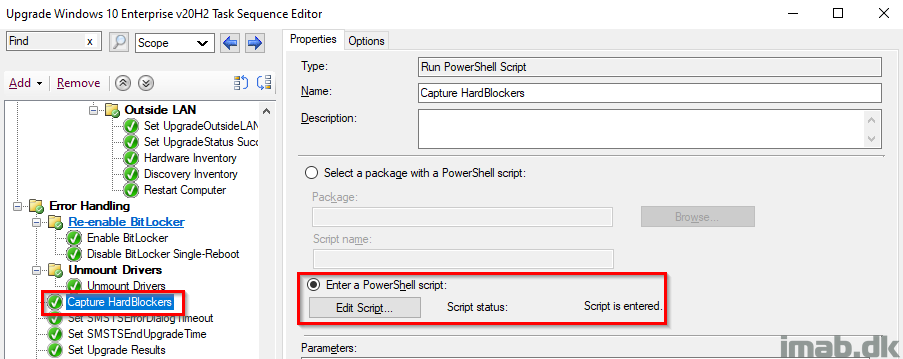
Error Handling
This is the part where we take care of errors. The entire group runs if _SMSTSLastActionSucceeded equals false OR _SMSTSOSUpgradeActionReturnCode not equals 0.

Capture HardBlockers
This step runs a PowerShell script, which will capture any hard blockers (should any hard blocker have been introduced since the PreCaching) and tattoo them into registry.
The PowerShell script is found in my GitHub page here: https://github.com/imabdk/WaaS/blob/main/Capture-HardBlockers.ps1
This script also uses the variables SMSTSCompanyName and SMSTSTargetOSBuild that we configured in the beginning, so everything is done dynamically.
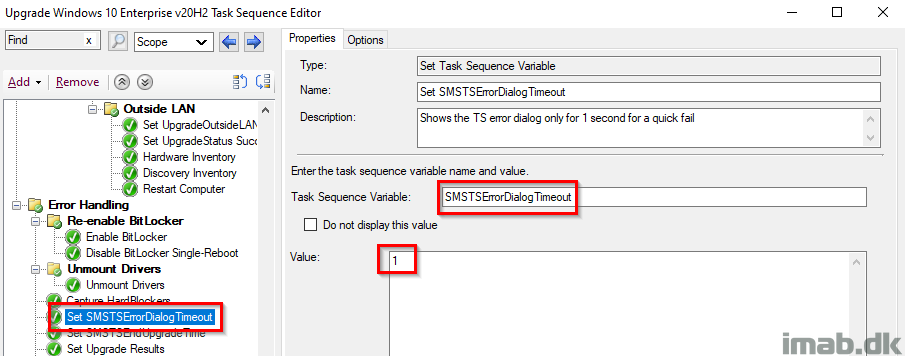
Set SMSTSErrorDialogTimeout
As the description says, this is set to have the task sequence to fail immediately without counting down from 15 minutes (If my memory serves me right, 15 minutes is the default here).
Inside or Outside LAN
Most of the steps here are explained in very good details in my first post: Windows as a Service: Sharing my PreCache and In-Place Upgrade Task Sequences – 20H2 edition, part 1
Basically, I’m doing all sorts of tattooing of registry and picking up log files for troubleshooting purposes.
Deployment
Ideally and as I touched briefly in the PreCache post, the collection where ALL the checks has passed will be where you will deploy the actual IPU task sequence to. Another approach is obviously to create additional collections and then use this collection as a limiting collection. Everything as it suits your own environment.
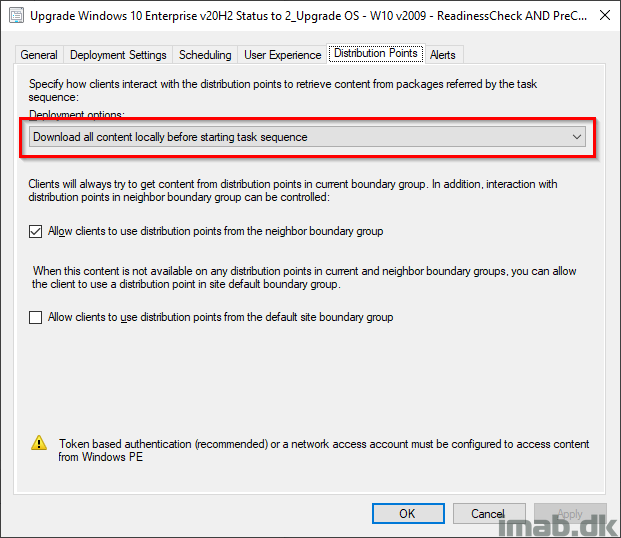
And when deploying the IPU task sequence, remember to deploy it with following deployment option: Download all content locally before starting task sequence. This will make sure that the content already in the CCM cache is used and that content is not being redownloaded.
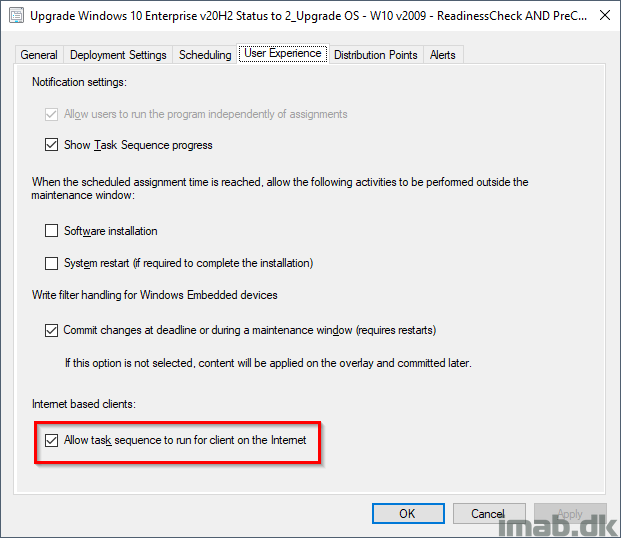
Also, if you want to enable the task sequence to run on the Internet via the CMG, remember to tick ON ‘Allow task sequence to run for client on the Internet’.
Download
Download my entire IPU Task Sequence here. Note that it’s exported without dependencies. I believe it’s the steps that are interesting here. Insert your own stuff where needed: imab.dk-IPUTS-20H2.zip (22887 downloads ) (Updated on 22 April 2021)
Let me know in the comment section down below if you need anything elaborated or if anything is missing out. I will make sure to reply promptly. 🙂
ENJOY! 🙂
Martin,
Thank you for taking the time to do this, I do have one question though. After looking at documentation of the task sequence and looking at the task sequence after importing it. The action: Set SMSTSDisableStatusRetry after the Upgrade Operating System has a TS Variable set as “_TS_CRNETWORK” equals 0. Where are you setting this so that this action runs? (and what is it)
Hello Vern, I do mention that in the post. I check for Network connectivity and if the device is offline, the SMSTSDisableStatusRetry is run to disable status messages, as they will cause the TS to run for a very long time 🙂
I just updated the post, making it a tad more clear what I’m doing in that section of the TS. Thank you! 🙂
Martin,
That was quick, thank you.
The blame lies on me though, for not seeing that as a set TS variable on the MS docs site. Ugh.
Looks great. Good way to start without the steroids 🙂
Thanks for the detailed steps.
Thank you! 🙂
Thank you for posting this.
Are you able to paste some missing files on github?
DefaultRegistry_W10.bat
Configure User Notification “Is that PSDeploymentToolKit?”
One of the FlashBIOS.cmd files
Also why are the Inventory steps running from a package and not just a command or a PS?
Just trying to understand the whole picture and start testing.
Thank you.
Most of those files are not needed. Those are custom to my upgrade. The Configure User Notification though is included in the post as a download.
The inventory runs as a package, as this is the recommended tool to do so. I mention that in the precache, part 1 🙂
Will this upgrade task sequence work on computers that have a compatibility block put on by Microsoft?
Thanks,
The Windows setup are looking for those compat blocks during the setup, so if a device is blocked, the task sequence will fail. You can bypass the compat block by setting a group policy, but I don’t recommend that.
Hey Martin, thanks for the great work,
Could you mind adding your “Upgrade failed” script to your github?
Hm, I’m sure I shared everything already. Which upgrade Failed script are you referring to? I might need more coffee, but I fail to see that anything is missing. 😀
OutsideLAN – Gather Logs – “Upgrade failed”
Maybe it is the ReadinessFailed.ps1 ?
Looks like I did forget something. Though I do think it quite similar to some of the others. I will upload asap 🙂
Thanks Martin, that’s the last thing is missing to push upgrade through cmg 🙂
I uploaded it to GitHub yesterday 🙂
Haven’t you missed out a restart after the windows upgrade step ?
the upgrade calls for a restart and if it doesn’t get one doesn’t the client end up being stuck in provisioning mode, and the task sequence bombs out at that point ….
In all of my testing (several hundreds of reruns), I see that the client always is taken out of provisioning mode automatically, as the windows setup itself always initiates the reboot (The action (Upgrade Operating System) initiated a reboot). I see this in the logs all the time: Taking the client out of provisioning mode, exiting SetClientProvisioningMode 0x000000. I’ve just moved the “manual” reboot a tad down the line of steps. I have never seen any issues because of this, but I’m curious to learn more.
Hi
What are you using to disable oobe in task sequence?
Hi Martin, thank you so much this and the PreCache sequence.
I have the PreCache all working and have extended my inventory to populate my upgrade collections. When I go to run the Upgrade Sequence it fails immediately and when I check the status message’s its because the CCM Cache is too small. Mine is the default size so 5gig, but the TS wants to download 6.7gig.
Obviously I can increase the size of the cache, but is there a size you would recommend? And would that be a size you’d recommend in general or just for upgrade purposes?
thanks,
I’d recommend a cache size of 20GB 🙂
Thank you for very detail post. Great work. Would be very interesting to see whats in your DefaultRegistry_W10.bat file
Just oldshool mods to the default profile. Sometimes I actually regret doing it in that way. Settings like always show This PC in the desktop, and other mods to WIndows which everyone would like (but can revert if they want to).
Can you provide some more detail on the collection queries used in the screenshot above? I’m trying to duplicated the entire setup before I start modifying it to suite my needs.
Thanks!
Jim
Hi thanks for this for, works great for my 20H2 upgrade. I have a question about BIOS though, in Part 1 you are pre-caching BIOS but in part 2 I cant see that location referenced in the flash BIOS step. We have 35 different models and if I pre-stage my upgrade TS with all the BIOS packages it works but trying to save some space and trying to get it to flash the BIOS using the files in C:\ProgramData\%SMSTSCompanyName%\WaaS\%SMSTSTargetOSBuild%\BIOS
Hi Martin, thanks for this, it’s very useful. One thing I’m not sure of: The steps Post-processing->Configure Windows->Copy Start Layout Files and Copy Start Menu files refer to a package but there is no reference to those packages in the downloads or documentation. Can you clarify what packages they refer to and what files they contain?
Thanks!
Hi Martin,
I can’t seem to get the IPUTS download to import. When I click view failure it says “Cannot validate a dependency to Package KR00414” If I select ‘Ignore Dependency’ from the options, it errors out saying:
Error: The SMS Provider reported an error.
Importing Task Sequence Package (1):
• Ignore Dependency Upgrade Windows 10 Enterprise v20H2
When I close the import wizard, nothing has been imported. Can you please check the file and verify it’s working as intended?
I think we got this sorted per email. If anyone else has download/import issues, let me know 🙂
Running into the same issue. Any insights to get this task imported?
Hello,
Thanks for sharing your IPU TS. It’s working fine 🙂
Do you have a TS sample for OS Deployment (new installation) ?
Hi Martin,
Thanks for sharing this. Your TS’s have really helped get me stared with a feature update I need to run. I have two questions though.
I am preparing to do run a feature update in my company to Win10 21H2 and most clients are currently running 1909. I have imported both TS’s into my lab and made very few changes to both. I ran the precache TS and it completed successfully. I checked the ccmcache folder and among what is cached, I verified the setup files for the Win10 are present. When running the upgrade TS, I noticed the MEM client is downloading the 21H2 files again from the DP. I’ve double checked both TS’s and verified the Upgrade Operating System task is using the same upgrade package. The only change I made to the Upgrade TS is I disabled the bitlocker steps (not using it) and the mount/unmount driver steps as I intend to handle driver updates a little differently.
I always thought MEM will only reuse cached content if the same TS/application/package runs again that initially cached it. Because these are two different TS’s and deployments, MEM will download and cache all content again. What do you think?
My second question is regarding the Fail Upgrade Manually step in the upgrade TS. I ran an upgrade on a test VM and it failed for whatever reason, so the Fail Upgrade Manually stopped the upgrade as it should. After the VM rebooted, I found it failed to take windows out of provisioning mode. I took it our manually via powershell but then the upgrade TS appeared stuck in the software center in an “installing” state. I looked at smsts.log and task manager and there was no activity to show it was doing anything. After waiting about 30 min there was no change and restarting the SMS agent service didn’t change anything. In the past to fix stuck TS’s I’ve run this query in wbemtest “Select * from sms_maintenancetaskrequests” and deleted the instance it found but this time it did not work. Any thoughts?
I am running MEM 2107.
Thanks for all of your help
Hey Mike, your first issues is probably due to this: And when deploying the IPU task sequence, remember to deploy it with following deployment option: Download all content locally before starting task sequence. This will make sure that the content already in the CCM cache is used and that content is not being redownloaded.
Thanks for suggesting this and you were correct. Changing the deployment to download all content before starting did the trick. I guess I skipped over that part when originally reading the blog. Even after reading it again I wouldn’t have thought that setting would force the TS to look at the cached folder but it certainly did. Thanks!
Hi Martin,
There is a type in the Mount Drivers powershell script as it has $compuderModel and it should be $computermodel.
I’ve notice this as I am testing it against HP and Dell machines. Never had problems with Lenovo’s as it uses the ComputerModel from CSProduct.
Thanks
Oh snap, thanks for letting me know 🙂
what is the driver package folder structure that you are setting in the WIM? I am using the scconfigmgr tool to download Dell drivers into the WIM files, but the powershell is having issues mounting and reading the file. I can mount it manually with DISM…was just curious. Thanks
Hello Martin!
I’ve been using this guide as a way to upgrade my end users machines, and it’s been great!
The =slight issue we’re having is that a deployed task sequence to users machine (while connected to our internal network/VPN) is unable to be run when the users are off our network/VPN.
Everything in the TS is precached, the issue is that when they hit Install — it just spins and does nothing.
I’ve set the TS to “Pre-Download content for this task sequence” and “Download all content locally before starting task sequence” but when the users hit install while “offline”, it just spins at installing.
It seems like it’s not pre-caching any of the TS execution files when the user gets the deployment “online”?
I looked at the log (TSAgent.log), and it says:
“Failed to get MP Name”
“Error getting package location and access account information. Code 0x80004005”
This sounds like it’s trying to download the files to execute the task sequence when it should already be downloaded?
in Set SMSTSCurrentOSBuild step in Powershell command a “\” is missed after HKLM:
You are right. Good catch.
Love your work
Any change you showing us win 11 OSD Task Sequence example also?
I know lot of people are waiting for that 🙂
Keep up the good work!
Thank you! I’m currently working my way through Windows 11 so I’d expect a post on Windows 11 in the coming weeks. 🙂
Hi, I have used this several times in the past but for windows 10 to 11 we were trying the “updates” method. We ran into issues and now when I try the very simplest thing with the pre-cache and even assessment TS the MECM client is re-downloading the entire upgrade package again to the system. It is like it just ignores that it already ran it and the files are all clearly there in the local mecm cache. Any thoughts or has anyone tried this again with newer versions of the MECM console?
Hi Martin,
Your post seems quite old, can you see any reason why this shouldnt work on Inplace upgrade from Windows 11 21H2 to Windows 11 23H2?
Also, do you know if you can integrate your ToastNotification script to prompt the user to begin the actual upgrade (i.e. after all files are precached and checks have been run?