This is a tad offtopic, but it took me a while to figure out how to make a dynamic stamp in Adobe Acrobat, as when inserted, prompts the user for input and automatically puts the input on top of the stamp. So here goes: (this requires Adobe Acrobat Pro or the ability to make/edit forms in pdf)
- First off, open Adobe Acrobat and go to Comment -> Annotations -> Stamp drop down -> Custom Stamps -> Create Custom Stamp (This is the easy part, so I only touch this briefly)
- Browse to your file containing the stamp (I have stamps made in the pdf format. For this I made the stamp in Illustrator)
- Give it a name and a category and click OK
With above in place, you now have a new stamp-file located at AppData\Roaming\Adobe\Acrobat\11.0\Stamps. It’s given a random generic name like “PSrfwCzHqxg6fYZmnjYV0D.pdf”. So far, so good.
Now go ahead and open and edit this file in Adobe Acrobat Pro and:
- Select Tools -> Forms -> Edit
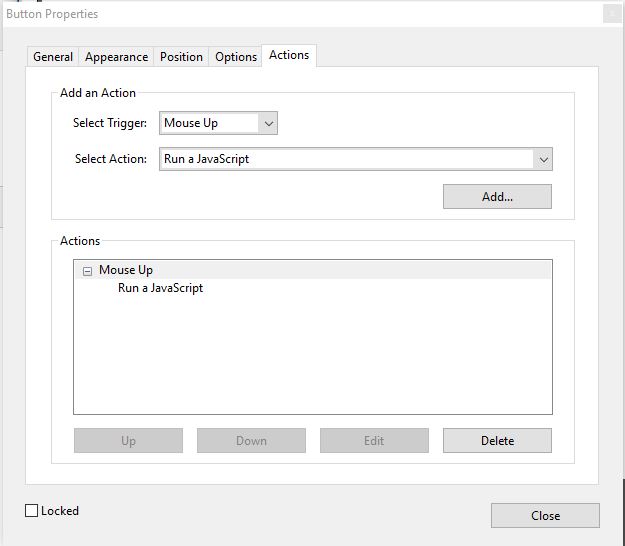
- Go to Tasks -> Add New Field -> Button and insert the button somewhere in the blank page
- Right Click the new button and select Properties
- Go to the Action page, and select Run a JavaScript in the Select Action option.
- Click Add and paste following two lines of code into the window and click OK and Close
var aTemplates = this.templates;
if (aTemplates) app.alert(aTemplates.join("\r"));
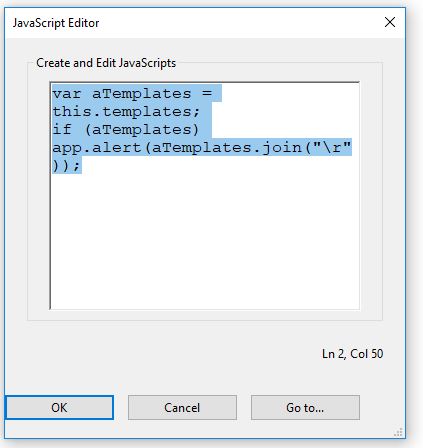
Now click the new button with the JavaScript action you just made, and take notice of the template IDs in the popup:
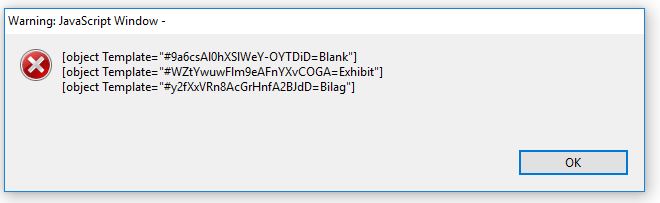
#9a6csAl0hXSlWeY-OYTDiD
#WZtYwuwFlm9eAFnYXvCOGA
#y2fXxVRn8AcGrHnfA2BJdD
Above IDs will be used when creating the text field on the stamp. The text field created in the following steps, is where the input from the prompt goes.
- Tasks -> Add New Field -> Text Field
- Right Click the new text field and select Properties
- Go to the Calculate page and insert a Custom calculation script
- Insert below script and make sure to your template IDs from above is correct
- Place the text field where desired and save the stamp file
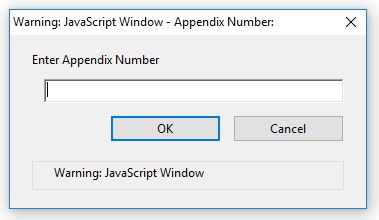
var cAsk = "Enter Appendix Number" ;
var cTitle = "Appendix Number: ";
if(event.source.forReal && (event.source.stampName == "#9a6csAl0hXSlWeY-OYTDiD"))
{
var cMsg = app.response(cAsk, cTitle);
event.value = cMsg;
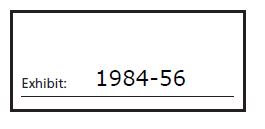
event.source.source.info.exhibit = cMsg;
}
Now, when the stamp is inserted from Adobe Reader / Adobe Acrobat following window pops up and the net result is my stamp with my input on top of it.