Introduction
Update! The content in this post, has been updated: Windows as a Service: Sharing my PreCache and In-Place Upgrade Task Sequences – 20H2 edition, part 1
This is an extremely hot topic and I do know that we have some awesome OSD experts out there sharing their content already (Gary Blok, Mike Terrill etc.). Now, their content is way superior to mine and probably satisfy a lot of needs already, but I think that content around WaaS in particular is interesting and especially when sharing how one does Windows Servicing in details.
So, this is me doing just that – sharing my precaching and in-place upgrade task sequences – in details. This will be a lengthy post, so grab a good cup of coffee 🙂
Also, this is based on a mid-size company in Denmark and we don’t manage thousands and thousands of devices. WaaS is a small part of my daily job and I’m the only one doing it, so the time and effort put into this is reflecting the size of the company and the resources available, but is still done with an eye on the detail. With that being said, some of the stuff I do here is done with inspiration from how some of the mentioned people does it (credit where due during the posts). If you find yourself in similar position or just need some more inspiration – then this will be for you 🙂
PreCaching Task Sequence
PreCaching is a must in my opinion. The Windows 10 upgrade already takes a considerable amount of time to complete and even more so if all the content needs to be downloaded once the user initiates the upgrade. Making sure the content is present in the CM cache before making the actual In-Place Uprade Task Sequence available is key. I also run Readiness and Compatibility Scan during the PreCache TS, also to make sure that the actual upgrade will run with higher chances of success.
Enough with the talking, here’s the details step-by-step:
Cleanup CM Cache
This step is probably a tad controversial (The CCM cache usually takes care of itself). I run a CM cache on 20480MB translating into 20GB. The content of my IPU is around 13GB and I have seen a few times that the CM cache was lacking sufficient free space or at least that what’s the CAS.log told me. I really really want the PreCaching to be done and preferably in the first run, so I’m doing some custom cleanup using a custom Powershell script as the very first step. The script only deletes content older than x days and excludes certain packageIDs and thus doesn’t touch any of the content provided by its own task sequence (that’d be silly)
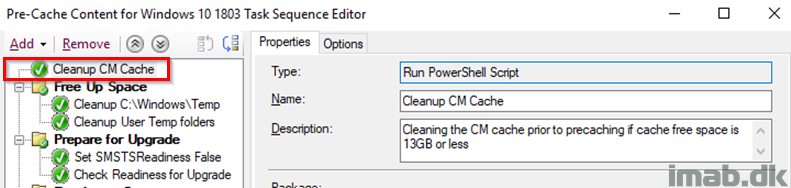
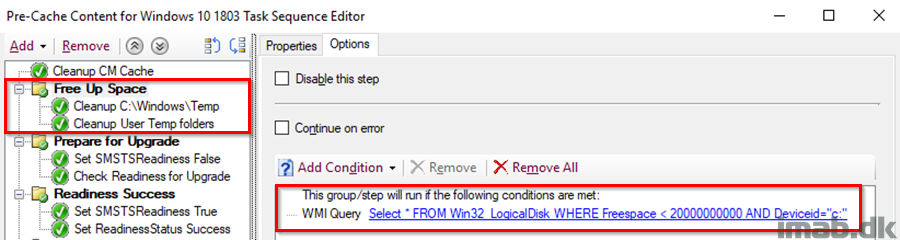
Free Up Space
First off, this is copied directly from Gary Blok’s Task Sequence over at garytown.com and is pretty straight forward: Delete files in Windows\Temp and temp in each user profile with a condition to only run if there is less than 20GB available free space on the hard drive.
For your convenience, I’m adding screenshots of the content when it makes sense to. I will however make the entire Task Sequence available for download in the end of the post.
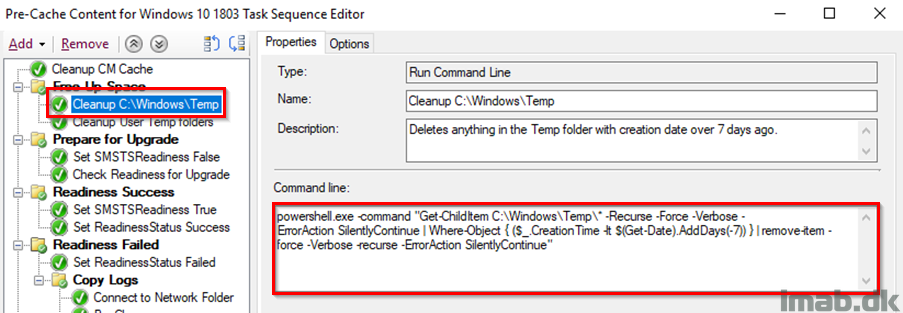
Cleanup C:\Windows\Temp
Powershell one-liner to cleanup %windir%\Temp.
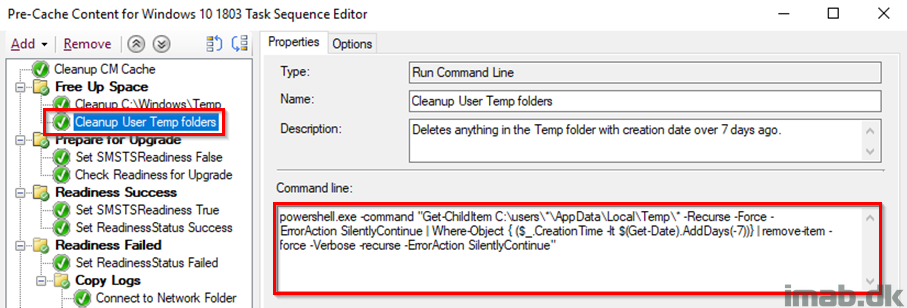
Cleanup User Temp folder
And another Powershell one-liner to loop through each user profile and delete more content.
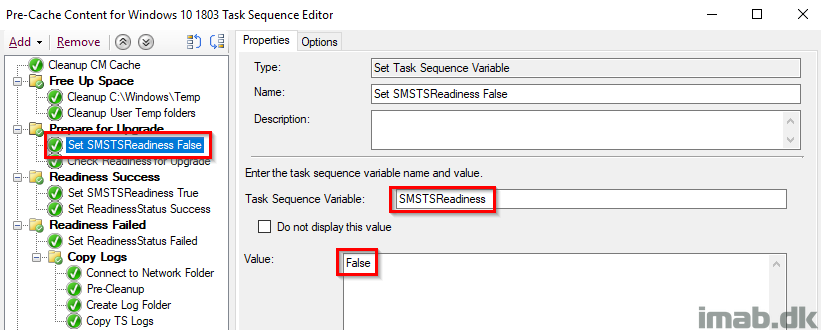
Set SMSTSReadiness False
Initially setting the SMSTSReadiness variable to False. This is later used to indicate whether the actual Readiness Check was run successfully.
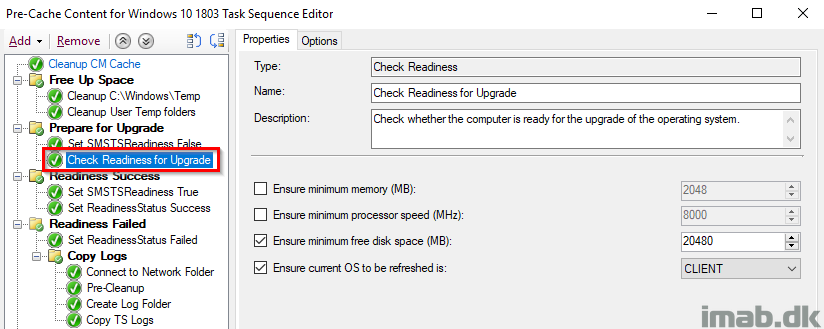
Check Readiness Upgrade
This step is pretty self explanatory. I want to make sure there’s at least 20GB of free space on the hard drive. If this step fails to run, the task sequence will continue (‘Continue on error’ on the entire group. I want to continue precaching content), but will also run the steps in the Readiness Failed group.
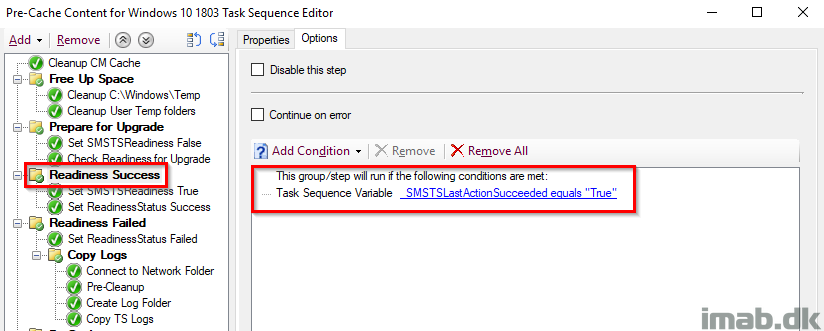
Readiness Success
This entire group runs, if the SMSTSLastActionSucceeded renders True which translates into running if the Prepare for Upgrade group ran successfully.
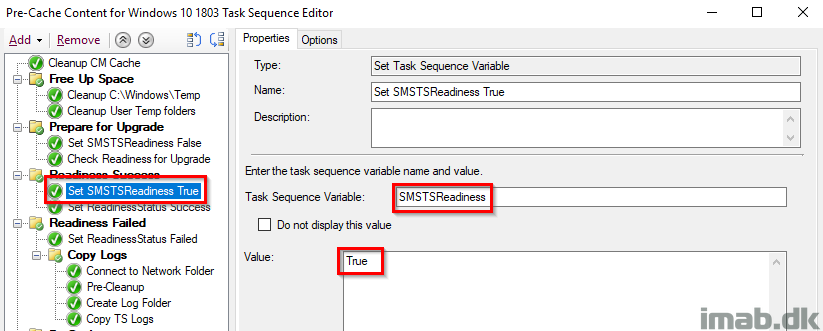
Set SMSTSReadiness True
This time setting SMSTSReadiness to True, because if this step runs, that means the Readiness ran successfully.
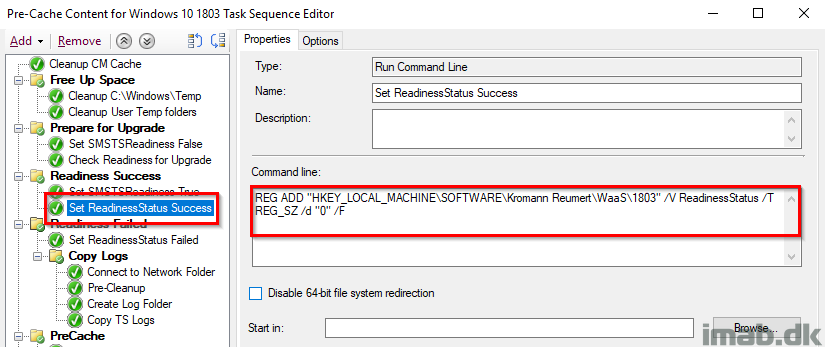
Set ReadinessStatus Success
This steps is tattooing the registry with a status of success for the Readiness Check. This is later inventoried with hardware inventory and used with collections – I’ll go into details on this part later on.
ReadinessStatus with a value of 0 indicates a success.
Readiness Failed
This entire group runs if the SMSTSReadiness variable is False, which means that the Readiness Success group didn’t run (obviously) which again means that the Readiness Check failed. In that case, we want to do some additional steps.

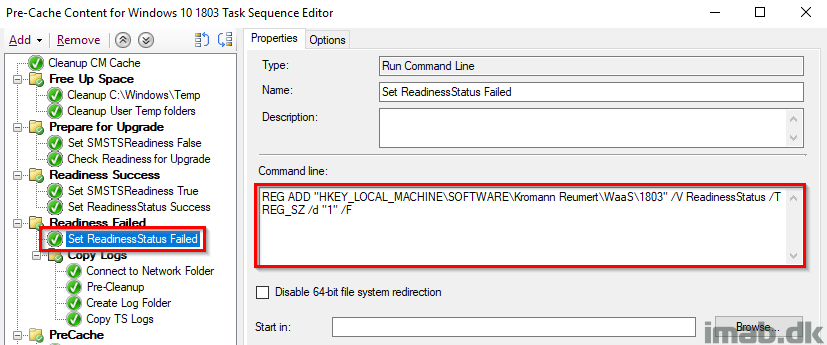
Set ReadinessStatus Failed
Again, tattooing the registry with a ReadinessStatus of 1 which equals to failed. This is also picked up by hardware inventory and used with collections.
Copy Logs
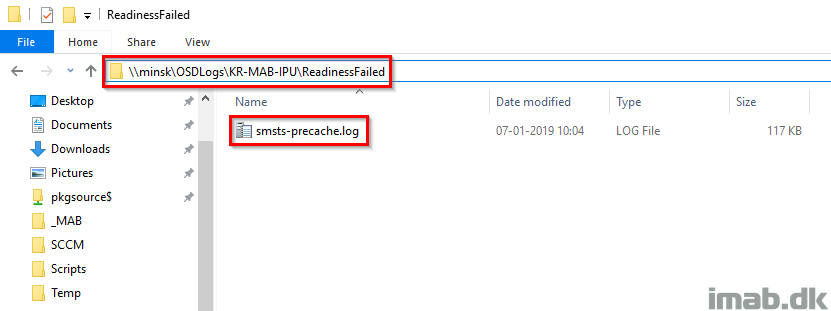
This group will make sure to copy out the smsts.log to a network location for when the Readiness Check failed.

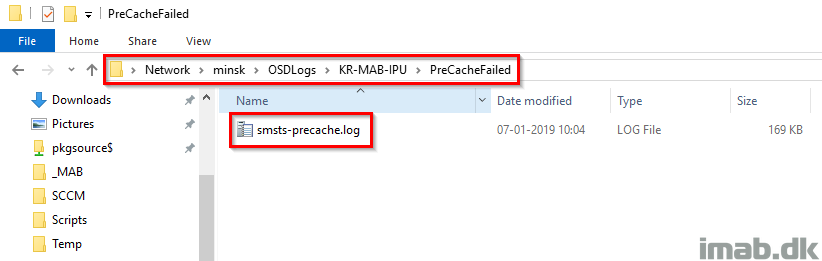
The steps will also create a sub folder with the name of the computer failing the Readiness Check and another sub folder indicating which step that failed. In this case ReadinessFailed. I rename the smsts.log to -precache to indicate what task sequence that was run (the readiness check is also being run in the actual in-place upgrade task sequence).
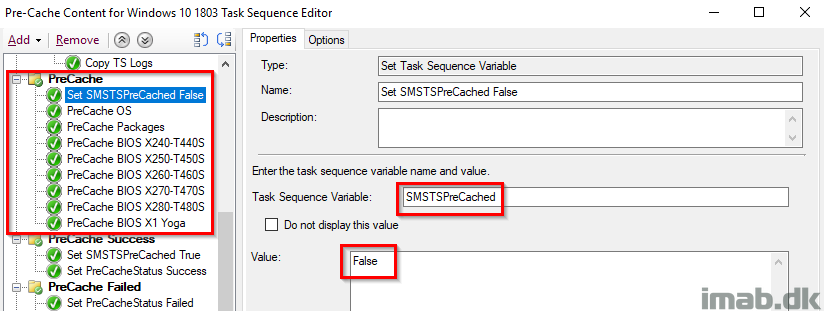
PreCache
This entire group also has ‘Continue on error’ set. I want the task sequence to continue regardless of errors, and instead provide me with the info on successes and failures through the tattooing and inventory.
Also, this group begins with setting the SMSTSPreCached variable to False.
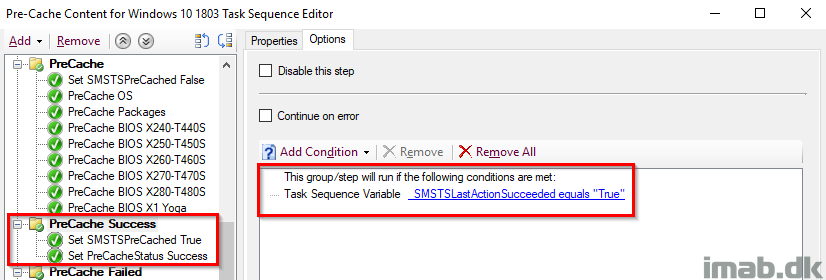
PreCache Success
This group runs if the previous action also ran, which translates to every single step in the previous group, making sure that everything is precached. If the packageID already exists in the CM cache, the content is kept in the cache and not re-downloaded.
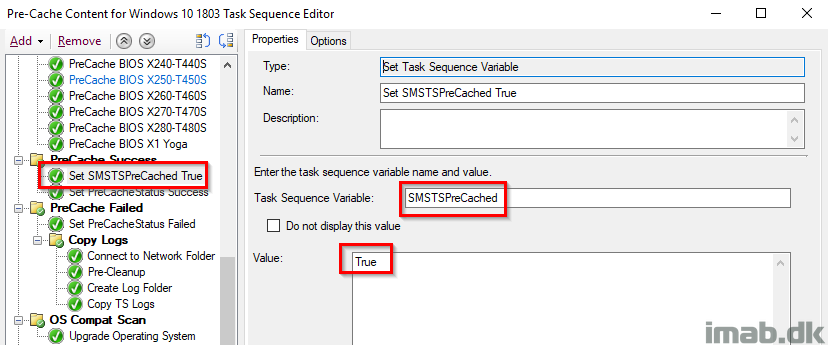
Set SMSTSPreCached True
Setting the SMSTSPreCached variable to True. Again, this is because the actual precaching was done successfully and thus we change the value from False to True for later use.
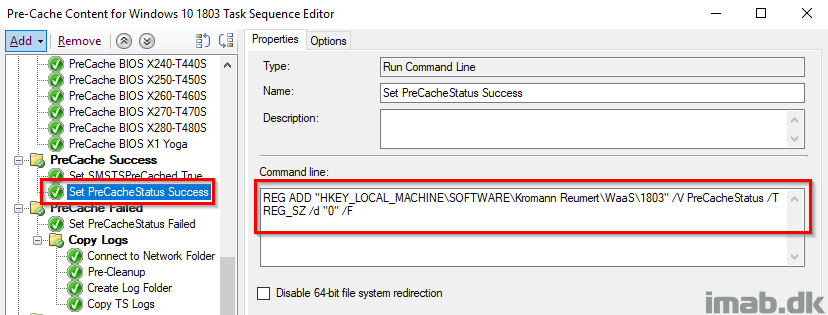
Set PreCacheStatus Success
Another registry-tattooing setting the PreCacheStatus registry key to 0, which indicates a success. This is still being picked up by hardware inventory.
PreCache Failed
This is completely identical to the Readiness Failed step. This group runs if the SMSTSPreCache variable is still set to False, which means something wasn’t precached successfully and additional steps is required.
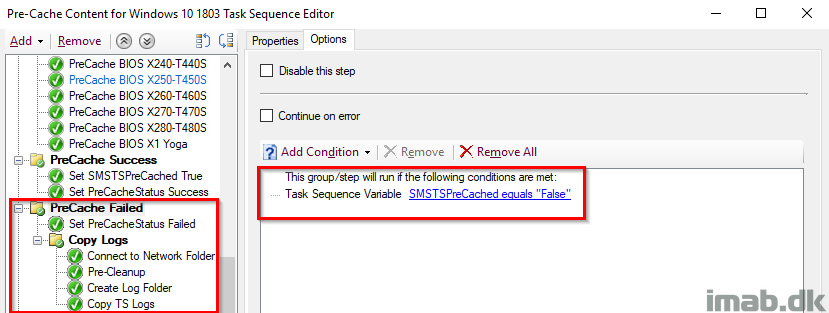
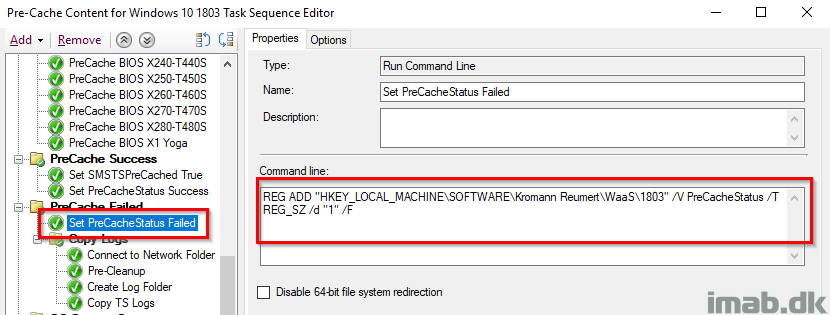
Set PreCache Status Failed
Again, something during the PreCache failed thus tattooing the registry with PreCacheStatus with a value of 1.
Copy Logs
Continuing copying out logs to a network share if something in the PreCache step failed.
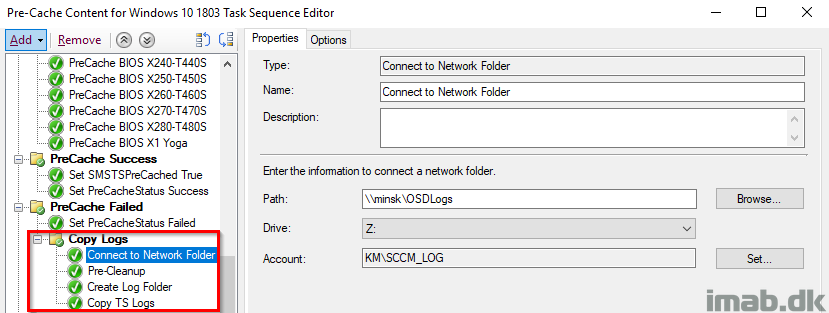
And again doing so to a custom sub folder to a folder for the computer failing.
OS Compat Scan
Plain and simple. This is running the Windows setup with the compat scan only switch. The group is running with ‘continue on error’ letting the task sequence to continue with the subsequent steps if the compat scan is failing.
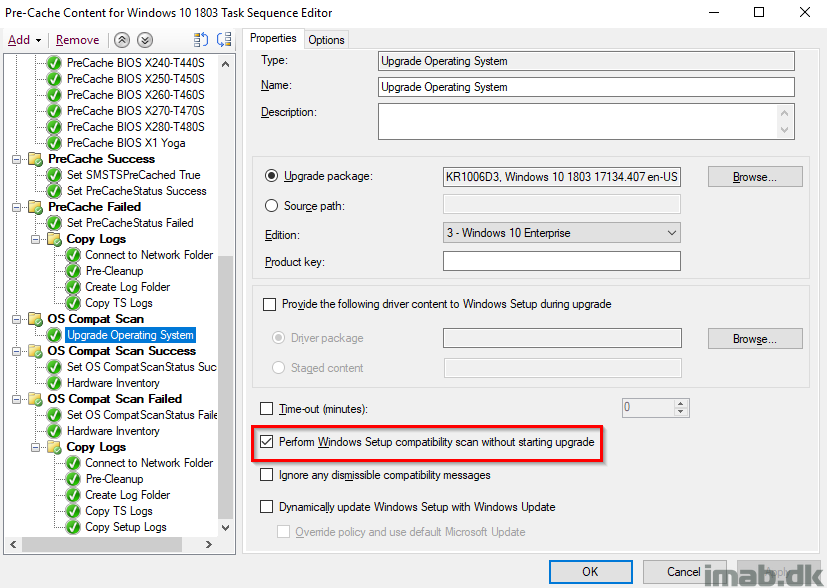
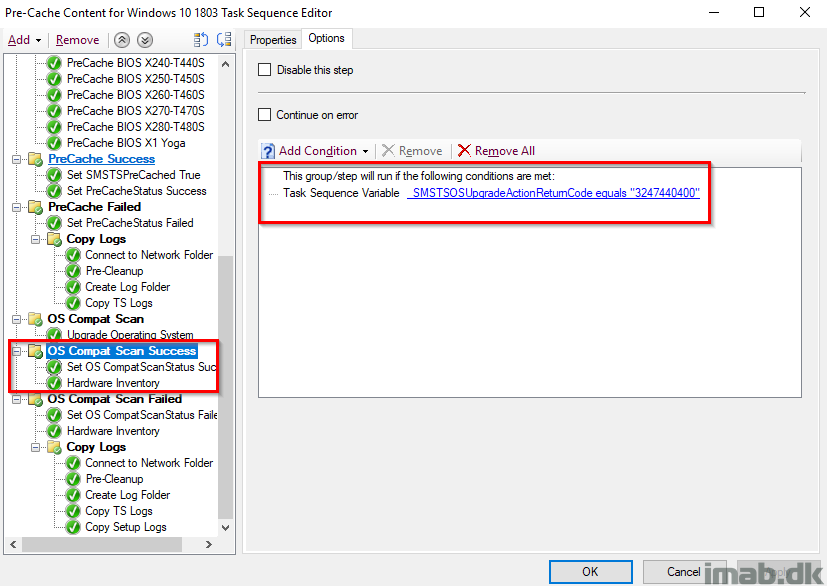
OS Compat Scan Success
This group will run if the actual compatibility scan is coming out OK. That translates into a hex-value which again translates into a decimal value of 3247440400. More on upgrade error codes here: https://docs.microsoft.com/en-us/windows/deployment/upgrade/upgrade-error-codes
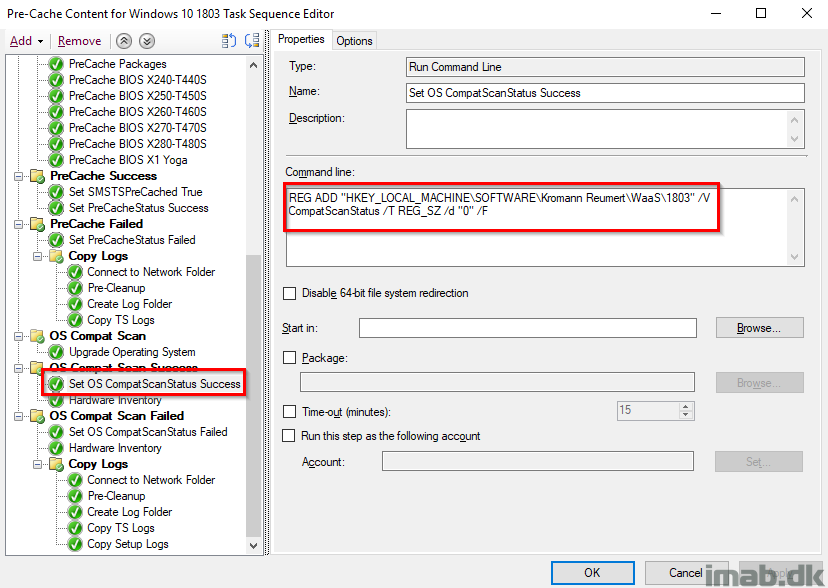
Set OS CompatScanStatus Success
Tattooing the registry with a registry key CompatScanStatus with a value of 0 which will indicate a success when picked up by hardware inventory.
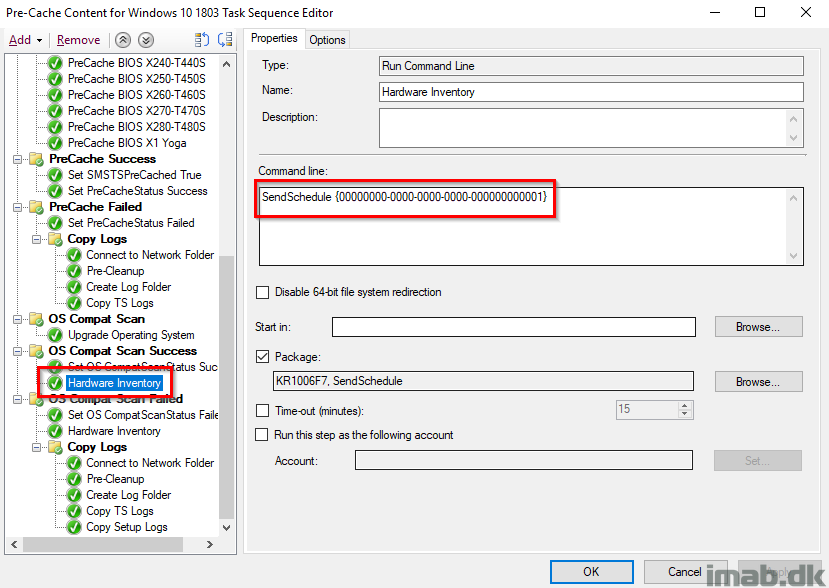
Hardware Inventory
Running hardware inventory picking up all the previous steps successes or failures. This time running post the OS compat scan success, which in this scenario is the final step.
Doing the exact same thing for the failure part, which also will be the last step to run regardless of any of the previous successes or failures. This way I always end the TS with running hardware inventory.
Why using a package to do this, you may ask? Simply because SendSchedule has more client actions to it and the proper way to do it imo: https://docs.microsoft.com/en-us/sccm/core/support/send-schedule-tool
OS Compat Scan Failed
This step will run if the OS compatibility scan is NOT OK. In this case using not equals with the SMSTSOSUpgradeActionReturnCode variable.
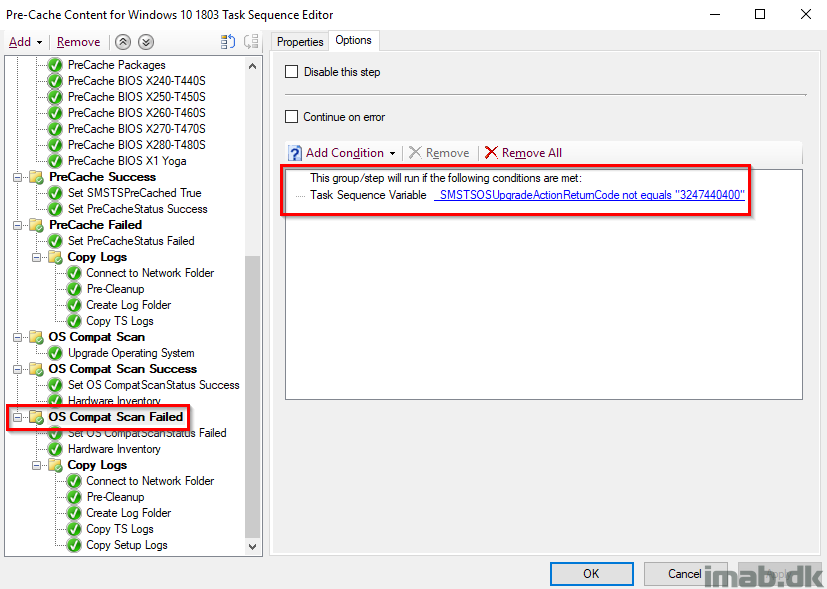
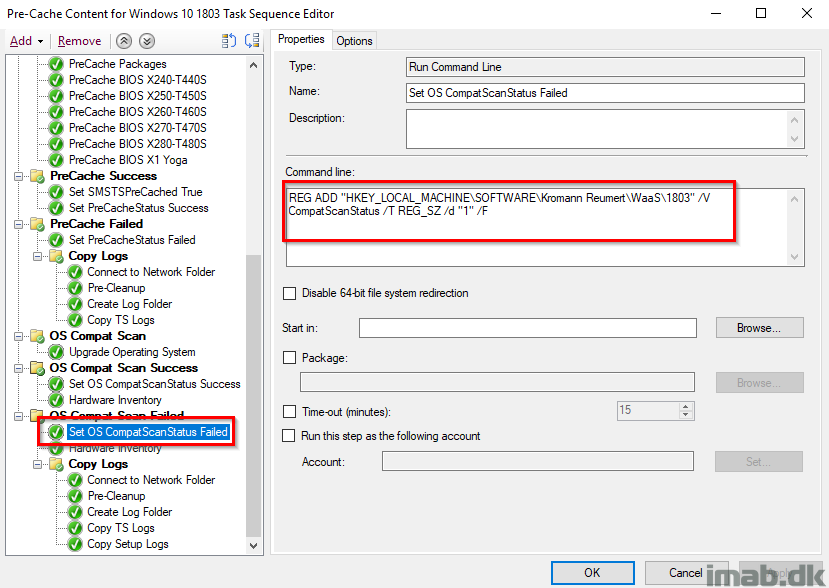
Set OSCompatScanStatus Failed
And finally tattooing the registry yet again with CompatScanStatus with a value of 1 indicating a failure.
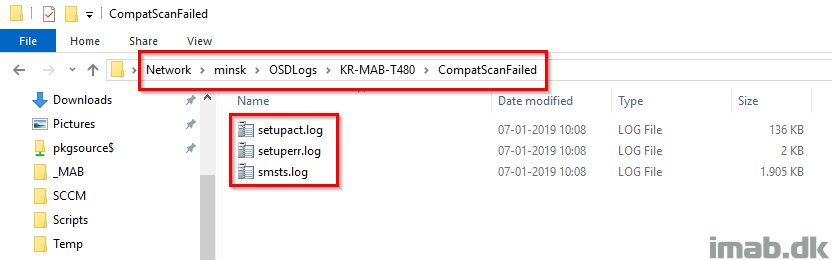
Copy Logs
Similar to the previous Copy Logs steps, now also adding the setup logs. These are obviously interesting for more insights on the compatibility scan part and why it failed.

The step will create another sub folder called CompatScanFailed where to both the setup logs and smsts.log will be copied.
Collections and hardware inventory
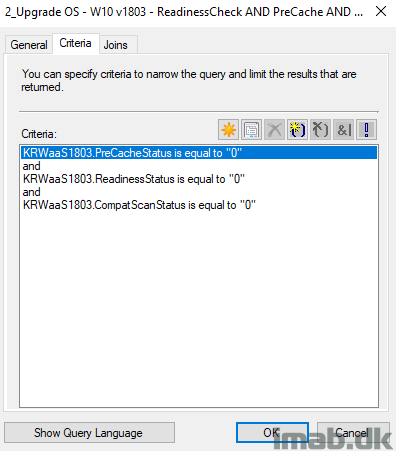
With all that info being tattooed into the registry it’s now time to make use of it. The idea here is, that before a given computer is offered the actual In-Place Upgrade Task Sequence, you want to make sure that the computer has passed the Readiness Check, the Precaching AND the OS Compat Scan.
Luckily, all of that info is stored for us in the registry and when picked up by hardware inventory, we can use that in collections (Note: it’s not picked up by default, you will have to extend hardware inventory to do that. Here’s an very old post of mine, sparingly describing how: https://www.imab.dk/extending-hardware-inventory-in-sccm2012/)
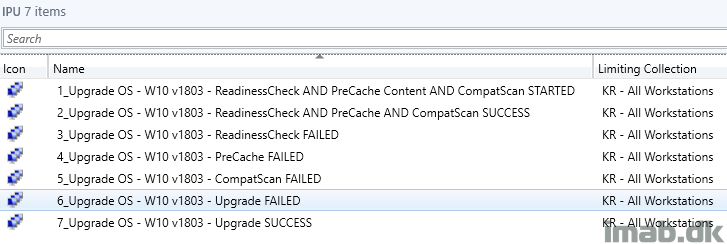
Below is the exact collection membership criteria of my collection, which then only have members where ALL of the checks done during the PreCaching is successfully completed. Nice!
More inspiration
Here’s another set of collections for your inspiration which also easily will display if you have computers failing either of the important steps allowing you to quickly take the required actions, for example rerunning the task sequence, investigate logs etc.
An example is to have the PreCache Task Sequence to run on a recurrent schedule for some of the FAILED collections, assuming you then and in between schedules will fix the issues.
Deployment
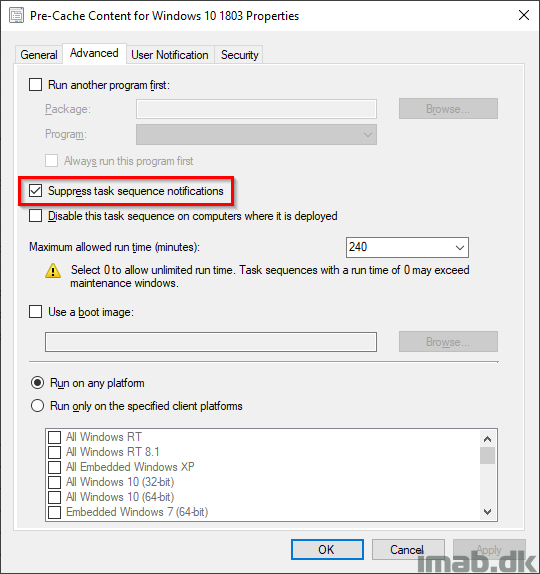
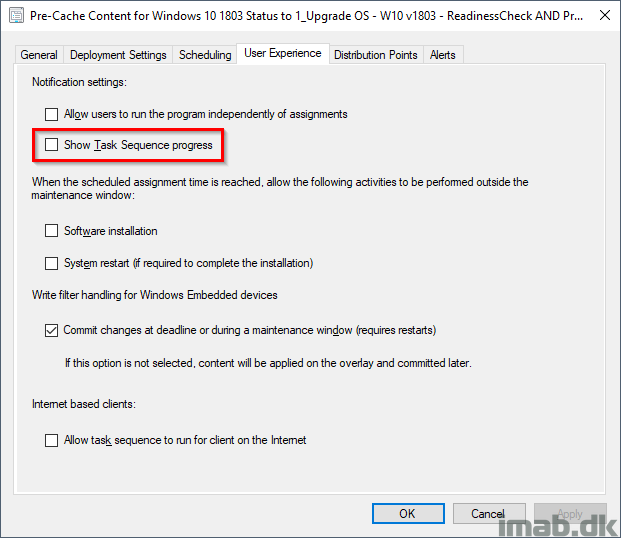
Also, when deploying the PreCache Task Sequence, make sure you do so with following settings. You want this to run completely silent for the end-user.
- Suppress task sequence notifications: Yes
- Show task sequence progress: No
Clean-CMCache.ps1
The script used for cleaning the CCM cache has been requested. So here it is. Use as you see fit. Needless to say: Test, test and test first. There are some references to my company for the registry. You might want to modify that 🙂
Update 11 january 2019: A comment on Facebook inspired me to do a slight change to the Clean-CMCache script. Instead of plainly deleting content older than x days, I’m instead deleting content if it’s not a part of the PreCache or IPU TS (Any of the packageIDs used). See the updated script below.
<#

.DESCRIPTION
    Cleaning up CCM cache items which is not a part of the In-Place Upgrade and PreCache Task Sequence AND is older than 1 day
    PackageIDs which is a part of the ApprovedPkgsIDs array is skipped.

.NOTES
    Filename:
    Version: 1.0
    Author: Martin Bengtsson
    Blog: www.imab.dk
    Twitter: @mwbengtsson
#>

# Check for administrative rights
if (-NOT([Security.Principal.WindowsPrincipal][Security.Principal.WindowsIdentity]::GetCurrent()).IsInRole([Security.Principal.WindowsBuiltInRole] "Administrator")) {

    Write-Warning -Message "The script requires elevation" ; break

}

# Construct COM Object
$CMClient = New-Object -ComObject "UIResource.UIResourceMgr"

# Get CM cache information
$CacheInfo = $CMClient.GetCacheInfo()
$CacheUsedSpace = $CacheInfo.TotalSize - $CacheInfo.FreeSize

# PackageIDs which is a part of the precaching
$ApprovedPkgIDs = "KR10070B","KR10070A","KR1006F8","KR10059F","KR1006D2","KR1006E3","KR1006D5","KR100557","KR100404","KR100414","KR1006F7","KR100467","KR10071E"

# Minimum space required in MB
[int32]$CacheMinSpace = "13000"

# If the free space in the CM cache is less than or equal to the minimum required by the IPU -> Do cleanup
if ($CacheInfo.FreeSize -le $CacheMinSpace) {

    Write-Host "CM cache is containing $($CacheUsedSpace)MB and has $($CacheInfo.FreeSize)MB free space. Not enough to precache IPU content"

    # Counting items in the CM cache for the first time. Only items not a part of the approved apps is being count
    $CacheCount = ($CacheInfo.GetCacheElements() | Where-Object {$_.ContentId -notin $ApprovedPkgIDs -AND $_.LastReferenceTime -lt (Get-Date).AddDays(-1)}).count

    # If items found, continue deletion
    if ($CacheCount -ge "1") {

        # For each element in the CM cache - delete it
        $CacheInfo.GetCacheElements() | Where-Object {$_.ContentId -notin $ApprovedPkgIDs -AND $_.LastReferenceTime -lt (Get-Date).AddDays(-1)} | % {

            try {
                Write-Host "Deleting cacheElementID" $_.CacheElementID
                $CacheInfo.DeleteCacheElement($_.CacheElementID)
            }
            catch [exception] {
                Write-Host "Something went wrong when deleting the cache element. Error message is: $_"

            }
        }

        # If the cache is now empty, create registry entries for inventory and reporting
        $CacheCount = ($CacheInfo.GetCacheElements() | Where-Object {$_.ContentId -notin $ApprovedPkgIDs -AND $_.LastReferenceTime -lt (Get-Date).AddDays(-1)}).count
        if ($CacheCount -eq "0") {

            Write-Host "CM cache is empty"
            $RegistryPath = "HKLM:\Software\Kromann Reumert\WaaS\1803"
            if (-not(Test-Path -Path $RegistryPath)) {
                New-Item -Path $RegistryPath –Force
            }

            New-ItemProperty -Path $RegistryPath -Name "CacheCleanUpStatus" -Value 0 -PropertyType "String" -Force
        }

        # If cache is not empty, something is not right - investigate
        $CacheCount = ($CacheInfo.GetCacheElements() | Where-Object {$_.ContentId -notin $ApprovedPkgIDs -AND $_.LastReferenceTime -lt (Get-Date).AddDays(-1)}).count
        if ($CacheCount -gt "0") {

            Write-Host "Something is not right - there are still content in the CM cache"
            $RegistryPath = "HKLM:\Software\Kromann Reumert\WaaS\1803"
            if (-not(Test-Path -Path $RegistryPath)) {
                New-Item -Path $RegistryPath –Force
            }

            New-ItemProperty -Path $RegistryPath -Name "CacheCleanUpStatus" -Value 1 -PropertyType "String" -Force

        }
    }

    # Not enough space in the CM cache AND nothing to clean up
    else {
        Write-Host "Not enough free space in the CM cache and nothing to cleanup. Used space is: $($CacheUsedSpace) and free space is: $($CacheInfo.FreeSize)"
    }
}

# Else do nothing
else {
    Write-Host "CM cache is all good - no cleanup needed. Free space is: $($CacheInfo.FreeSize)MB"
}
Download
Download my entire PreCache Task Sequence here: imab.dk_PreCacheTS.zip (24171 downloads )
Stay tuned for part 2, where I will walk you through my In-Place Upgrade Task sequence.
Great – would you share the script? (Cleanup CM Cache)
Of course. Let me update the post asap with a download link 🙂
The script is now included 🙂
Hi,
How can we control the restart post OS upgrade stage using this inplace upgrade task sequence? Any help?
This is great, many thanks.
However, I´m having issues with the Hardware Inventory step.. I got the SendSchedule.exe from my CCM installation folder and copied it to my share and created a package only containing the exe. Added the package to the steps in TS but when running the TS i get the following error:
“Ohanterat undantag: System.IO.FileNotFoundException: Det g†r inte att l„sa in filen eller sammans„ttningen Microsoft.Diagnostics.Tracing.EventSource, Version=1.1.28.0, Culture=neutral, PublicKeyToken=b03f5f7f11d50a3a eller ett av dess beroenden. Det g†r inte att hitta filen.”
Application log on the client is showing a few entries aswell but nothing that makes any sense to me.
That’s a first. Are you running the exact same command as I am in the TS? What if you run it manually?
Yes sir! SendSchedule {00000000-0000-0000-0000-000000000001}
Running it from CMD with or without admin gives me the same error message. Tried diffrent clients with the same result.
Application log:
Tillämpningsprogram: SendSchedule.exe
Framework-version: v4.0.30319
Beskrivning: Processen avslutades på grund av ett ohanterat undantag.
Undantagsinformation: System.IO.FileNotFoundException
vid Microsoft.SendSchedule.Program.Main(System.String[])
Have you got the required .ddl and .xml file next to the actual .exe? 🙂 microsoft.diagnostics.tracing.eventsource.dll and sendschedulemessages.xml
There we go, works like a charm if you include all the required files 😀
Thanks!
Great Job Martin. Can’t wait for part 2
Thank you! 🙂
Thank you for the TS….can you please include the packages?
Not the BIOS and wim files….but scripts should not take that much space…
Thank you
Absolutely – I will do it asap 🙂 (there’s only one script though – I might just include that in the post somewhere)
The script is now included in the post 🙂
Fantastic post… I’ll use this for sure when i get to WaaS. Right now, it update time from 7 to 10 🙂
Thank you for letting me know, Jan. Appreciated 🙂
Hello once more!
Seem to be having some issues with the Hardware Inventory for the registry keys..
I can tell from the dataldr.log that the changes to the .mof was accepted. I used RegKeyToMof to get all the data. I imported the .mof under HW Inventory and i can see the key being inventoried by looking at the InventoryAgent.log
However I´m not able to Query the value..
This is from the log:
“Collection: Namespace = \\.\root\cimv2; Query = SELECT __CLASS, __PATH, __RELPATH, KeyName, CompatScanStatus, PreCacheStatus, ReadinessStatus FROM WaaS_1803; Timeout = 600 secs.
Any ideas? 🙂
Great post Martin! I went to test it out in my lab, but wasn’t able to import the TS. It says “Cannot validate a dependency to Package KR100404.” I extracted the content, tried to revise the package ID and re-zip it, but then it’s not recognized at all.
I noticed you mentioned the total size of your pre-cache was about 13 GB. I’m guessing it’s because it’s caching driver packs for all your models? I suggest looking at Gary Blok’s “Set Dynamic Variables” driver logic. From a single TS step, I was able to add every package ID for over 10 different devices, then have it cache only the applicable model. Total size with v1803 was about 8 GB.
On average, how long does it take for your machines to complete the IPU? Mine are averaging 1-2 hours, would like to find ways to speed up the process. Updating the drivers adds more time, but it’s definitely worth doing.
Thanks Ian. The package KR100404 is just a bunch of script I use in the actual IPU as well, hence they are also precached. You should be able to import the TS ignoring any referenced packages. The packages I use are secondary to this, but yes, I precache BIOS and some applications which are being upgraded as well. The precaching of BIOS etc. is done conditionally and only for the relevant models. Thanks though for the reminder 🙂 I’m averaging 1-2 hours as well – mostly around 1 hour and the latter if it’s a slow device/SSD.
Hey, thanks for sharing. Very helpful. Why do you still use “Check Upgrade Readiness” if you set it to continue on error?
Hey and thank you. I do that because I want the precaching to begin regardless of the device failing the readiness. The readiness checks for 20GB available free disk space. Let’s say it only has 18GB free, I still want something to be precached and then deal with the lacking disk spaces afterwards (it usually means the user is having A LOT of pictures or other private stuff which I will tell them to remove asap – or I will remove it for them) 🙂
Hey Martin,
Just confirming, $ApprovedPkgs in the script are the reference packages to the IPU Task Sequence? Correct?
Hey, that’s correct. We don’t wanna delete those 🙂
Just for understanding – Does this affect all references in the task sequence, i.e. also applications (application model)?
Thanks for sharing! This is very helpful information.
But I’m at a loss as to why the task sequence is downloading the OS and Packages in C:\_SMSTASKSEQUENCE\Packages and not in the CCMCache folder. The step specifically states Place in the following location: ‘Configuration Manager client cache’ but it uses the task sequence location instead.
Any idea as to what I am doing wrong?
Hey, that’s only while the TS is running. The content will end up in the actual CCM cache when the TS finishes 🙂 See CAS.log. Something like this: CacheManager: Starting copy operation, source = ‘C:\_SMSTaskSequence\Packages\KR100557’ to cache location ‘C:\WINDOWS\ccmcache\1j’.
Hi Martin,
But for your deployment actual Upgrade TS this happens again. It doesnt look in the CCMCache for legacy COntent for OSimages and PAckages. In my LAB its again downloading the OSImage to _SMSTSTaskSequence while its actually already in the CCMCache 🙁
same.. 🙁
I can’t seem figure out how to import the information for hardware inventory in our environment. I tried using the import output from RegKeyToMOF and I followed your guide and created the file manually.
It always says the classes to be imported are not available, although the configuration.mof editing was successful. Any idea?
I have a few suggestions. Can you reach out to me on Facebook or Twitter? 🙂
Hi Martin, this is a brilliant tutorial and a great example of how to leverage all of the features that ConfigMgr offers us as Admins. I’ve managed to re-create it pretty much exactly as you have it for my Enterprise of 20,000 users. I’ve been using Servicing Plans quite successfully since v1703 but prefer the flexibility this approach brings. Even though the downtime for the user is greater.
I have one question regarding your deployment 7 Collections. I can see how to populate numbers 2-7 but I’m not sure what criteria you are using to populate Collection number 1 to indicate the Compatibility Scan has started and what use this one actually has?
Hey Andy, really happy that you find this useful. The STARTED collection is simply where I deploy the PreCache TS to. The criteria here in my situation, is all Windows 10 devices which is not running the target OS already, which translates into all the device that I need to upgrade. Hope that makes sense – and yet agin thank you for taking your time to provide me feedback 🙂
Hi Martin!!
Great idea and great TS!! I’ve been testing it in my environment (SCCM 1810) and I’ve noticed something “weird”. The PreCache OS step works great and downloads the upgrade package to the ccmcache folder, but when the Upgrade OS step runs… it downloads the upgrade package again!!
I’ve even tried running the PreCache TS multiple times on the same system and the PreCache step avoids re-downloading the content, but the Upgrade OS step always downloads the content over and over again!!
Quick solution I found, on the PreCache OS step, save the path as a variable (OSCache in my case) and in the Upgrade OS step reference the source path as %OSCache01% instead of the upgrade package.
Hi Bernardo, first off thank you! Now, if contents gets re-downloaded, something in your deployment is not right. The actual IPU task sequence must be deployed with ‘Download all content locally before starting the task sequence’. If all the packages by then is in the cache, the CAS component will run through them and verify they are all there in relevant revision and then start the TS. Nothing should be re-downloaded.
Doh – should have refreshed the page before submitting the same question 🙂
I’m not sure – did you find the answer to your question? 🙂 nothing should be redownloaded if the deployment is set to download everything before running the TS. CAS.log will be helpful here 🙂
Hi Martin,
simple mistake in my haste to get it all up and running as quickly as possible – I had also forgotten to check the “Download all content locally” on the TS Deployment. It’s all good now – thanks again 🙂
Awesome. Thanks for letting me know 🙂
Precaching TS , should I deploy as require or available ?
And also I need to include drivers in precache group based on model , Then how can I execute that downloaded drivers in main TS?
Hi Martin,
me again 🙂
I’ve noticed a little oddity when re-running the Pre-Cache TS if there was an issue to resolve after the first run.
All the content was successfully pre-loaded into the Configuration Manager client cache as per the option on the “download package content” step when it first ran.
On the second run I can see from the logs that it didn’t re-download any of the packages again (OS, Language Packs, Support packages, Drivers etc) during the PreCache stage. However it does download the entire OS package again when running the Compatibility Scan step into the Task Sequence working directory ignoring the copy already in the ConfigMgr cache. As this is the biggest one it’s a bit of a pain.
Any ideas?
Agreed, I thought of something genius to circumvent this, but it didn’t work. What I tried was in the Source Path for the Upgrade Assessment step, setting the source to %_SMSTSPackageCacheLocationCM1000A9% being the package ID of the OS Package. But it didn’t get interpreted to the path so it failed. I’m trying to think of another way to handle this. I’ll report back if I come up with something.
I believe I have found a way around this, only running the OS compat scan again if it actually failed on the first run. In this case, if the TS is being run again for whatever reason, the entire OS compat scan is skipped unless it failed or it’s the first time running.
Hmm, I will try to reproduce and see if I can come up with some clever answer. 🙂
I believe I have found a way around this, only running the OS compat scan again if it actually failed on the first run. In this case, if the TS is being run again for whatever reason, the entire OS compat scan is skipped unless it failed or it’s the first time running.
Hi Martin,
I don’t think it matters if it’s a re-run or not. Even on a first run where it’s successfully pre-downloaded the upgrade OS package to the CCMCACHE, once it hits the “Upgrade OS” compat scan step it uses the content from the TS working directory ignoring the cached content. I’m seeing this in my log file when the same package has been successfully downloaded and staged in the CCMCACHE folder
“C:\_SMSTaskSequence\Packages\P0101073\SETUP.EXE” /ImageIndex 1 /auto Upgrade /quiet /noreboot /DynamicUpdate Disable /compat ScanOnly
and from earlier in the same TS Log
Downloading content for SMS Package P0101073 successful
Resolved and downloaded (for CCM cache) package P0101073 to C:\_SMSTaskSequence\Packages\P0101073
Staging package: P0101073 to CCM cache location C:\WINDOWS\ccmcache\
Download package P0101073 to ‘C:\WINDOWS\ccmcache\’ successful
Download packages action completed
Process completed with exit code 0
Hmm, I’m not seeing that. On the very first run, the OS compat scan is not re-downloading the content in my end. however, if the TS is re-run I do see the content being redownload, but I have a way around this with conditions on the step. Let me know if this is something you are interested in 🙂
Sorry, I should have clarified. It doesn’t re-download it on the first run, but doesn’t run it from the CCMCACHE folder either. It uses the working copy in the _SMSTaskSequence folder, ignoring the copy that’s been pre-cached.
On the second run, during the pre-cache section it finds the OS package in the CCMCACHE fine, but then downloads it again when running the OS Upgrade so it runs it from the _SMSTaskSequence folder again :-/
I don’t think it’s related to anything you’ve done but seems to be a ConfigMgr “peculiarity”.
Hi Martin,
Can you elaborate on the conditions you made to mitigate the redownload on a rerun?
/Heine
Hi Heine, can you drop me an email on mab@imab.dk? 🙂
Great post, it’s a pleasure to read it.
Out of curiosity, what are you actually doing in all you PreCache? Using the “Download Package Content step ?
Hi Martin,
I modified slightly the clean-ccmcache script: https://github.com/jrudlin/SCCM-Scripts/blob/master/Clean-CMCache.ps1
It now checks for running TS or not – so could be run in a CI or a TS for example.
It also pulls the package ID and app content IDs from the running TS and dynamically builds the $ApprovedPkgIDs so that you would not have to maintain this list statically.
cheers
@JackRudlin
Nice! Thanks for sharing that with me 🙂
# Else do nothing
else {
Write-Host “CM cache is all good – no cleanup needed. Free space is: $($CacheInfo.FreeSize)MB”
}
Changed in mine to:
# Else do nothing
else {
Write-Host “CM cache is all good – no cleanup needed. Free space is: $($CacheInfo.FreeSize)MB”
$RegistryPath = “HKLM:\Software\BPH\WaaS\1809”
if (-not(Test-Path -Path $RegistryPath)) {
New-Item -Path $RegistryPath –Force
}
New-ItemProperty -Path $RegistryPath -Name “CacheCleanUpStatus” -Value 0 -PropertyType “String” -Force
}
So that on second run, it gets set to 0 if the cache is all good.
Its a great document !! Definitely helpful.
Thank you! 🙂
For the precaching steps for the OS I was wondering how many OS references this generates for your task sequence. In my lab I found out that the OS package in the Precaching step has a different package ID then the OS package used for the OS Compatibility step resulting in double the amount of GB’s to be downloaded… 4GB for the precache OS and 4GB for the Upgrade package. Am I doing something wrong or is it 4GB that could be saved by just downloading all the contents of the task sequence local instead of using the precaching steps?
Hello, I am experiencing when IPU runs the computer goes to a lockscreen after som time(GPO..), and it seems that it stops the TS while its locked. Does anyone have a reasonable way to override the gpo options just for the TS?
Im struggling a bit with gathering the hardware inventory by modifying configuraton.mof. would you mind add yours or example of yours as a reference? The info from the old post doesnt work for me at all, so not sure what is wrong.
I found an interesting thing… I got to the OS Compat Scan section. It ran and found an incompatibility. So, the task sequence properly went to the failed sections of the TS and set the registry codes as it should, etc.
However, SCCM thinks the task sequence ran properly and now reports that it will not run again.
I’m not entirely sure what to do at this point with that. How do I tell SCCM that it actually failed?
I manually ran the compat scan and it says my Intel Graphics 4600 is incompatible. So, that’s fine, I will deal with that.
There are a few options. If you really want the TS to fail, you can manually fail it with a new step running cmd.exe /c exit 1. I don’t do that though. Instead I rely on redeploying the TS to the collection now containing the device which failed the CompatScan. You can have the TS run again regardless of succes or failure selecting the appropriate rerun behavior. I do this, because I want to be in total control of when the TS is run again. 🙂
Thanks, Martin, That sounds good.
The thing I’m currently up against is the two devices I’m hoping to upgrade are apparently having the same problem. They are getting an error That the Intel Graphics Card 4600 is not compatible with Windows 10 and thus it fails. I’m currently looking for a solution but so far none of the offered solutions online are helping. I am going to try installing a spare video card just to see if that does the trick.
That sound very specific for the model in question. Have you tried updating the driver? Are there a driver for the Windows 10 version you are upgrading to? 🙂
Yes, I updated the driver and I put in a GeForce 710 card to see if that would work but then it fails saying the 710 is incompatible and still lists the 4600. There are a bunch of posts out there about the Intel 4600 not being compatible. They list a KB item that “fixes” it but I already have it installed on the computer. Others simply say no way around it, don’t upgrade. It seems ridiculous.
Wow, I haven’t seen that before. Have you tried running the upgrade regardless?
I have not tried yet. I wasn’t brave enough but I will probably next week. I am completely self-taught on SCCM (e.g. reading blogs like yours) so I am quite slow and don’t understand everything.
Let me know if I can help with anything, but the issue you describe here I havent encountered myself. Seems like a huge bug that the setup returns incompatability. What version of Windows are you upgrading to?
Sorry I haven’t checked this for a while… I’m upgrading to 1809
Thanks for this amazing post Martin.
Looking forward to your updated Windows 10 1809 task sequence.
Thanks a bunch for letting me know Mark. Appreciated 🙂
Thanks for the excellent guide. I am seeing a problem some others have reported with the PreCache OS. For the PreCache TS, it runs a Download Package Content task into the CM client cache which works fine. However in the Upgrade TS, when it runs Upgrade OS task, it downloads the OS Upgrade Package to C:\_SMSTaskSequence\Packages\, and seems to ignore the existence under C:\Windows\ccmcache. So the PreCache OS task does not seem to be working unless I am missing something. When it runs the Upgrade OS task, should it look for the package under C:\Windows\ccmcache?
Hi Martin! Thank you very much for your hard work! Here’s just one thing I thought about while working through the Task Sequence: Define a task sequence variable like SMSTSBuild and reference to it e.g. REG ADD “HKEY_LOCAL_MACHINE\SOFTWARE\WaaS\%SMSTSBuild%” or during drive map \\server\OSDLogs$\IPU\%SMSTS_Build%\. Keep this updated for each build release and you are done. However, this task sequence is great! Thanks!
Thank you Dietmar. That’s a clever little change 🙂
Hi, thanks for the guide. I’m looking for the code for the step “PreCache OS”. I don’t see a screen shot in the guide for any of the PreCache steps (OS, BIOS, etc.,). Can you please share those details.
Hi guys,
Can someone share the code to update configuration.mof for Hardware Inventory Extension? Tried to use RegKeyToMof doesn’t work for me.
Thanks.
Did you get it? I can share that as well if needed 🙂
Confguration.mof
#pragma namespace (“\\\\.\\root\\cimv2”)
#pragma deleteclass(“WaaS_1909″, NOFAIL)
[DYNPROPS]
Class WaaS_1909
{
[key] string KeyName;
String ReadinessStatus;
String PreCacheStatus;
String CompatScanStatus;
String UpgradeStatus;
};
[DYNPROPS]
Instance of WaaS_1909
{
KeyName=”Waas_1909”;
[PropertyContext(“Local|HKEY_LOCAL_MACHINE\\SOFTWARE\\WaaS\\1909|ReadinessStatus”),Dynamic,Provider(“RegPropProv”)] ReadinessStatus;
[PropertyContext(“Local|HKEY_LOCAL_MACHINE\\SOFTWARE\\WaaS\\1909|PreCacheStatus”),Dynamic,Provider(“RegPropProv”)] PreCacheStatus;
[PropertyContext(“Local|HKEY_LOCAL_MACHINE\\SOFTWARE\\WaaS\\1909|CompatScanStatus”),Dynamic,Provider(“RegPropProv”)] CompatScanStatus;
[PropertyContext(“Local|HKEY_LOCAL_MACHINE\\SOFTWARE\\WaaS\\1909|UpgradeStatus”),Dynamic,Provider(“RegPropProv”)] UpgradeStatus;
};
Import mof:
#pragma namespace (“\\\\.\\root\\cimv2\\SMS”)
#pragma deleteclass(“WaaS_1909”, NOFAIL)
[SMS_Report(TRUE),SMS_Group_Name(“WaaS_1909”),SMS_Class_ID(“WaaS_1909”)]
Class WaaS_1909: SMS_Class_Template
{
[SMS_Report(TRUE),key] string KeyName;
[SMS_Report(TRUE)] String ReadinessStatus;
[SMS_Report(TRUE)] String PreCacheStatus;
[SMS_Report(TRUE)] String CompatScanStatus;
[SMS_Report(TRUE)] String UpgradeStatus;
};
Amazing Stuff!! And Thank you for the wonderful documentation that you put with it. I have 2 questions:
1. Precache TS, what deployment options under distribution points do you use? Download all content or when needed by TS?
2. Should the Precache TS be deployed as required, or can we use available with the option to pre-download content?
Excellent tutorial, thank you!
I have successfully run the TS and it works as I had hoped. I am, however, having problems when trying to update the configuration.mof for the Hardware Inventory.
I have used RegKeyToMOF to export the syntax (as others who have commented) but the dataldr.log reports errors (Failed to convert MOF class/MofCompiler failed/parsing error). The output from RegKeyToMOF on the client that I tried to add to configuration.mof can be seen below, if anyone has run into the same problem I would appreciate som feedback.
We are running CB 1910.
#pragma namespace (“\\\\.\\root\\cimv2”)
#pragma deleteclass(“1909″, NOFAIL)
[DYNPROPS]
Class 1909
{
[key] string KeyName;
String ReadinessStatus;
String PreCacheStatus;
String CompatScanStatus;
};
[DYNPROPS]
Instance of 1909
{
KeyName=”RegKeyToMOF”;
[PropertyContext(“Local|HKEY_LOCAL_MACHINE\\SOFTWARE\\XX\\WaaS\\1909|ReadinessStatus”),Dynamic,Provider(“RegPropProv”)] ReadinessStatus;
[PropertyContext(“Local|HKEY_LOCAL_MACHINE\\SOFTWARE\\XX\\WaaS\\1909|PreCacheStatus”),Dynamic,Provider(“RegPropProv”)] PreCacheStatus;
[PropertyContext(“Local|HKEY_LOCAL_MACHINE\\SOFTWARE\\XX\\WaaS\\1909|CompatScanStatus”),Dynamic,Provider(“RegPropProv”)] CompatScanStatus;
};
Task sequence failed with error code 0x800700002 in the task sequence step Hardware inventory. Please advised.
Silly question but what do those PRE-Cache – steps look like? YOu are using “download package” steps? Those do not work for me ever. they always fail to find content.
Hello,
Is there a way to have a report based on the Check Readiness?
Cause of course all client which doesn’t pass the “Check Readiness” are under failed, and you have to inspect every one to see what exactly failed.
Extraordinary tutorial
I implemented the same and TS working as expected with windows feature upgrade in the intranet machines. For VPN (Work From Home) network machine getting below error message and Bit Locker is disabled.
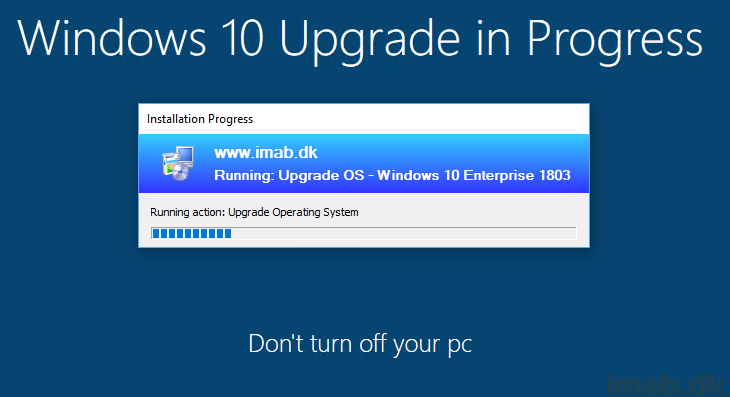
Below is the error pop-up message.
“Kromann Reumert Deployment
This computer is still actively being upgraded to the latest version of windows.
Please do not interact with this computer, reboot or shut it down.”
Brilliant!
your tutos are really helpful !
Thanks a lot for all you have shared.
thank you for information
kampus modern