Introduction
Yes! It’s true. I’m still leveraging Task Sequences and Configuration Manager to upgrade Windows 10.
I’m also Co-managing my devices and deploy regular updates via Windows Update for Business. Just not feature updates. I fancy the full-control approach, taking the opportunity to update BIOS and drivers while at it. Everything works directly over the Internet via the Cloud Management Gateway. No hard requirements in being on-premises or on VPN.
I have previously shared my precache and in-place upgrade task sequences. A lot have happened since then, and I wanted to take the opportunity to share my updated approach in details.
I’m covering each and every step, just like I did in my previous blog posts. Some steps are exactly the same, but in order to fully supersede the old posts, I’m covering everything in details here.
Now, I can’t go over explaining my WaaS process without mentioning THE OSD experts Gary Blok, Mike Terrill. They are tirelessly sharing their approach as well. If you are looking for a WaaS solution on steroids, I suggest you head over to garytown.com and miketerrill.net for inspiration.
If you are looking for something less advanced, then you are at the right place. With that being said, some of the stuff I do, is done with inspiration from what Gary is sharing at garytown.com – just without the steroids. 😛
And yes! The task sequence will be available for download in the very end of the post!
Let’s get to it. 🙂
Part 2: Windows as a Service: Sharing my PreCache and In-Place Upgrade Task Sequences – 20H2 edition, part 2
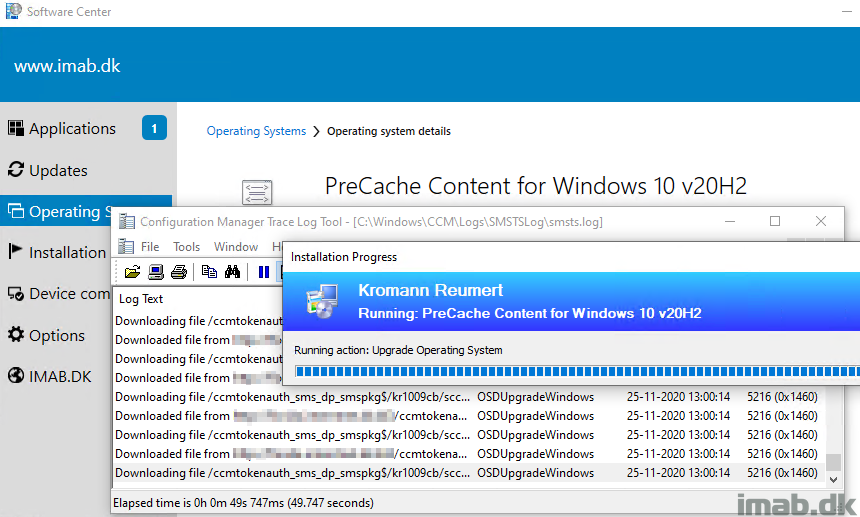
PreCaching Task Sequence
A lot of people are steering away from using Task Sequences and moves into Feature Updates, especially when upgrading from the first to the second (2004 -> 20H2) Windows 10 release of the year, where an enablement package is sufficient. And for good reasons. It’s a hell of a lot faster and barely have any downtime.
But I’m still sticking to task sequences. I’m usually only upgrading Windows 10 once a year, and when I do, I typically go with the second release, and thus moves from second release, to the second release (1909 -> 20H2). And in this scenario, an enablement package does not work.
So with that said, back to the topic: PreCaching is a still must in my opinion, to smooth out the experience, making everything run faster and taking the opportunity to run Compatibility Scan as well to increase the chances of success.
So this is my PreCaching Task Sequence, step-by-step:
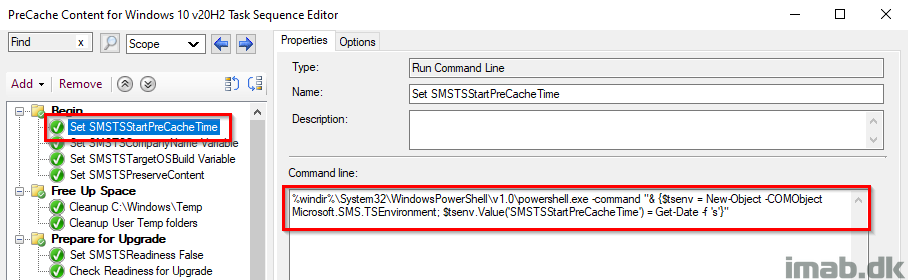
Set SMSTSStartPreCacheTime
This step records the date and time of when the PreCaching Task Sequence was started. The date and time is later picked up by a PowerShell script and written into registry to be inventoried.
%windir%\System32\WindowsPowerShell\v1.0\powershell.exe -command "& {$tsenv = New-Object -COMObject Microsoft.SMS.TSEnvironment; $tsenv.Value('SMSTSStartPreCacheTime') = Get-Date -f 's'}"
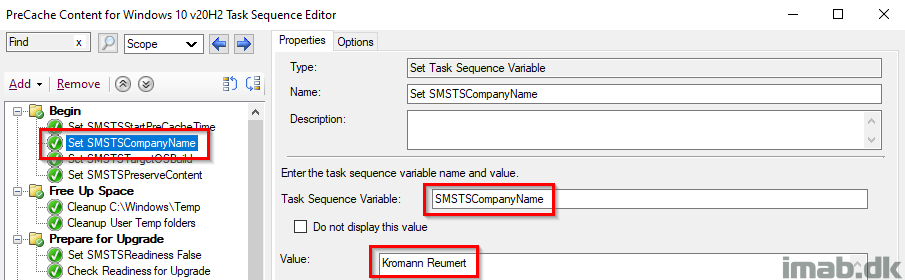
Set SMSTSCompanyName
This step is used to create the relevant structure in registry as well as locally in C:\ProgramData.
- Example1: HKLM\Software\CompanyName\WaaS\2009
- Example2: C:\ProgramData\CompanyName\WaaS\2009
NOTE: This should make it fairly easy to modify the entire task sequence to use with your process. Changing the value here, will change the value everywhere throughout the task sequence.
Set SMSTSTargetOSBuild
This step is used to create the relevant structure in registry as well as locally in C:\ProgramData.
- Example1: HKLM\Software\CompanyName\WaaS\TargetOSBuild
- Example2: C:\ProgramData\CompanyName\WaaS\TargetOSBuild
NOTE: This should make it fairly easy to modify the entire task sequence to use with your own process. Changing the value here, will change the value everywhere throughout the task sequence.

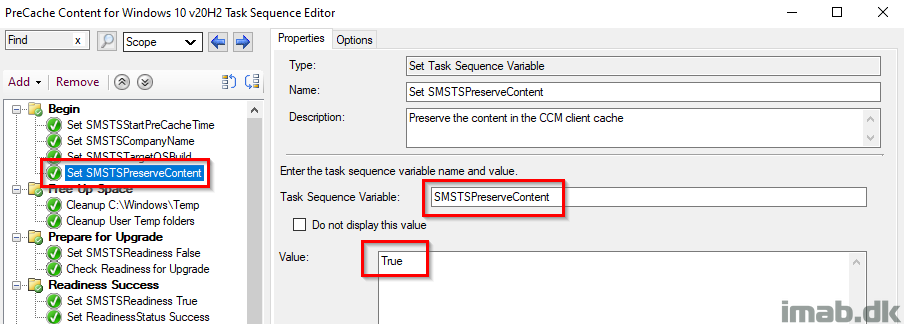
Set SMSTSPreserveContent
This variable flags the content in the task sequence, to be kept in the Configuration Manager client cache after the deployment.
This is needed when precaching the OS when running the compatibility scan.
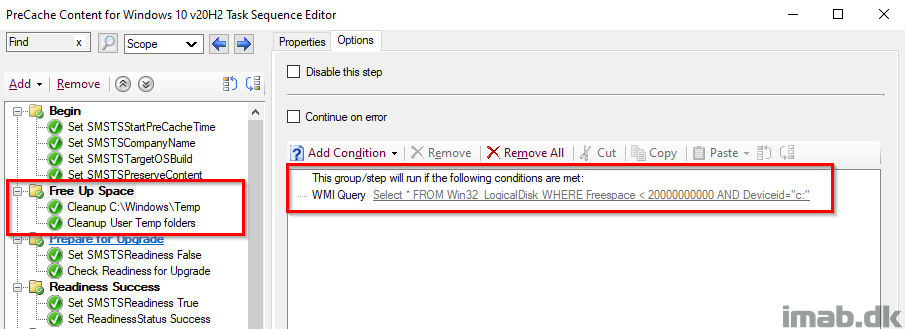
Free Up Space
Delete files in Windows\Temp and temp in each user profile, with a condition to only run if there is less than 20GB available free space on the hard drive
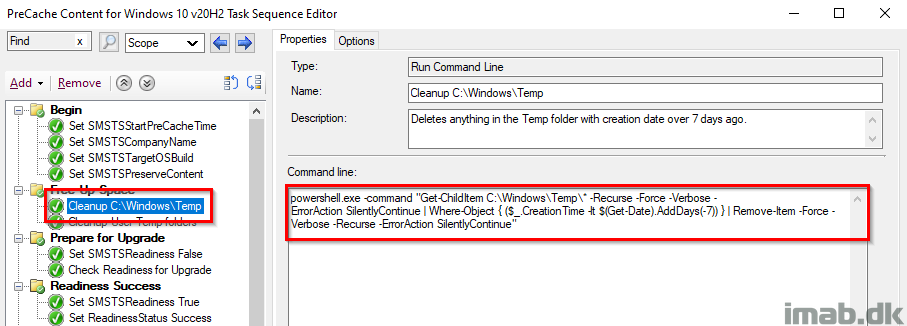
Cleanup C:\Windows\Temp
PowerShell one-liner to cleanup %windir%\Temp.
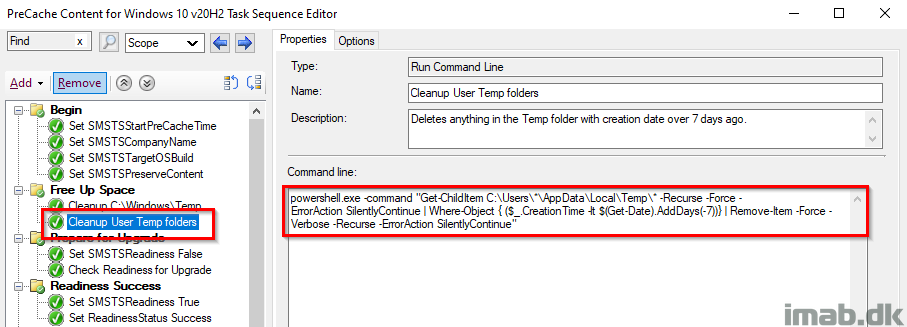
Cleanup User Temp folder
And another PowerShell one-liner, to delete content in each user’s temp folder.
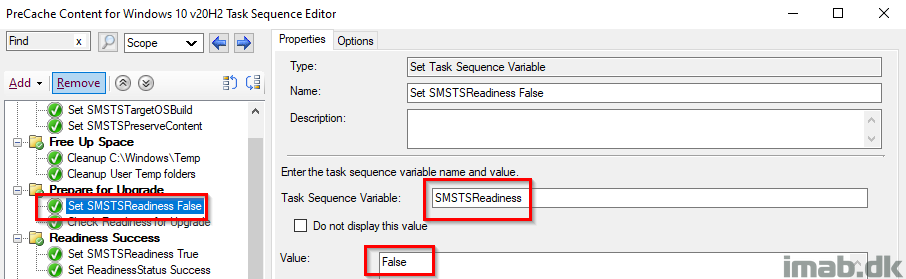
Set SMSTSReadiness False
Initially setting the SMSTSReadiness variable to False. This is later used to indicate whether the actual Readiness Check was run successfully.
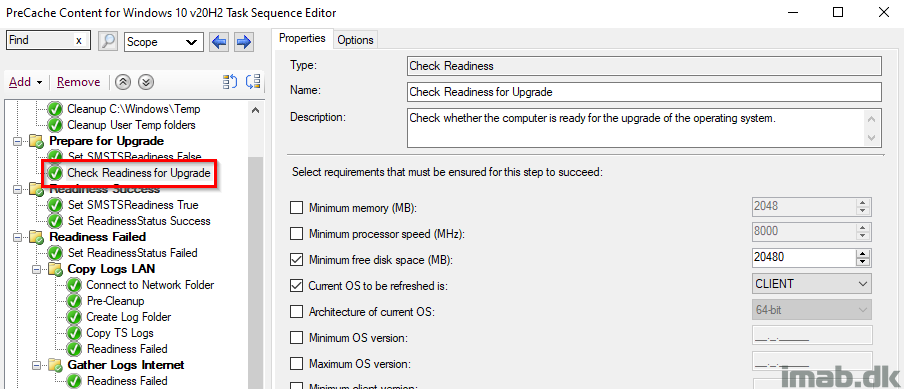
Check Readiness Upgrade
This step is pretty self explanatory. I want to make sure there’s at least 20GB of free space on the hard drive. If this step fails to run, the task sequence will continue (‘Continue on error’ on the entire group. I want to continue precaching content), but will also run the steps in the Readiness Failed group.
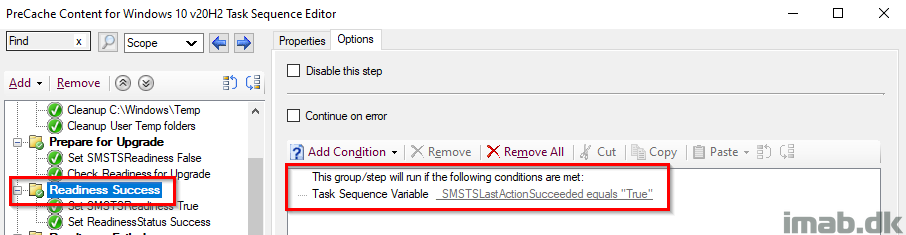
Readiness Success
This entire group runs, if the SMSTSLastActionSucceeded renders True, which translates into running if the Prepare for Upgrade group ran successfully.
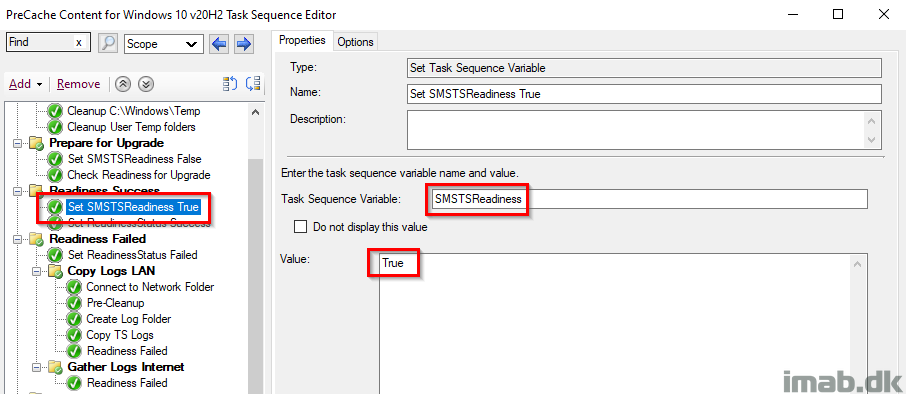
Set SMSTSReadiness True
This time setting SMSTSReadiness to True, because if this step runs, that means the Readiness ran successfully.
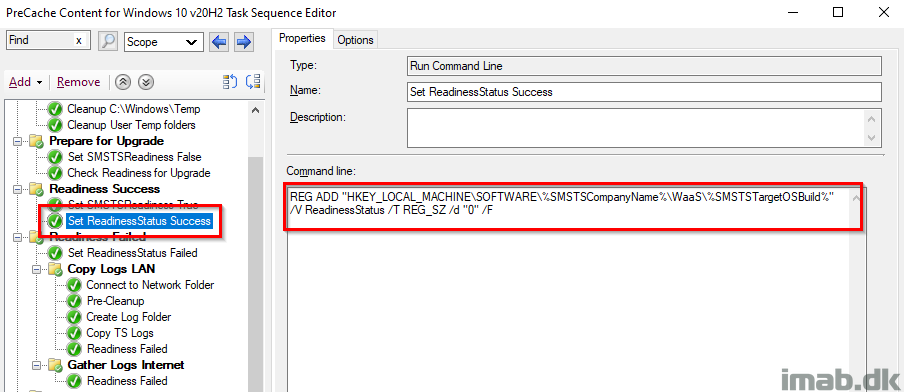
Set ReadinessStatus Success
This steps is tattooing the registry with a status of success for the Readiness Check. This is later inventoried with hardware inventory and used with collections.
This is also the first step, where you will notice the use of the variables SMSTSCompanyName and SMSTSTargetOSBuild, and how they dynamically creates the registry structure.
ReadinessStatus with a value of 0 indicates a success.
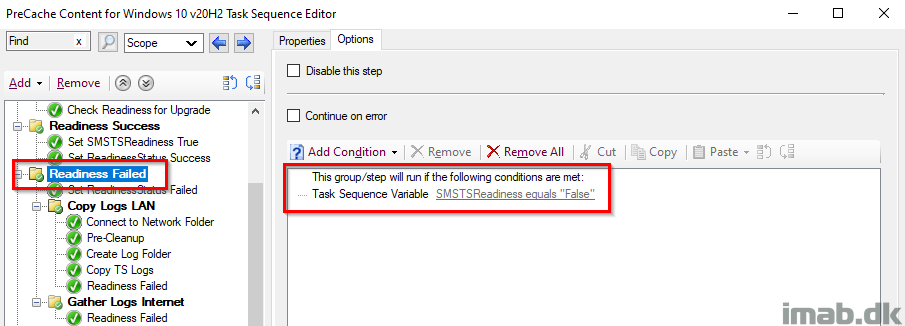
Readiness Failed
This entire group runs if the SMSTSReadiness variable is False, which means that the Readiness Success group didn’t run (obviously) which again means that the Readiness Check failed. In that case, we want to do some additional steps.
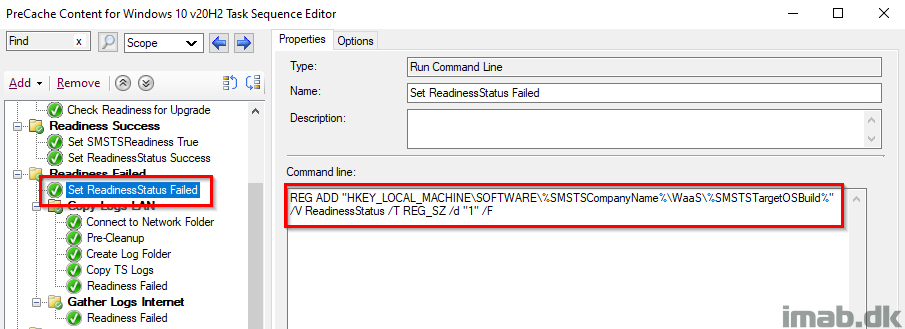
Set ReadinessStatus Failed
Again, tattooing the registry with a ReadinessStatus of 1 which equals to failed. This is also picked up by hardware inventory.
Again, notice the use of the variables SMSTSCompanyName and SMSTSTargetOSBuild. There’s no need to modify the actual command line.
Copy Logs LAN
This group will make sure to copy out the smsts.log to a network location for when the Readiness Check failed.
This group will only run, if the current Management Point is your local Management Point. This translates into, if the device is being within the local area network, which is required in order to complete the subsequent steps.
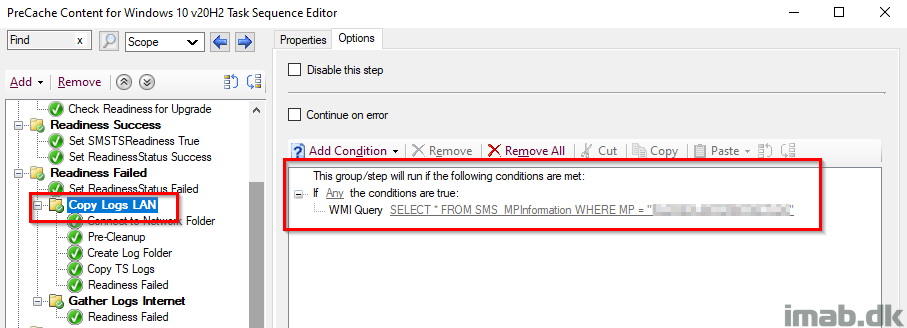
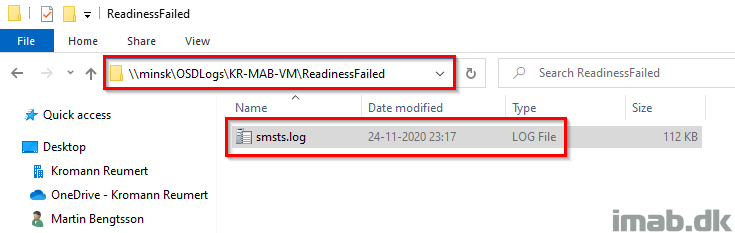
The steps will also create a sub folder with the name of the computer failing the Readiness Check and another sub folder indicating which step that failed. In this case ReadinessFailed.
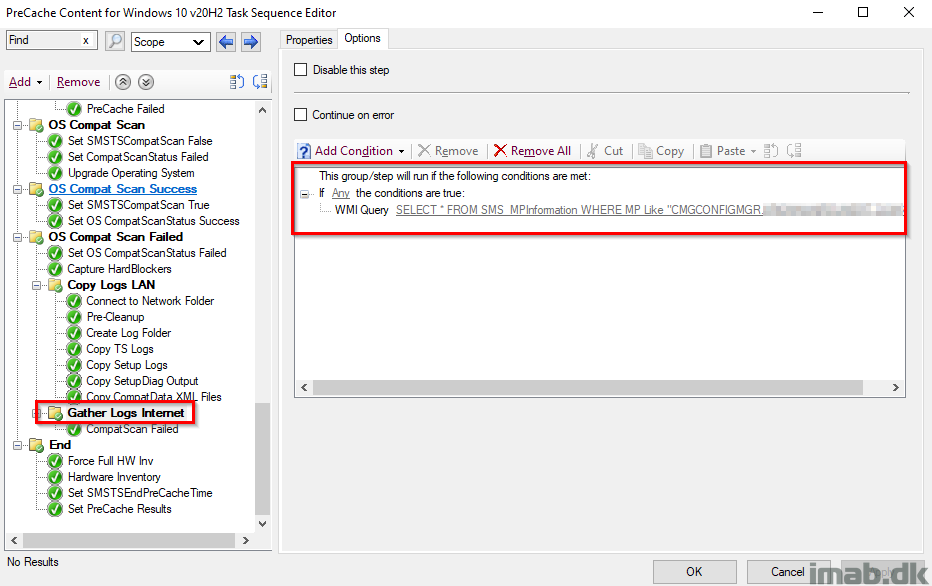
Gather Logs Internet
This group will run, if the task sequence is running over the Internet via the Cloud Management Gateway.
This is done, because file shares are not available for copying out log files, when running the task sequence on the Internet.
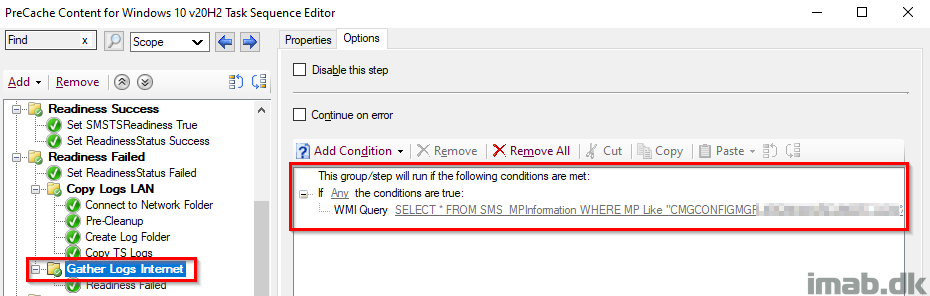
Readiness Failed
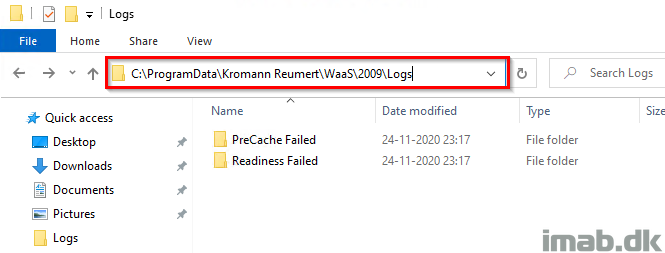
Instead, I’m gathering the log files for the failure with a PowerShell script, so I can pick them up later if needed.
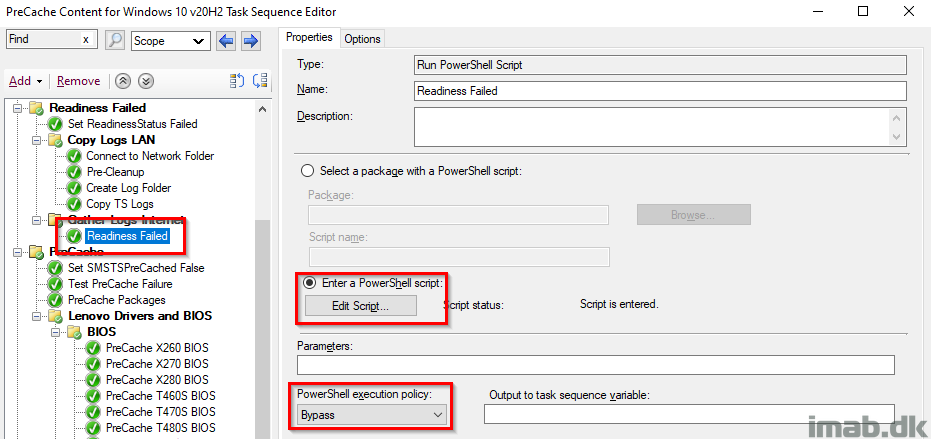
This is done by copying out the smsts.log file for the time of the failure, and put it into C:\ProgramData\CompanyName\WaaS\TargetOSBuild\Logs\ReadinessFailed.
The PowerShell script used in this step, is found in my GitHub page here: https://github.com/imabdk/WaaS/blob/main/ReadinessFailed.ps1
The script is using the variables SMSTSCompanyName and SMSTSTargetOSBuild as well, and will create a folder structure dynamically based on that.
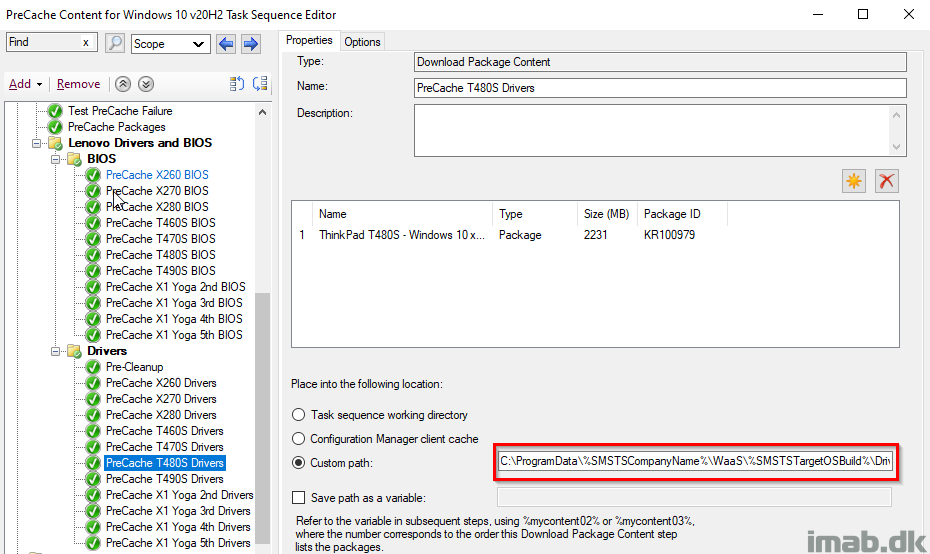
PreCache
This entire group also has ‘Continue on error’ set. I want the task sequence to continue regardless of errors during precaching, and instead provide me with the info on successes and failures through the tattooing and inventory.
This group begins with setting the SMSTSPreCached variable to False.
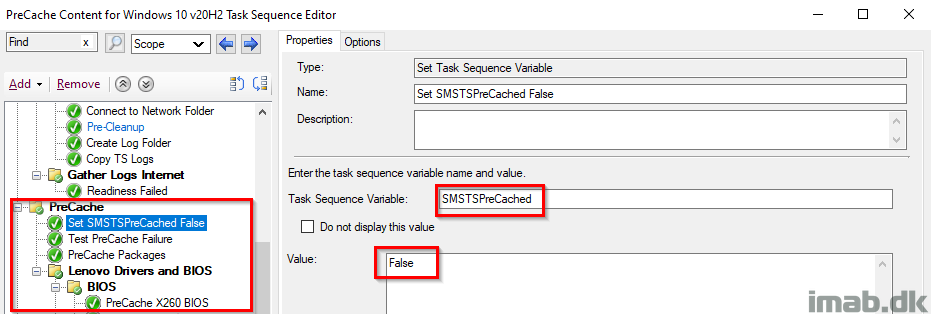
I’m precaching both BIOS and drivers, and below is a snippet of the Download Package Content step for the drivers of a Lenovo T480S.
Notice this also is done dynamically to a custom path, based on the variables SMSTSCompanyName and SMSTSTargetOSBuild which was configured in the beginning.
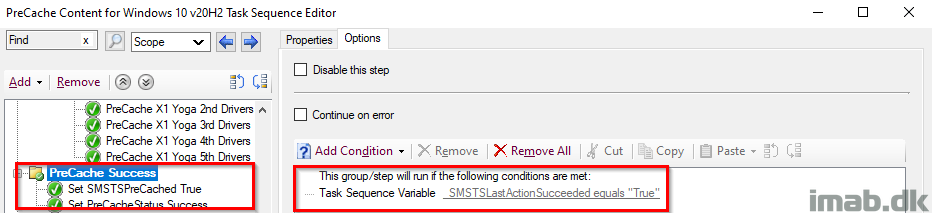
PreCache Success
This group runs if the previous action also ran, which translates to every single step in the previous group, making sure that everything is precached. If the packageID already exists in the CM cache, the content is kept in the cache and not re-downloaded.
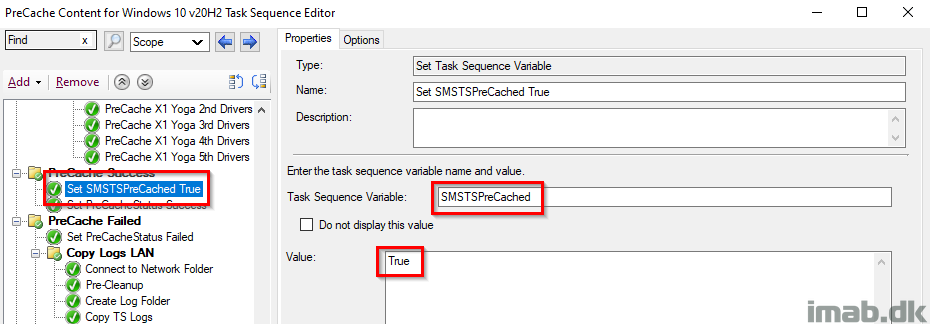
Set SMSTSPreCached True
Setting the SMSTSPreCached variable to True. Again, this is because the actual precaching was done successfully and thus we change the value from False to True for later use.
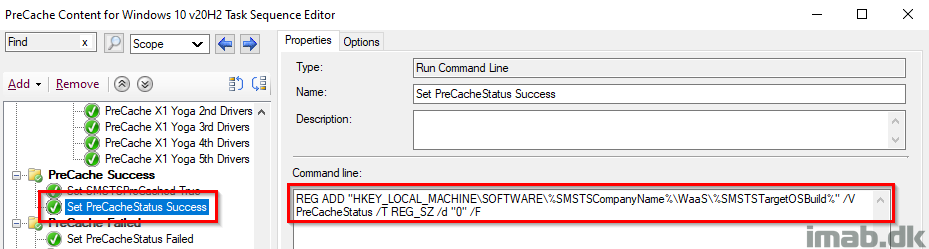
Set PreCacheStatus Success
Another registry-tattooing setting the PreCacheStatus registry key to 0, which indicates a success. This is still being picked up by hardware inventory.
Notice this also is done based on the variables SMSTSCompanyName and SMSTSTargetOSBuild that we configured in the beginning.
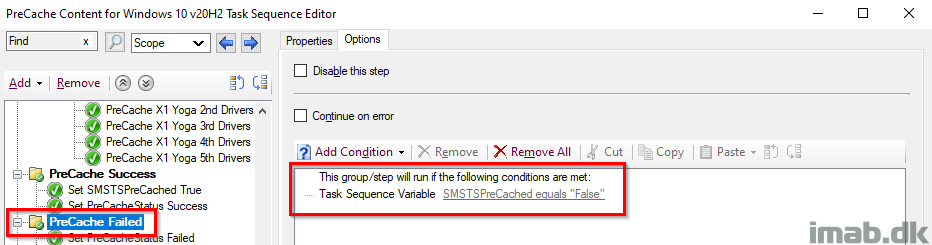
PreCache Failed
This is completely identical to the Readiness Failed step. This group runs if the SMSTSPreCache variable is still set to False, which means something wasn’t precached successfully and additional steps is required.
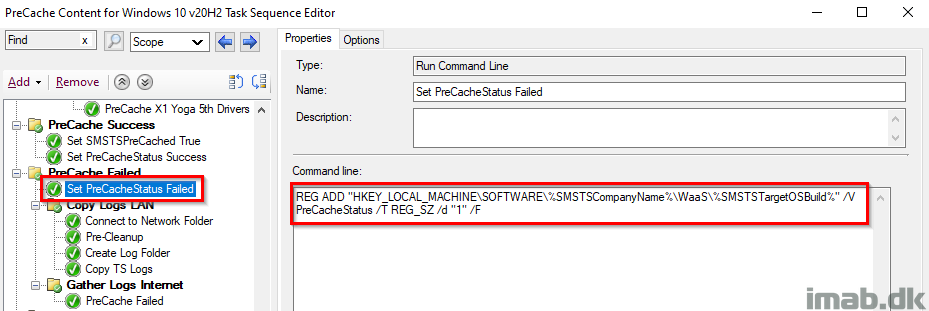
Set PreCacheStatus Failed
Again, something during the PreCache failed thus tattooing the registry with PreCacheStatus with a value of 1. This is picked up by hardware inventory.
Notice this also is done based on the variables SMSTSCompanyName and SMSTSTargetOSBuild that we configured in the beginning.
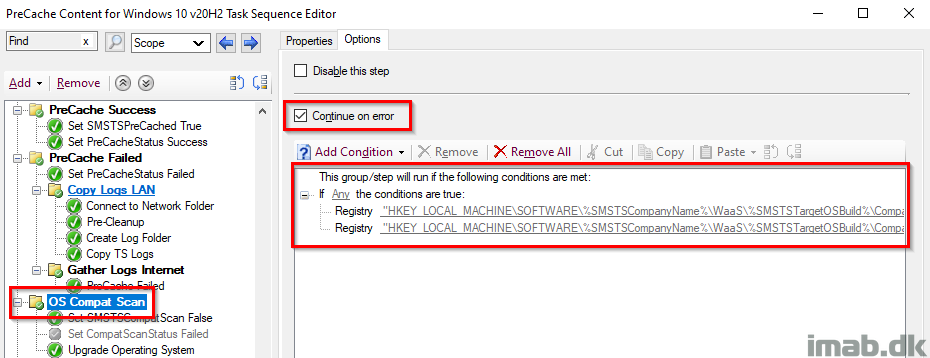
OS Compat Scan
This group takes care of the compatibility scan as well as precaching of the OS.
This entire group also has ‘Continue on error’ set. I want the task sequence to continue regardless of errors during compatibility scan, and instead provide me with the info on successes and failures through the tattooing and inventory.
This group is only run, if the compatibility scan haven’t successfully run previously. This condition is made to prevent, that the task sequence runs the most time-consuming step again, in case the task sequence needs to be rerun due to other reasons.
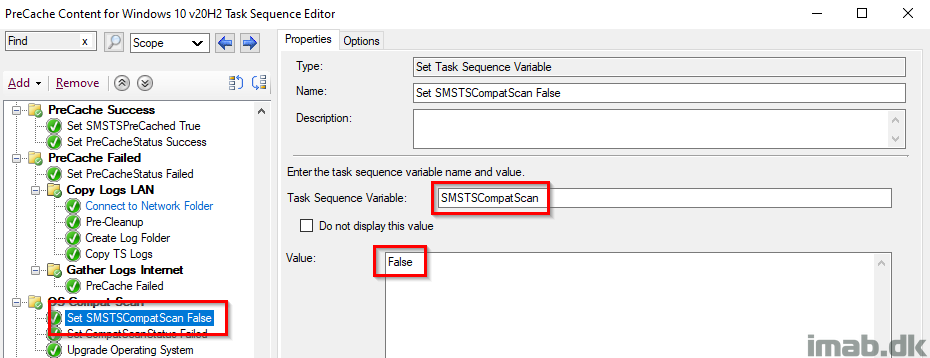
Set SMSTSCompatScan False
Initially setting the SMSTSCompatScan variable to False. This is later used to indicate whether the actual Compat Scan was run successfully or not.
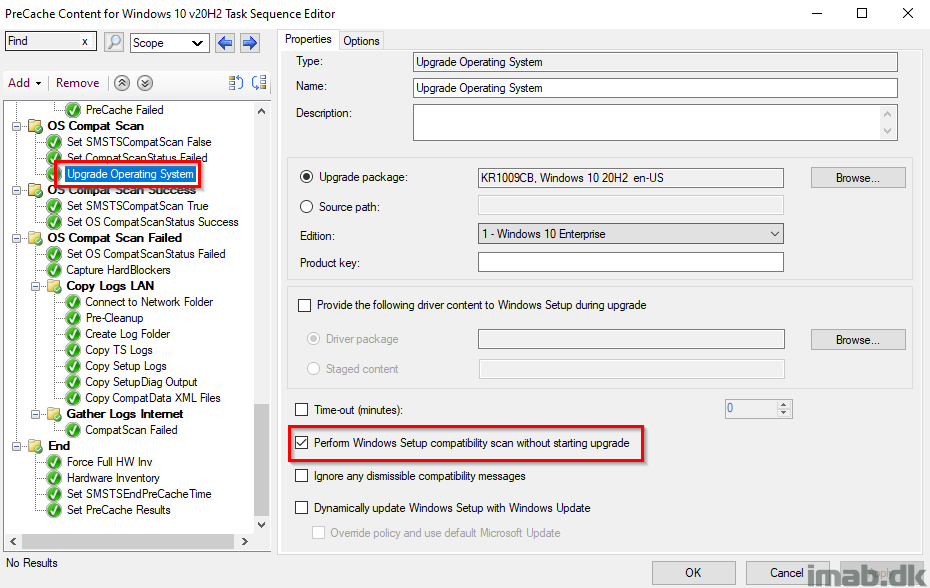
Upgrade Operating System
This step is self-explanatory. This is where the compat scan is run. The important part is obviously to tick on ‘Perform Windows Setup compatability scan without starting upgrade‘
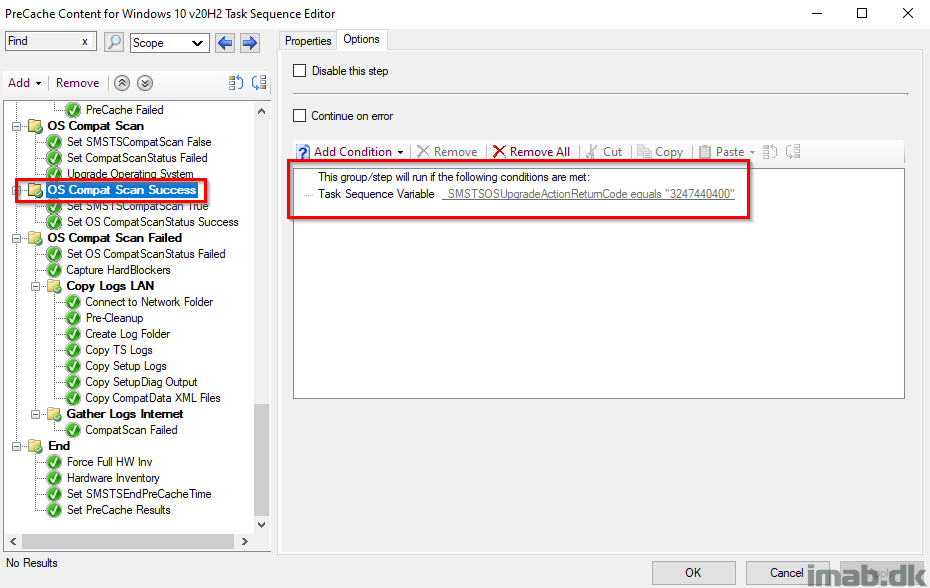
OS Compat Scan Success
This group will run if the actual compatibility scan is coming out OK. That translates into a hex-value, which again translates into a decimal value of 3247440400. More on upgrade error codes here: https://docs.microsoft.com/en-us/windows/deployment/upgrade/upgrade-error-codes
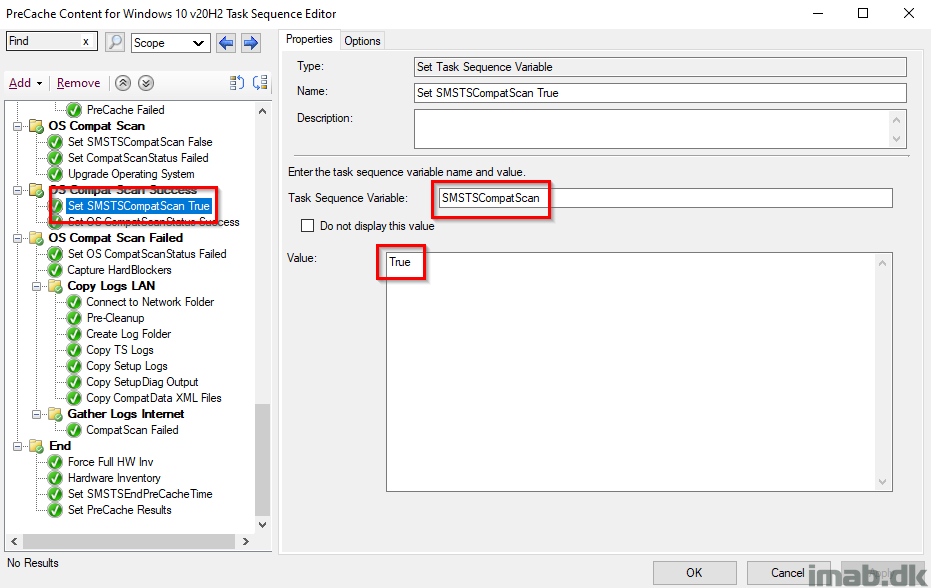
Set SMSTSCompatScan True
Setting the SMSTSCompatScan variable to True. This is because the actual compatibility scan was done successfully and thus we change the value from False to True for later use.
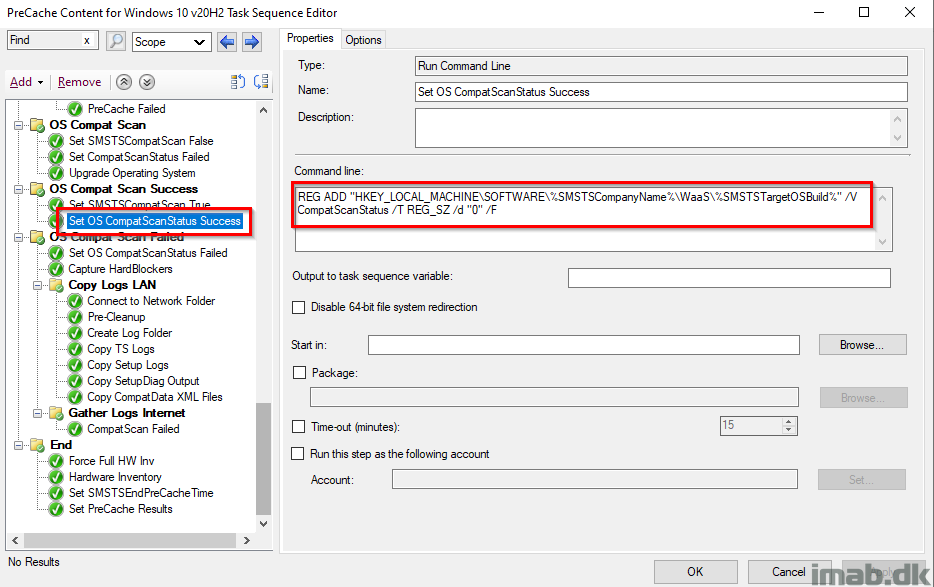
Set OS CompatScanStatus Success
Tattooing the registry with a registry key CompatScanStatus with a value of 0, which will indicate a success when picked up by hardware inventory.
OS Compat Scan Failed
This step will run if the OS compatibility scan is NOT OK. This is the case if the SMSTSCompatScan variable still returns False, thus indicating that _SMSTSOSUpgradeActionReturnCode didn’t return the expected value.
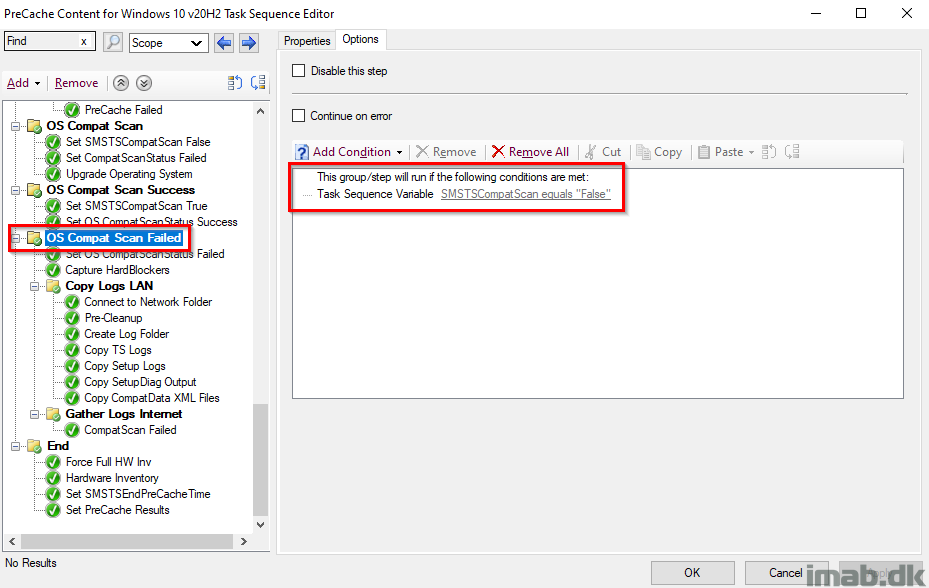
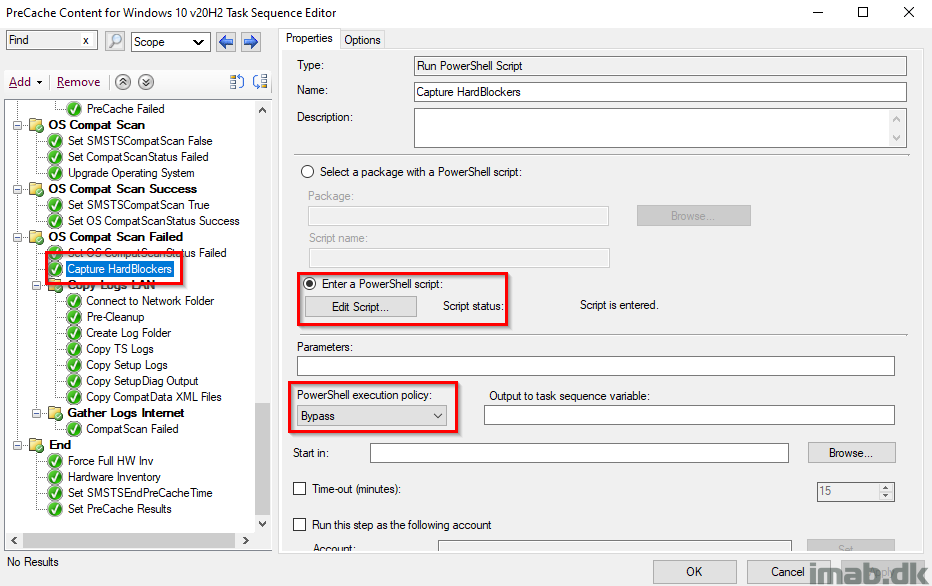
Capture HardBlockers
This step runs a PowerShell script, which will capture any hard blockers and tattoo them into registry.
The PowerShell script is found in my GitHub page here: https://github.com/imabdk/WaaS/blob/main/Capture-HardBlockers.ps1
This script also uses the variables SMSTSCompanyName and SMSTSTargetOSBuild that we configured in the beginning, so everything is done dynamically. The script needs no modifications.
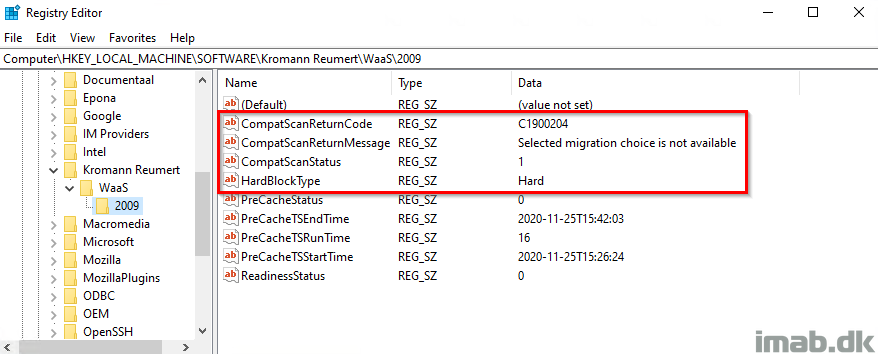
What the registry will look like, when a hard blocker is captured and written to registry, is similar to below illustration:
This is also inventoried with hardware inventory, in order for us to take appropriate actions.
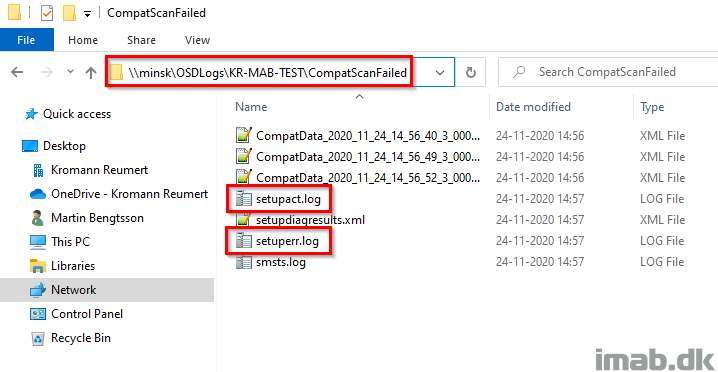
Copy Setup Logs
This step is unique for the compatibility scan steps, and will copy out the setup logs found in $WINDOWS.~BT\Sources\Panther directory.
The log files of interest is setuperr.log and setupact.log
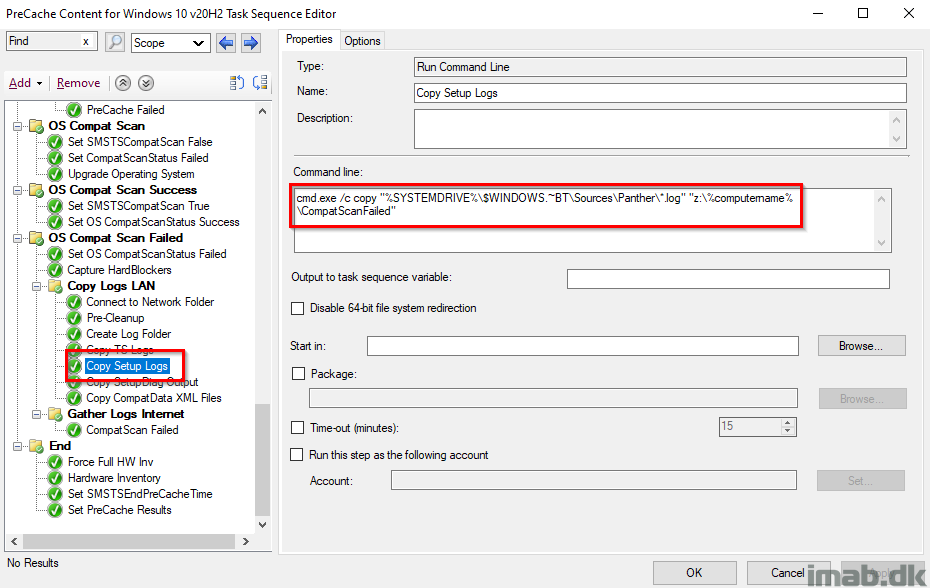
The folder on the file share, will look similar to below illustration. I have highlighted the log files in question:
Copy SetupDiag Output
This step is something new, that only works for Windows 10 2004 and later.
In case of errors during the windows setup, in this case during the compatibility scan, SetupDiag.exe will run automatically.
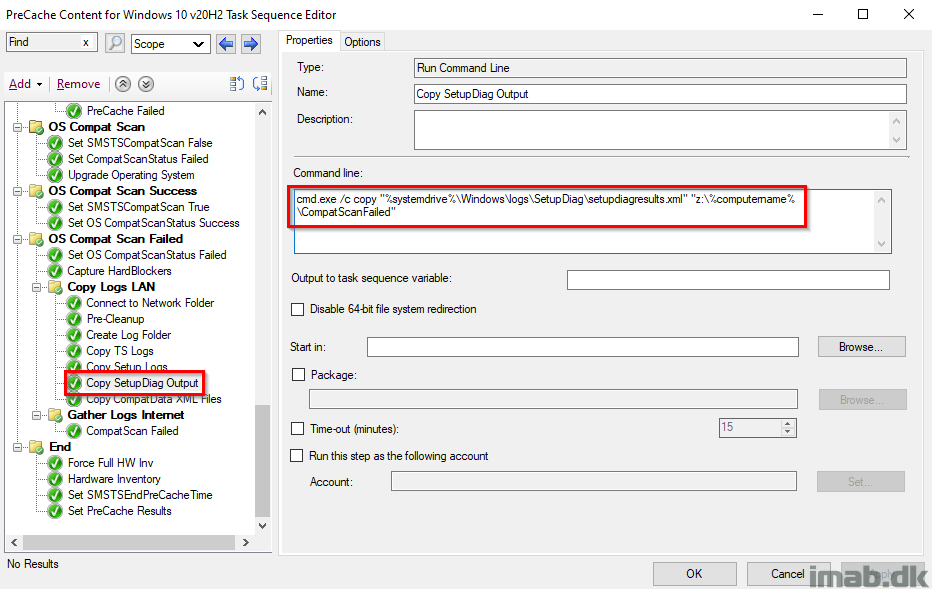
SetupDiag.exe will output to %windir%\logs\SetupDiag\setupdiagresults.xml and this file is being copied over to the file share as well.
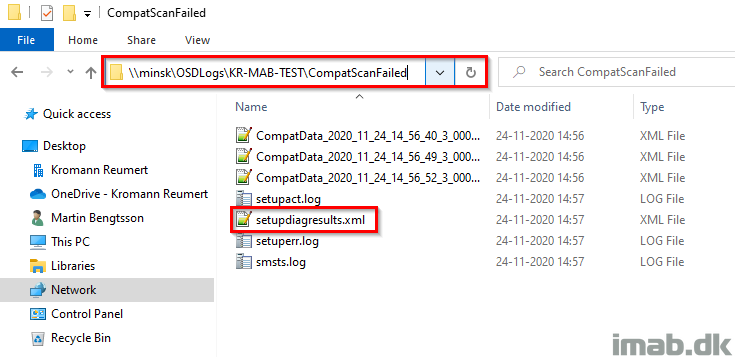
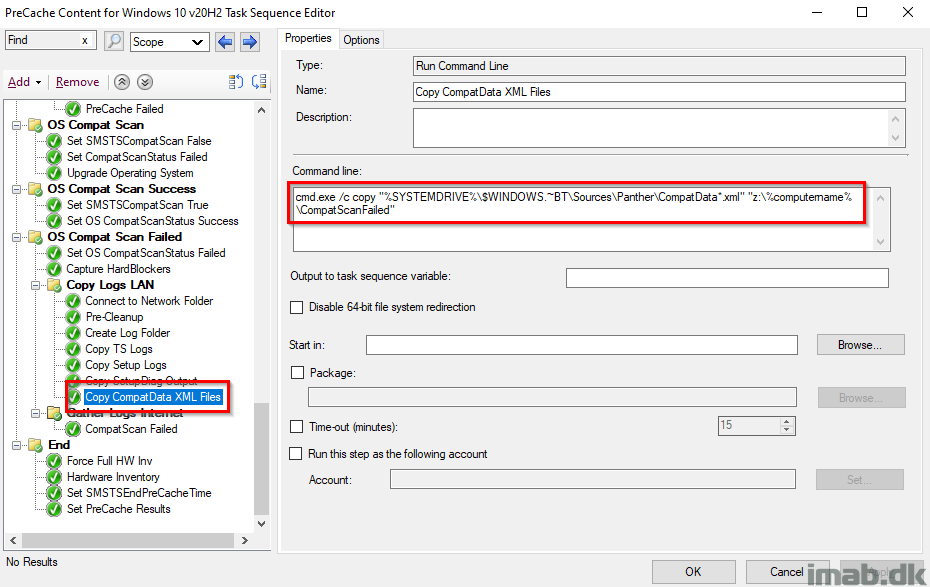
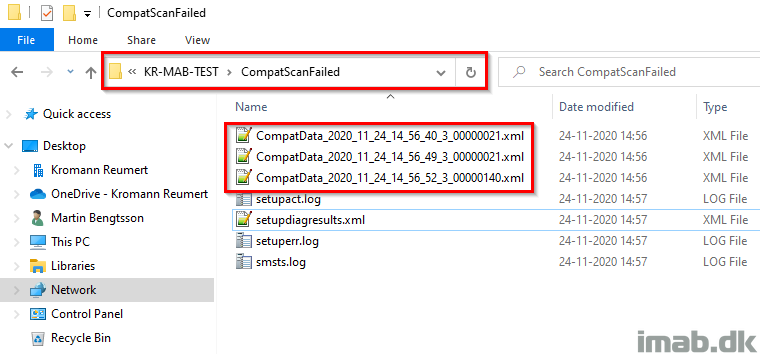
Copy CompatData XML Files
This step is unique for the compatibly scan steps, and will copy out the CompatData.xml files found in $WINDOWS.~BT\Sources\Panther directory to the file share.
The CompatData.xml files, when copied to the file share, will look similar to below illustration:
Gather Logs Internet
This group will run, if the task sequence is running over the Internet via the Cloud Management Gateway.
This is done, because file shares are not available for copying out log files, when running the task sequence on the Internet.
CompatScan Failed
Instead, I’m gathering the log files for the failure with a PowerShell script, so I can pick them up later if needed.
This is done by copying out .log and .xml files for the time of the failure, and put it into C:\ProgramData\CompanyName\WaaS\TargetOSBuild\Logs\CompatScanFailed.
The PowerShell script used in this step, is found in my GitHub page here: https://github.com/imabdk/WaaS/blob/main/CompatScanFailed.ps1
The script is using the variables SMSTSCompanyName and SMSTSTargetOSBuild as well, and will create a folder structure dynamically based on that.

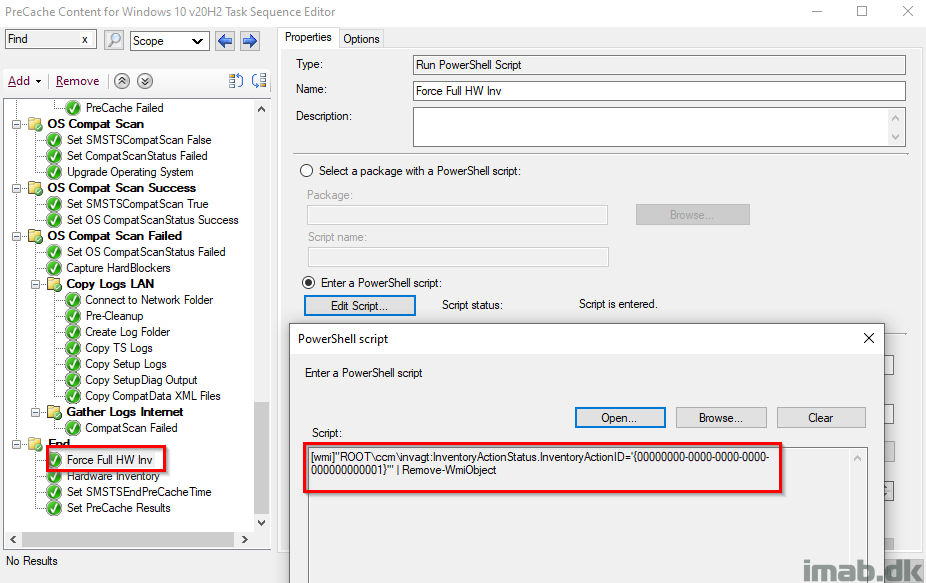
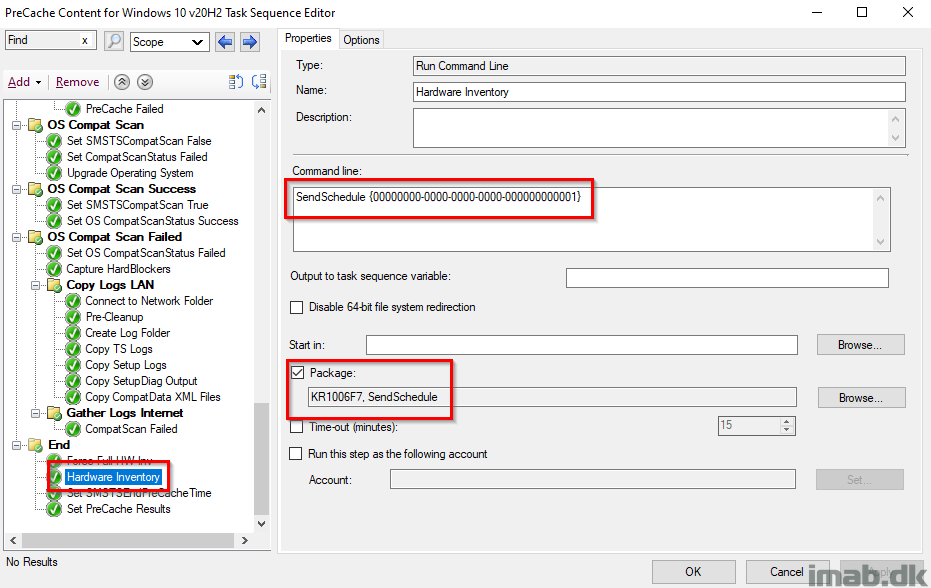
Hardware Inventory
Running hardware inventory picking up all the previous steps successes or failures. I’m running a full hardware inventory, because I’ve seen something not properly being inventoried when just running a delta. Don’t ask.
[wmi]"ROOT\ccm\invagt:InventoryActionStatus.InventoryActionID='{00000000-0000-0000-0000-000000000001}'" | Remove-WmiObject
Why using a package to do this, you may ask? Simply because SendSchedule has more client actions to it and the proper way to do it: https://docs.microsoft.com/en-us/sccm/core/support/send-schedule-tool
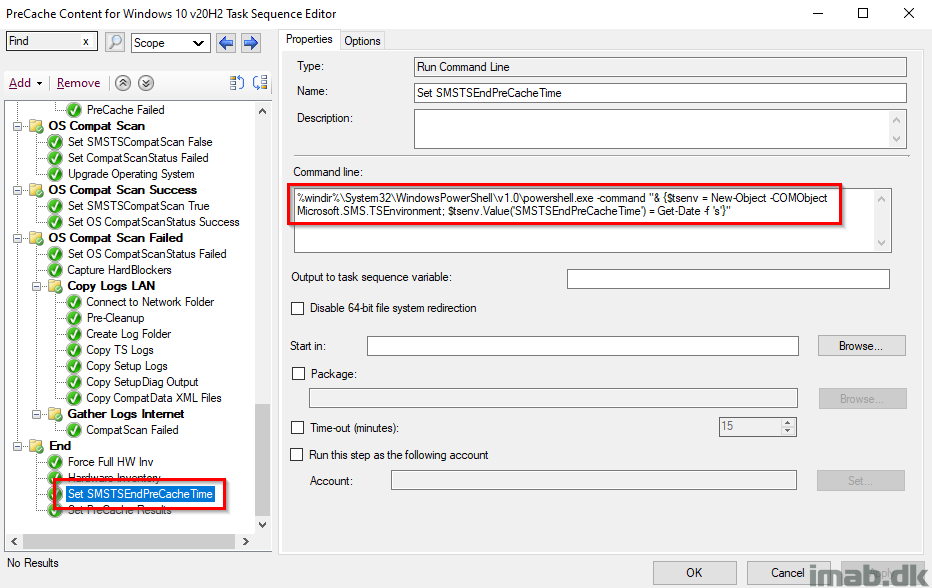
Set SMSTSEndPreCacheTime
This step records the date and time of when the PreCaching Task Sequence is done running. The date and time is later picked up by a PowerShell script and written into registry to be inventoried.
%windir%\System32\WindowsPowerShell\v1.0\powershell.exe -command "& {$tsenv = New-Object -COMObject Microsoft.SMS.TSEnvironment; $tsenv.Value('SMSTSEndPreCacheTime') = Get-Date -f 's'}"
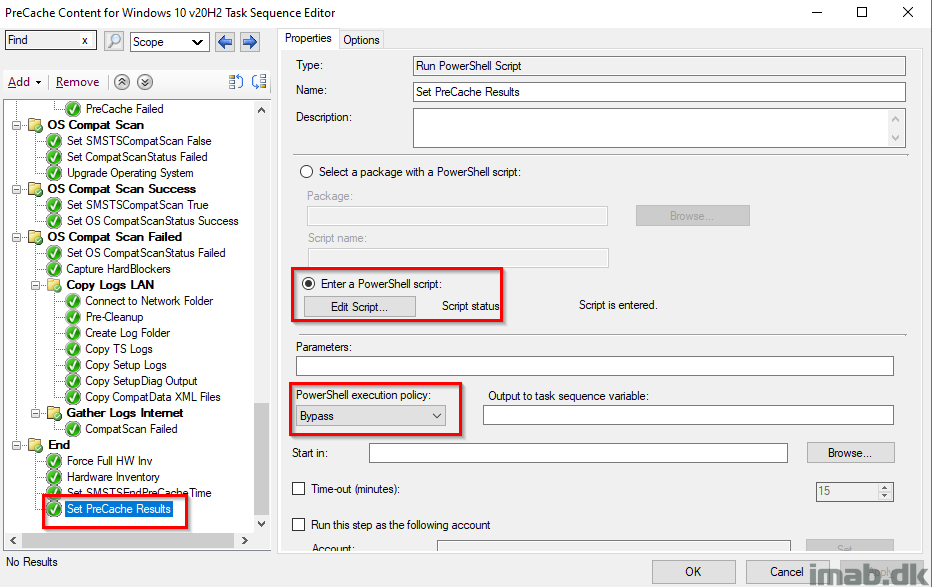
Set PreCache Results
This step is the final piece of the puzzle, running a PowerShell script, which will tattoo the complete PreCache and CompatScan status into the registry.
The PowerShell script can be found on my GitHub page here: https://github.com/imabdk/WaaS/blob/main/SetPreCacheResults.ps1
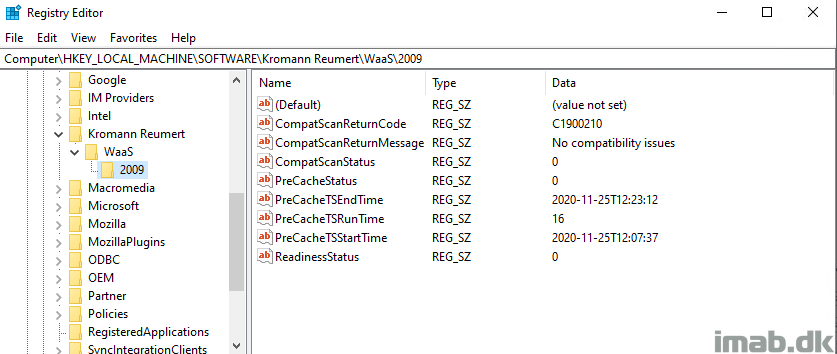
The registry, when everything is successful, looks like below illustration.
NOTE: This is the state you want your devices in, before offering them the In-Place Upgrade Task Sequence.
Collections and hardware inventory
With all that info being tattooed into the registry it’s now time to make use of it. The idea here is, that before a given computer is offered the actual In-Place Upgrade Task Sequence, you want to make sure that the computer has passed the Readiness Check, the Precaching AND the OS Compat Scan.
Luckily, all of that info is stored for us in the registry and when picked up by hardware inventory, we can use that in collections (Note: it’s not picked up by default, you will have to extend hardware inventory to do that. Here’s an very old post of mine, sparingly describing how: https://www.imab.dk/extending-hardware-inventory-in-sccm2012/)
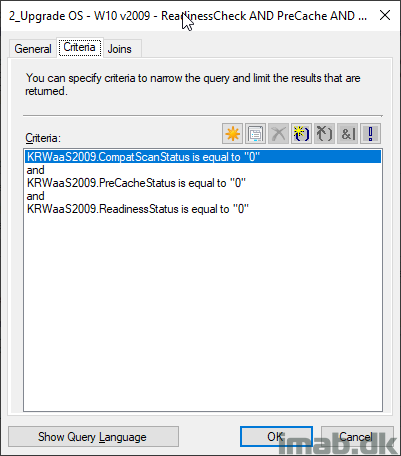
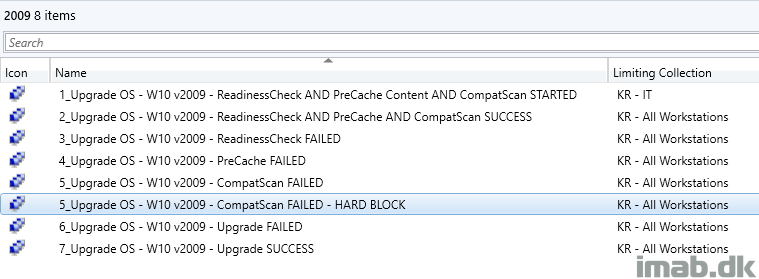
Below is the exact collection membership criteria of my collection, which then only have members where ALL of the checks done during the PreCaching is successfully completed. Nice!
More inspiration
Here’s another set of collections for your inspiration, which also easily will display if you have computers failing either of the important steps allowing you to quickly take the required actions, for example rerunning the task sequence, investigate logs etc.
An example is to have the PreCache Task Sequence to run on a recurrent schedule for some of the FAILED collections, assuming you then and in between schedules will fix the issues.
Deployment
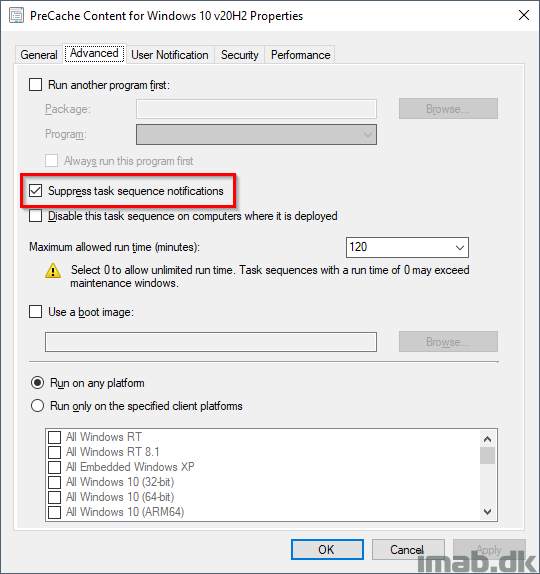
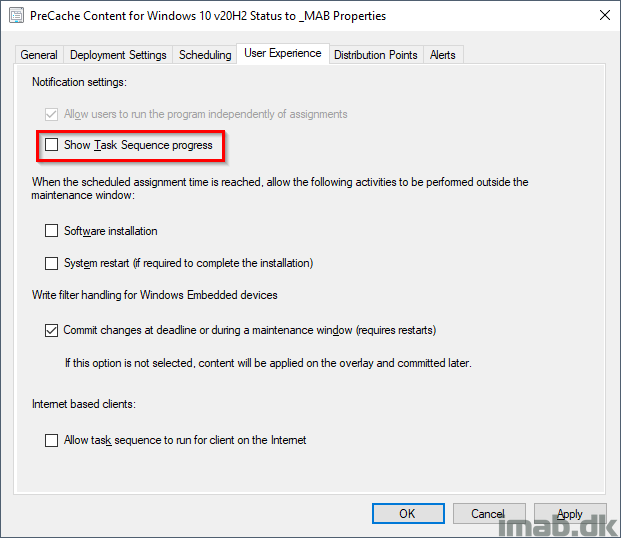
Also, when deploying the PreCache Task Sequence, make sure you do so with following settings. You want this to run completely silent for the end-user.
- Suppress task sequence notifications: Yes
- Show task sequence progress: No
Download
Download my entire PreCache Task Sequence here, exported without content: imab.dk-PreCacheTS-20H2.zip (24934 downloads )
Stay tuned for part 2, where I will walk you through my In-Place Upgrade Task sequence.
ENJOY 🙂
That’s awesome WORK! Thank you very much!
Thank you for letting me know. Much appreciated! 🙂
When do you think you can post up your upgrade task sequence? I have one but I want to compare and see if I can get any help to make improvments.
I hope during this week, and if not, primo next week. Thanks for the interest 🙂
Amazing information, I’ve used your previous task sequences before and will be using this updated one, thanks a lot.
Thank you! 🙂
Eccezionale
Thank you! 🙂
Impressive and very helpful. Thanks
Thank you! 🙂
Awesome work! Question regarding the first PreCache Packages step above the Lenovo Drivers and BIOS Group. Is that a placeholder? After importing the TS and making modifications, ,when I go to save it wants me to enter a package into that step but not sure if anything should be put there.
Yeah, I exported the TS without content, so that is where all my packages which is drivers or bios or the OS itself is precached. It cannot be empty, so that’s why you are seeing that warning. Disable it in that case 🙂 And thanks!
Thanks, this is great. No disrespect to the others they do some great stuff but I think this strikes the perfect balance. It’s elegant and not over complicated. Thanks for taking the time to blog and share your work.
Thank you! Much appreciated, and happy you find it useful 🙂
Awesome work, thank you for sharing!
Did anyone came across this issue, where CompatScan SafeGuard blocks the installation because local Administrator or Guest account is renamed?
https://docs.microsoft.com/en-us/windows/release-information/status-windows-10-20h2#1514msgdesc
Do we have to wait for a fix, or is there something that can be done? 🙂
Thank you
I’ve seen that mentioned a few times on twitter. I haven’t seen it myself. Let me see if I can dig up a solution.
So, the only solution for now is to rename the account back to their defaults: https://support.microsoft.com/en-us/help/4592802/error-when-accessing-the-sign-in-options-or-users-mmc-snap-in
in Pre-Cache i’m doing Rename-LocalAccount back to default before CompatScan, and the same thing in In-place upgrade procedure.. Seems to be working OK, no problems so far..
Thank you!
MY Certificates get deleted every time. Upgrading from 1903 to 20H2.
Mounting .old hive and reimporting solves the problem.. for now
Right, that’s a known issue and should’ve been resolved if you patch or redownload your Windows 10 media 🙂
I’m using 20H2 October 2020 iso? Isn’t this the correct one?
It is, but the issue you mention has been fixed since the release of 20H2, so you should redownload the iso from VLSC or Visual studio or service your media yourself with the latest patches. Find more details here: https://docs.microsoft.com/en-us/windows/release-information/status-windows-10-20h2#1513msgdesc
Latest VLSC ISO build is 19052.508, required add-package:
KB4594440, KB4580419, KB4586864
So if .508 is the latest on VLSC, you need to service your media yourself. Also, I think you mean 19042 🙂
Hey Martin,
Is this workaround still required or will it work with renamed accounts as-is now?
Thanks,
Kyle
I’m pretty sure that the hard blocker for when hacing renamed builtin accounts still exist, and my process does nothing about that. 🙂
Great write up! How are things coming along on part 2?
Hey Andrew, it’s in the making, but I was just put on another task, which I’m also blogging, so I’m thrown around a bit. Apologies for any inconvenience.
No worries! Thanks for the quick response. Look forward to reading about whatever your working on now along with part 2.
Great job, thanks for contributing.
I was left with just one doubt: will it benecessary to redo the hardware extension (\inboxes\clifiles.src\hinv and edit the configuration.mof) for each new build of Windows (2004, 2009, 2104, 2109 … .)?
Example:
Build 2004 REGEDIT:
[HKEY_LOCAL_MACHINE\SOFTWARE\MPT\WaaS\2004]
“CompatScanReturnCode”=””
“CompatScanReturnMessage”=””
“CompatScanStatus”=””
“PreCacheStatus”=””
“PreCacheTSEndTime”=””
“PreCacheTSRunTime”=””
“PreCacheTSStartTime”=””
“ReadinessStatus”=””
Build 2004 configuration.MOF:
…
[PropertyContext(“Local|HKEY_LOCAL_MACHINE\\SOFTWARE\\MPT\\WaaS\\2004|CompatScanReturnCode”),Dynamic,Provider(“RegPropProv”)] CompatScanReturnCode;
[PropertyContext(“Local|HKEY_LOCAL_MACHINE\\SOFTWARE\\MPT\\WaaS\\2004|CompatScanReturnMessage”),Dynamic,Provider(“RegPropProv”)] CompatScanReturnMessage;
[PropertyContext(“Local|HKEY_LOCAL_MACHINE\\SOFTWARE\\MPT\\WaaS\\2004|CompatScanStatus”),Dynamic,Provider(“RegPropProv”)] CompatScanStatus;
[PropertyContext(“Local|HKEY_LOCAL_MACHINE\\SOFTWARE\\MPT\\WaaS\\2004|PreCacheStatus”),Dynamic,Provider(“RegPropProv”)] PreCacheStatus;
[PropertyContext(“Local|HKEY_LOCAL_MACHINE\\SOFTWARE\\MPT\\WaaS\\2004|PreCacheTSEndTime”),Dynamic,Provider(“RegPropProv”)] PreCacheTSEndTime;
[PropertyContext(“Local|HKEY_LOCAL_MACHINE\\SOFTWARE\\MPT\\WaaS\\2004|PreCacheTSRunTime”),Dynamic,Provider(“RegPropProv”)] PreCacheTSRunTime;
[PropertyContext(“Local|HKEY_LOCAL_MACHINE\\SOFTWARE\\MPT\\WaaS\\2004|PreCacheTSStartTime”),Dynamic,Provider(“RegPropProv”)] PreCacheTSStartTime;
[PropertyContext(“Local|HKEY_LOCAL_MACHINE\\SOFTWARE\\MPT\\WaaS\\2004|ReadinessStatus”),Dynamic,Provider(“RegPropProv”)] ReadinessStatus;
};
…
Build 2009 REGEDIT:
[HKEY_LOCAL_MACHINE\SOFTWARE\MPT\WaaS\2009]
“CompatScanReturnCode”=””
“CompatScanReturnMessage”=””
“CompatScanStatus”=””
“PreCacheStatus”=””
“PreCacheTSEndTime”=””
“PreCacheTSRunTime”=””
“PreCacheTSStartTime”=””
“ReadinessStatus”=””
Build 2009 configuration.MOF:
…
[PropertyContext(“Local|HKEY_LOCAL_MACHINE\\SOFTWARE\\MPT\\WaaS\\2009|CompatScanReturnCode”),Dynamic,Provider(“RegPropProv”)] CompatScanReturnCode;
[PropertyContext(“Local|HKEY_LOCAL_MACHINE\\SOFTWARE\\MPT\\WaaS\\2009|CompatScanReturnMessage”),Dynamic,Provider(“RegPropProv”)] CompatScanReturnMessage;
[PropertyContext(“Local|HKEY_LOCAL_MACHINE\\SOFTWARE\\MPT\\WaaS\\2009|CompatScanStatus”),Dynamic,Provider(“RegPropProv”)] CompatScanStatus;
[PropertyContext(“Local|HKEY_LOCAL_MACHINE\\SOFTWARE\\MPT\\WaaS\\2009|PreCacheStatus”),Dynamic,Provider(“RegPropProv”)] PreCacheStatus;
[PropertyContext(“Local|HKEY_LOCAL_MACHINE\\SOFTWARE\\MPT\\WaaS\\2009|PreCacheTSEndTime”),Dynamic,Provider(“RegPropProv”)] PreCacheTSEndTime;
[PropertyContext(“Local|HKEY_LOCAL_MACHINE\\SOFTWARE\\MPT\\WaaS\\2009|PreCacheTSRunTime”),Dynamic,Provider(“RegPropProv”)] PreCacheTSRunTime;
[PropertyContext(“Local|HKEY_LOCAL_MACHINE\\SOFTWARE\\MPT\\WaaS\\2009|PreCacheTSStartTime”),Dynamic,Provider(“RegPropProv”)] PreCacheTSStartTime;
[PropertyContext(“Local|HKEY_LOCAL_MACHINE\\SOFTWARE\\MPT\\WaaS\\2009|ReadinessStatus”),Dynamic,Provider(“RegPropProv”)] ReadinessStatus;
};
…
Thank you!
Hey, yes that will be necessary as the registry entries are changing 🙂
A bit late but you don’t have to redo the hardware extension.
Within RegKeyToMOF you can select “Dynamic instances (Only takes fields found in the first child)” and than point to HKEY_LOCAL_MACHINE\SOFTWARE\MPT\WaaS and below this you have HKEY_LOCAL_MACHINE\SOFTWARE\MPT\WaaS\2009, HKEY_LOCAL_MACHINE\SOFTWARE\MPT\WaaS\20H2 and so on.
My MOF looks like this:
#pragma namespace (“\\\\.\\root\\cimv2”)
#pragma deleteclass(“CompanyName_SCCM_OSUpgrade”, NOFAIL)
[dynamic, provider(“RegProv”), ClassContext(“Local|HKEY_LOCAL_MACHINE\\SOFTWARE\\CompanyName\\Waas”)]
Class FU_SCCM_OSUpgrade
{
[key] string Version;
[PropertyContext(“CompatScanReturnCode”)] String CompatScanReturnCode;
[PropertyContext(“CompatScanReturnMessage”)] String CompatScanReturnMessage;
[PropertyContext(“CompatScanStatus”)] String CompatScanStatus;
[PropertyContext(“PreCacheStatus”)] String PreCacheStatus;
[PropertyContext(“PreCacheTSEndTime”)] String PreCacheTSEndTime;
[PropertyContext(“PreCacheTSRunTime”)] String PreCacheTSRunTime;
[PropertyContext(“PreCacheTSStartTime”)] String PreCacheTSStartTime;
[PropertyContext(“ReadinessStatus”)] String ReadinessStatus;
[PropertyContext(“UpgradeReturnCode”)] String UpgradeReturnCode;
[PropertyContext(“UpgradeReturnMessage”)] String UpgradeReturnMessage;
[PropertyContext(“UpgradeStatus”)] String UpgradeStatus;
[PropertyContext(“UpgradeTSEndTime”)] String UpgradeTSEndTime;
[PropertyContext(“UpgradeTSStartTime”)] String UpgradeTSStartTime;
[PropertyContext(“UpgradeTSRunTime”)] String UpgradeTSRunTime;
[PropertyContext(“UpgradeTSPackageID”)] String UpgradeTSPackageID;
[PropertyContext(“UpgradeTSName”)] String UpgradeTSName;
};
Hi Sebastien, can I get your contact please?I have got few questions pls
Thank you.
By the way, I found the “RegKeyToMof” tool on Technet, to simplify the redaction of MOF for extending SMS & SCCM hardware inventories with custom RegistryKeys.
https://gallery.technet.microsoft.com/RegKeyToMof-28e84c28
Greetings.
A Very Well Documented and nicely written Article! I had one question though, how do you deal with language packs? Do you change the language to english prior to the upgrade and restore the language pack after the upgrade?
Thank you. I’m fortuneate enough not to deal with other languages than en-US, so I’m afraid nothing in my WaaS process will cater for anything other than that.
I realize it’s old but just found it. I usually create a separate TS for each language and call it based on variable (Computer name, IP etc.)
thanks for the blog. It was very useful. I have a question. can you provide me the details of the registry condition for OS Compat Scan
OS Compat Scan
This group takes care of the compatibility scan as well as precaching of the OS.
This entire group also has ‘Continue on error’ set. I want the task sequence to continue regardless of errors during compatibility scan, and instead provide me with the info on successes and failures through the tattooing and inventory.
This group is only run, if the compatibility scan haven’t successfully run previously. This condition is made to prevent, that the task sequence runs the most time-consuming step again, in case the task sequence needs to be rerun due to other reasons.
Full details of the registry condition…
Hi Martin,
Testing the Precache TS and on the Hardware Inventory step, wanted to see if you would have any idea for direction on this.
I am getting a .NET error when trying to use SendSchedule. The error shows as Exit Code -532,462,766 on the Asset Message, but in the Action Output it has Process Completed with exit code 3762504530.
I found the following two entries under event viewer, I will shorten the .NET Error which indicates it cannot find a file, but I am not sure what file it wants. I am using a package that contains only the SendSchedule.exe & Microsoft.Diagnostics.Tracing.EventSource.dll
1. Application Error (Source)
Faulting application name: SendSchedule.exe, version: 5.0.8913.1000, time stamp: 0x5dc49cea
Faulting module name: KERNELBASE.dll, version: 10.0.18362.1237, time stamp: 0x7044674f
Exception code: 0xe0434352
Fault offset: 0x001146d2
Faulting process id: 0x1e3c
Faulting application start time: 0x01d6de301b0f41be
Faulting application path: C:\_SMSTaskSequence\Packages\S01001DA\SendSchedule.exe
Faulting module path: C:\WINDOWS\System32\KERNELBASE.dll
2. .NET Runtime
Application: SendSchedule.exe
Framework Version: v4.0.30319
Description: The process was terminated due to an unhandled exception.
Exception Info: System.IO.FileNotFoundException
Thanks in advanced for any input you might have and great work again on these task sequences, I am having a good time playing with them.
Hi Martin,
Please remove my previous submission regarding the Send Schedule error. I figured out the issue and it was caused by not having the SendScheduleMessages.xml file in my package. Thanks again for providing your pre-cache and upgrade TS.
Thank you for letting me know! 🙂
Thanks for leaving the resolution in this thread!
Thanks for this guide it is great.
One question, how did you configure the criteria for the collections to reference the registry items?
Happy for you to show me for just one collection and I will figure the rest out from there.
Cheers
Hey Alan, you will need to extend hardware inventory to pick up those registry entries to use with the collections. Google search for Extend hardware inventory configmgr will give you a lot of useful results 🙂
May I ask why do you prefer to use the registry of the system to tattoo data of the TS rather than using WMI? Just curious.
Registry is available for “everyone” and easy for “everyone” to open up and have a look at. Helpdesk personal etc. 🙂
The Copy Logs LAN WMI doesn’t seem to work when I add it – I have done a lot of searching and also used WMI Explorer. That class seems to be gone. SMS MP Information> Any suggestions
So, if running Get-WmiObject -Namespace ROOT\ccm\LocationServices -Class sms_mpinformation in an elevated Powershell does not return results? That does not sound like an healthy CM client.
Hi,
I’ve been using the 1909 TS with huge success, wanted to thank you 🙂
And a suggestion, for simplifying this is Modern Driver and Bios management, have a look at that.
https://msendpointmgr.com/modern-bios-management/
Helped me a lot with simplifying Bios and Driver management.
Thank you! 🙂
Hi Martin,
This is great work which we are planning to implement for our 20H2 upgrade. Previously used OneVinn TSLaunch approach for 1909, which worked great in DEV, but wasn’t 100% reliable during the rollout.
Thanks
Thank you! Let me know if you need any assistance 🙂
Hi Martin
In the pre-cache and the caching of drivers, Bios & OS who doe you get around the folder being created which is the same as the package-id.
As in the 2nd task sequence I find it failing when it try’s to get to the content which the PS script is calling but not seeing the folder with the package id
regards
Adrian
I mount the wim, which is named exactly like the computer model. This works for Lenovo, but might need som adjustments on other makes and models. The script in the 2nd task sequence looks for that dynamically. I take it this is the part that’s failing for you: https://github.com/imabdk/WaaS/blob/main/Mount-Drivers.ps1
BTW, you don’t need to do drivers like this. You can skip all of that, and just take the concept of the precaching/IPU, if doing drivers via WIM doesn’t fit into your environment 🙂
Thank you for sharing your task sequences. These are excellent and have saved me a large amount of work.
My query relates specifically to the task sequence deployment options.
I am upgrading machines which are LAN attached as well as machines which are currently used at home / offsite. We do not have a CMG but use Microsoft DirectAccess for our seamless VPN.
I currently have both task sequences set to Download content locally when needed by the running task sequence.
I believe this is contrary to what you recommend. If I set the precache task sequences to download all content locally before running the task sequence will it download / cache ALL driver packages for ALL hardware models specified in the task sequence before running . I cater for 25 different models of HP, Dell and Lenovo machines and only want to locally cache the required WIM files for each specific model.
Thanks once again
Hi
Did you face the situation when user reboots his computer during precache ?
It seems we have to restart the TS using Powerhsell.
And hopefully, it doesn’t redownload packages already in cache (but I dont know yet about Wim drivers download outside ccm cache)
Hello,n thanks for your sharing …
How did you mange the reboot of computers during precache ?
Ive tested it, and find that deployments isn’t displaying any error, needed to restart the TS using a pshell script, already downloaded package did not had to be dl again
I don’t know if WIM drivers packages, downloaded outside the default ccm cache folder, need to be dl again.
The total space used for our 20H2 precache TS is about 7gigs
And we have a little bandwith, so Im afraid the precache TS could last an entire day maybe, so I need to manage this …. maybe I can intercept shutdown to start a shutdown /a cmd
Hi there
I found out that bandwith limitation was not applied when downloading content … are you concern about this ?
Hi Martin,
This is most definitely a great work from you. Thanks for sharing!
I am in the process of implementing your idea in our company to complete feature update from v1803/v1809 to v20H2 for nearly 2000 devices. I’d like to ask you a couple of questions regarding your approach. Please, see below:
1. When creating the deployments for both Task Sequences – how are you configuring the re-run behavior for it? Are you configuring it to re-run if failed on previous attempt?
2. From your experience – if we do not want to update drivers and bios as part of the task sequence would the OS upgrade process complete while preserving the existing drivers it already had prior to the upgrade?
Many thanks in advance!
Kind Regs,
Bruno
Thanks for this post, very useful strategy! Would you be able to share the contents of your “Send status” package please? Script etc.
Thanks
Hi Martin,
What advertisement are you using on your failed collections in order to solve the issues encountered ? It’s great to have a collection for the failed installs but it’s another to troubleshoot them together and not 1 by 1 as if possible 🙂
Thank you for your reply !
Hi everyone.
I don’t know if there are still active Users or Martin himself here but I want to ask anyway.
The PreCache Tasksequence never fails, so how do you manage the rerun-behavior? Do you just set it to always rerun and have your query collections do the rest? How often do you schedule?
I edited the TS and added a step in the end that fails the TS with “cmd /c exit 1” if SMSTSReadiness, SMSTSPreCached or SMSTSCompatScan are “False”.
How do you all handle this?
Thank you for your reply
Hi good morning, I do think Martin does look in
I use these IPU sequences a lot in testing. You can make the precache fail through leaving out a TPM to get a hardblock for 21h2 up to 22h2 for example, but I don’t think that is what you are asking Sebastian.
Would these kind of upgrade operations ever be rerun on a schedule in production? These ts provide very good logging and registry entries, but seeing as an OS upgrade, do they not still need manual monitoring and redeployment?
For me these provide great handling in order to see manually what needs to be addressed before IPU can proceed successfully of not
I have not been able to get SendSchedule to run in the task sequence. I have the .xml file that seemed to be Derrick A’s issue, but I am getting the same error in my event log after the TS fails as they were.
When I try and test SendSchedule on the client in command prompt using “SendSchedule.exe /L” it errors out with:
Unhandled Exception: System.IO.FileNotFoundException: Could not load file or assembly ‘Microsoft.Diagnostics.Tracing.EventSource, Version=1.1.28.0, Culture=neutral, PublicKeyToken=b03f5f7f11d50a3a’ or one of its dependencies. The system cannot find the file specified.
at Microsoft.SendSchedule.Program.Main(String[] args)
I can run that same command with success on the server in command prompt.