Managing workgroup/DMZ clients with ConfigMgr

For security reasons, we have decided to join specific computers, serving a specific role to a workgroup instead of our domain. While being in a workgroup in the DMZ, we still had the need to manage them using ConfigMgr.

I had no previous experience in managing DMZ workgroup computers, so I had to gather the required know-how.

This is what I did:

  • Listed the limitations regarding workgroup clients. (No Active Directory)
  • Created the proper boundaries for the workgroups clients. (If no boundaries are created, all clients will be considered as a slow client)
  • Made sure that port 80 (CM) and port 8530 (WSUS) are forwarded to through the firewalls to the new network.

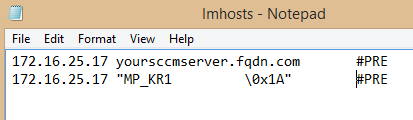
As the workgroup clients are on their own network, and without DNS to give them information about which and where to locate a Management Point, we had to make following changes to the host files (C:\Windows\System32\drivers\etc) on the clients:

host1

lmhost1

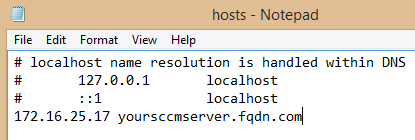
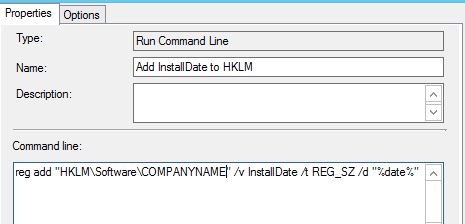
With these changes in place, you can install the CM client with following commandline: “ccmsetup.exe” SMSSITECODE=SITECODE SMSMP=yoursccmserver.fqdn.com

If installing the client from an OSD task sequence, you cannot use the SMSSITECODE property (We have a seperate OSD TS for these clients joining a workgroup).

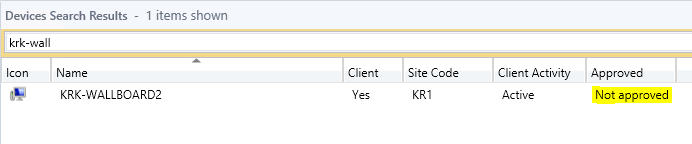
When the client is installed successfully, you will be able to see the client in the SCCM console. Note that the client is not automatically approved (This can be changed to automatically auto approve all sorts of clients, but is not recommended)

notapproved

After manually approving the client in the console, the client will start to download policies from the Management Point. (To speed up this process, you can restart the ccmexec service)

In the initial phase of getting this to work, it’s a really good idea to watch the proper log files, to see what actually happens, and in case of any errors, take the required actions.

These are some of the important client logs to consider:

LocationServices.log
ClientIDManagerStartup.log
Policyagent.log

Enjoy… 🙂

Tattoo and inventory the registry

OBS: This post is primary about how to tattoo the registry with any given information, and then inventory it with SCCM2012.

In need of knowing when a client got it’s OS intalled/reinstalled? Read further. There is no built-in feature in ConfigMgr, that quickly enables you to find that piece information, which basically means we have to make our own.

In following post I will explain what I do, using hardware inventory in ConfigMgr 2012.

First off, we have to make sure that the information we need, in this instance, the date of OS deployment is created during the actual installation. This can be achieved in various ways. I choose to add an entry to the registry.

Running following commandline from within your OS task sequence does just that:

reg add “HKLM\Software\COMPANYNAME” /v InstallDate /t REG_SZ /d “%date%”

RunDeployDate

With this in place, we have what we need on the clientside. The command will leave a trace of the actual date of when the computer got installed.

Now we need to tell ConfigMgr how to use this, and for this I use hardware inventory.

Hardware inventory means changes to the configuration.mof. Download and use RegKeyToMof will make your life easier on this one: Download here

What you basically need to do, is to browse your way to the registrykey you wish to inventory. In this case HKLM\Software\COMPANYNAME\ and check off InstallDate. RegKeyToMof will automatically generate the necessary snippet of code to be inserted into the configuration.mof file and for your Client Settings in the ConfigMgr console.

Configuration.mof:

configmof

Client Settings:

clientmof

Now update the client’s policy, run a new hardware inventory cycle and monitor the log files. InventoryAgent.log on the client, and dataldr.log on the server are relevant in this case. Datalgr.log vil start updating once the changes to configuration.mof has been done.

If everything goes as expected, you will be able to run a resource explorer on the client from the ConfigMgr console, and see something similar to this:

resourcexplor

And finally from here, you will be able to use this information in queries or even build a report, and this way locate clients which haven’t been reinstalled for a long period of time.

Enjoy.

Edit default user registry hive

You can apply registry settings in various ways, but sometimes you might consider making a setting default, not only for the current users of a computer, but also for every new user. This is already achieveable through Group Policies you might think, and that is true. What I prefer to do however, is to make changes to the default user. You can do that during deployment of the OS, and therefore limit the changes coming from your group policies. (Awesome!)

Consider this: You have decided to show the icon for This PC on the desktop on Windows 8, and would like that for every future users of your computers in the environment.

This is what I do:

Create a simpe batch script containing following:

DefaultRegistry

This will make changes to the default user, and all future userprofiles created on the computer, will have this change.

BitLocker on Windows 8.1 and ConfigMgr 2012 R2

We have decided to encrypt our harddrives on our upcoming Windows 8.1 environment using BitLocker.

I had no previous experience with BitLocker, so I started out reading and learning and eventually got it to work. All the necessary information was spread across several TechNet articles, so I decided to put together a post explaining how I did it.

1) Fortunately for me, our domain is running on 2012 servers, so no need to extend the AD schema. You have to though, if you’re running 2003 domain controllers. Here’s something about the topic on TechNet: http://technet.microsoft.com/en-us/library/dd875529(v=ws.10).aspx#BKMK_3

2) What I had to do instead, was to verify that the schema objects was there, and delegate the correct permissions on the OU where my new Windows 8.1 computers are going to be. This is explained in details on TechNet as well. Here: http://technet.microsoft.com/en-us/library/dd875533(v=ws.10).aspx and here: http://technet.microsoft.com/en-us/library/jj592683.aspx#BKMK_addscons

3) Further to that, I configured BitLocker policy settings for the Windows 8.1 clients, enabling the TPM chip to backup BitLocker recoverykeys into AD. These are the exact policies that I apply to my Windows 8.1 OU:

  • Computer Configuration > Policies > Administrative Templates > System > Trusted Platform Modul Services:

TPMGPO

  • Computer Configuration > Policies > Administrative Templates > Windows Components > BitLocker Drive Encryption:

BitLocker

  • Computer Configuration > Policies > Administrative Templates > Windows Components > BitLocker Drive Encryption > Operating System Drives:

BitLocker2

4) Configuring the task sequence in ConfigMgr was pretty straightforward. 2012 SP1 has added support for pre-provisioning of BitLocker, which means SCCM will start encrypting the disk right after partitioning of the disks, and will be done with the image. Make sure the steps are exactly as on the picture.

BitLockerTS

5) Finally I installed the BitLocker Drive Encryption Administration tools on my DC’s, which enables me to view the BitLocker recoverykeys on the computer objects in AD.

BitlockerAdmin

6) Deploy the task sequence to the proper collection, and make sure the TPM chip is enabled in BIOS and you are set. (You can enable the TPM chip from within the task sequence using a script provided by Lenovo. I will update this post on how to do that ASAP. Download the scripts here: http://support.lenovo.com/en_US/downloads/detail.page?&LegacyDocID=MIGR-68488

Updating KMS to activate Windows 8.1 and Server 2012 R2 hosts

As many others these days, I’m messing around with Windows 8.1 and was looking into upgrading our KMS to support the new OS.

Here’s what I did:

1) Download and install following update on your KMS host: http://support.microsoft.com/kb/2885698 and reboot the server.

2) Uninstall current KMS key from an elevated command prompt using: slmgr.vbs /upk

3) Install the new Server 2012 R2 KMS key also from an elevated prompt using: slmgr.vbs /ipk NEWKEYGOESHERE

4) Activate the new key running slmgr.vbs /ato

…and voila: our KMS is ready for Windows 8.1 and Server 2012 R2 🙂

Failed to resume task sequence (0x800700EA)

I just upgraded my SCCM 2012 environment to the latest R2-release and while everything seemed to be without obstacles, I ran into this error:

<![LOG[Failed to resume task sequence (0x800700EA).]LOG]!><time=”08:41:37.801+420″ date=”09-19-2013″ component=”TSMBootstrap” context=”” type=”3″ thread=”3256″ file=”tsmbootstrap.cpp:426″>EA)

My OSD Task Sequence got to install the OS and the SCCM client, and then just booted directly into the OS skipping the rest. No error was displayed, so I checked the SMSTS.log and saw the above error.

I was using boot images created from MDT 2012, which I thought would be OK in this case. But apparently it’s not – boot images created with MDT 2012 is no longer working and when I switched back to the default ones, my Task Sequence completed.

The new boot images comes with the new Windows 8.1 ADK (http://www.microsoft.com/en-US/download/details.aspx?id=39982) and R2 will upgrade them automatically.

The new boot images will look like this:

Bootimage

Automatic Deployment Rule and Deployment Package

*UPDATE* This has been fixed in R2, and you are now able to select a deployment package from within the console *UPDATE*

Just a quick note on the above topic. I have created several Automatic Deployment Rules in my ConfigMgr environment, and was looking for a way to change which Deployment Package the updates was stored in. The console in SP1 doesn’t offer the opportunity, so I went to my favorite search engine and came across this blog post:

http://www.petervanderwoude.nl/post/changing-the-deployment-package-linked-to-an-automatic-deployment-rule-in-configmgr-2012/

Peter’s work is accepted to TechNet galleries:

http://gallery.technet.microsoft.com/Change-the-Package-linked-65662298

How to install SCEP client during OSD

Some might claim that installing the SCEP client during OSD is an unnecessary step, but I’d claim otherwise.

Installing the SCEP (System Center Endpoint Protection) client as an step in your OSD task sequence, will provide instant protection against malware, whereas waiting for the automatic installation through the client policy, will leave the OS unprotected for the duration of the client policy polling interval + the time needed for the actual installation.

With that said, I’ll recommend to install the SCEP client during OSD. You can do that by separating the scepinstall.exe from the SCCM client installation folder (\\SITESERVER\SMS_<SITECODE>\Client\) and create a standard package and program running following command: scepinstall.exe /s /q /NoSigsUpdateAtInitialExp

Distribute the package to your distribution points, and add the step to your OSD Task Sequence as any other package.

/NoSigsUpdateAtInitialExp will prevent the installation to reach out to Microsoft.com for definitions updates, and therefore limit the WAN usage, which is considered good practice. Definitions should be installed from your Software Update Point:

SCEPOSD

Install the SCCM client using a script

There are several ways to install the SCCM client. As you know, it may be installed during OSD using a package, or the built-in push feature after discovery, but sometimes it might come handy to be able to install it using a script. (More about Client Deployment here: http://technet.microsoft.com/en-us/library/gg682132.aspx)

Nothing really fancy, just a plain .bat file containing following information:

“\\SITESERVER\SMS_SITECODE\Client\ccmsetup.exe” /mp:FULLY QUIALIFIED SERVERNAME SMSSITECODE=SITECODE

Replace everything in bold with your own details.