Introduction
This is not one of the usual topics I blog about, but nonetheless it’s quite relevant. If you leverage Conditional Access to protect your corporate resources, good chances are that you are blocking legacy authentication (or at least that is something you should consider doing).
If you also fancy connecting to Exchange Online using Powershell for automation reasons, another good chance is that this is done with basic/legacy authentication. This is obviously a conflict with my first statement, so I figured it would make a good blog post to describe how to connect to Exchange Online automated with Modern Authentication while being protected by Conditional Access.
Basic Authentication
Connecting to Exchange Online with basic/legacy authentication is pretty straightforward and is covered here: LINK
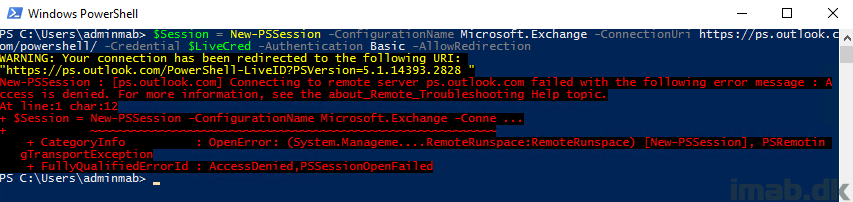
In short, the authentication used here is obviously not Modern Authentication (ADAL), as we can notice the -Authentication parameter is set to basic, and if connecting to Exchange Online using this method while blocking legacy authentication with Conditional Access, you will see following error:
“New-PSSession : [ps.outlook.com] Connecting to remote server ps.outlook.com failed with the following error message : Access is denied. For more information, see the about_Remote_Troubleshooting Help topic”
Modern Authentication
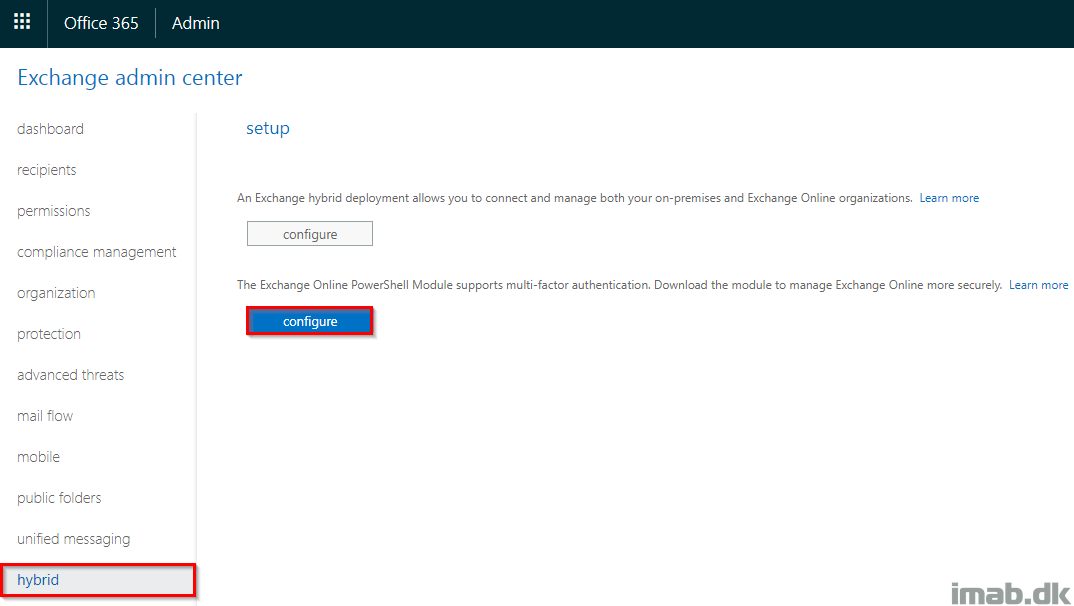
Now, connecting to Exchange Online using Modern Authentication is another story and requires a separate Powershell module. This module is available for download through the Exchange Admin Center via admin.microsoft.com. Go fetch. The download is called Microsoft.Online.CSE.PSModule.Client.application
When logged into the Exchange Admin Center, you will find the download available from the hybrid menu as shown below:
Note: The download and installation has to be done with Internet Explorer or Edge and can be a somewhat annoying task depending on your setup.
The module is installed into %localappdata%\Apps which also can be rather inconvenient, only making it available for the user profile that downloaded and installed it.
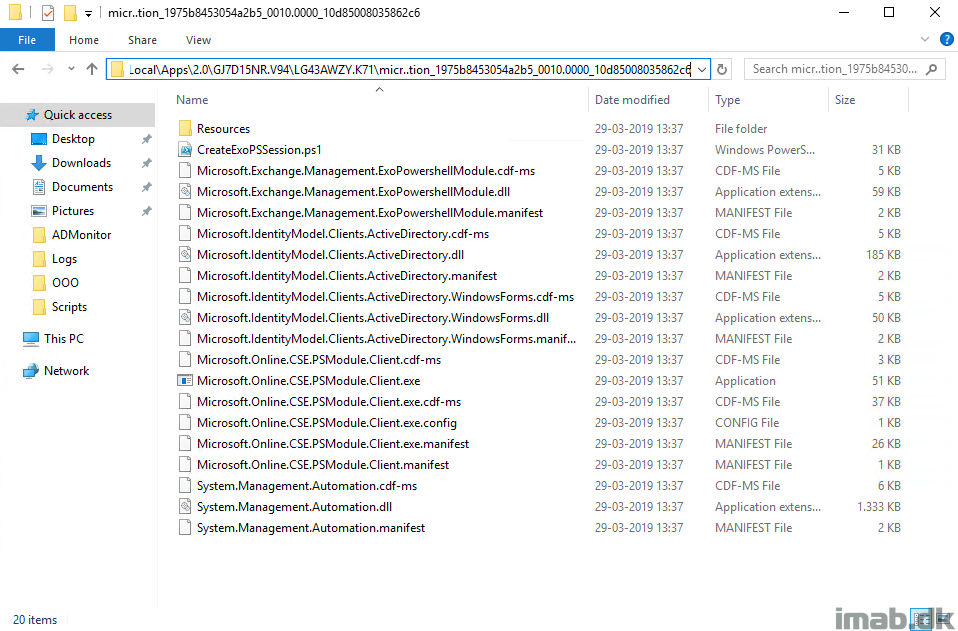
The content of the entire download and installation looks like below.
Using the Module
Putting the actual module to use is the next task here. What I like to do first though, is to copy out the entire folder from above to another location. The current location in %localappdata% doesn’t make sense to me, and I rather want it stored differently.
Here I’m storing it in my OneDrive, making it available to me on any device:

Also, before being able to authenticate we need a set of credentials. I have covered this in previous posts, but if you need to do something automated you need to include an automated way of authentication.
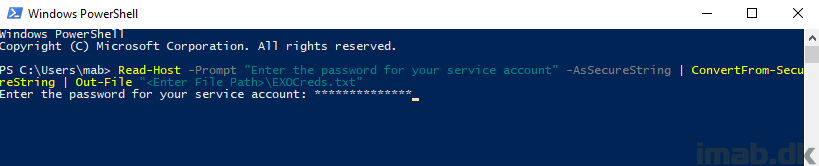
This can be done with this line of Powershell, converting the password of your admin account into an encrypted secure string:
Read-Host -Prompt "Enter the password for your service account" -AsSecureString | ConvertFrom-SecureString | Out-File "<Enter File Path>\EXO-ADAL.txt"
On to the loading the actual module. And this was the tricky part, which isn’t documented anywhere on Microsoft Docs. Loading the module is done with following Powershell script.
Change following in your end:
- Path to the module binaries. I’m storing it in my OneDrive. Change to fit your needs
- adminUPN: This is your admin account
- adminPwd: This is the path to the EXO-ADAL.txt created previously
# Path to the Exchange Online module binaries - change this to suit your needs
$ModulePath = "C:\Users\mab\OneDrive\Documents\WindowsPowershell\Modules\CreateExoPSSession"
# The primary Exchange Online module dll
$ExoDll = "Microsoft.Exchange.Management.ExoPowershellModule.dll"
# Store module into variable
$GetModule = (Get-ChildItem -Path $ModulePath -Filter $ExoDll -Recurse).FullName | Select-Object -First 1
# Import modules
Import-Module $GetModule
# Credentials as secure string
$adminUPN = "Admin@YourTenant.onmicrosoft.com"
$adminPwd = Get-Content "C:\Users\mab\OneDrive\Documents\WindowsPowershell\PSKeys\EXO-ADAL.txt" | ConvertTo-SecureString
$Creds = New-Object -TypeName System.Management.Automation.PSCredential -ArgumentList ($adminUPN, $adminPwd)
# Establish the Powershell session
Get-PSSession | Remove-PSSession
$EXOSession = New-ExoPSSession -UserPrincipalName $User -Credential $Creds
Import-PSSession $EXOSession
Powershell ISE and scripts
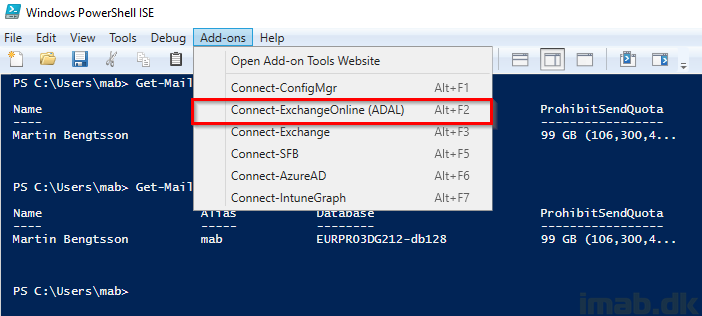
Finally, if you take all of that goodness and use it like I explained in my previous post here: https://www.imab.dk/connect-to-microsoft-graph-for-intune-with-powershell-ise-add-ons-with-a-single-click/
You will find yourself with a solid way to authenticate and automate against Exchange Online in a secure manner using Modern Authentication while still being protected by Conditional Access.

You should always use the Powershell module from the echange online portal as this gets updates regularly. This way you always have the latest cmdlets ar your disposal.
Other than that it’s a great way to quickly connect from several machines.
I agree, but I still don’t fancy the binaries being put in localappdata so either way I’d rather update it manually when I need to 🙂 Thanks for the feedback – always appreciated 🙂
Nice with ADAL, but i have MFA on my admin accounts and when i use MFA in Powershell ISE it hangs after i while… any solution for that?
Amazing, Thanks! Why does MS not have clear documentation for accessing powershell EXO via modern auth programmatically.. everything else i’ve seen assumes user interaction.
Is there any way to apply the same logic for MSOL Module as well?
Thanks!
Isn’t MSOL being deprecated? 😮 but yet, thats possible as well.
Well that’s true but the AzureAD module doesn’t yet have all functionalities of MSOL. Can you please advise on how I can implement the same method for MSOL module? I believe the module path is “C:\Program Files\WindowsPowerShell\Modules\MSOnline” but what are the other parameters that I need to load?
Thanks for this great work. Quick question when I try to automate this code with task scheduler I get the bellow error otherwise this method works perfectly. Do you have any advice on how to get passed the below error?
PS>TerminatingError(New-ExoPSSession): “Showing a modal dialog box or form when the application is not running in UserInteractive mode is not a valid operation. Specify the ServiceNotification or DefaultDesktopOnly style to display a notification from a service application.”
New-ExoPSSession : Showing a modal dialog box or form when the application is not running in UserInteractive mode is
not a valid operation. Specify the ServiceNotification or DefaultDesktopOnly style to display a notification from a
service application.