Introduction
Some time last year, I wrote a blog post on how I moved away from traditional driver management with Configuration Manager, into a more ‘modern’ approach using regular packages.
- Find this post here: Almost Modern Driver Management with ConfigMgr and Powershell
Then a few days ago, I stumbled upon a twitter conversation with some very clever people, mentioning how they compressed some of their deployments of huge application into .zip files. The conversation moved on, and some more clever people mentioned the idea of compressing the binaries with WIM.
- Find the entire twitter conversation here: https://twitter.com/acjuelich/status/1284327742062899200
That got me intrigued, so I wanted to explore that option on my own. The result is obviously this blog post. 🙂
P.S. For good measures and all: Compressing binaries with WIM to use with ConfigMgr was not my idea nor invention. This is just me exploring, learning and sharing that experience with anyone who’s interested.
Quick look into the past
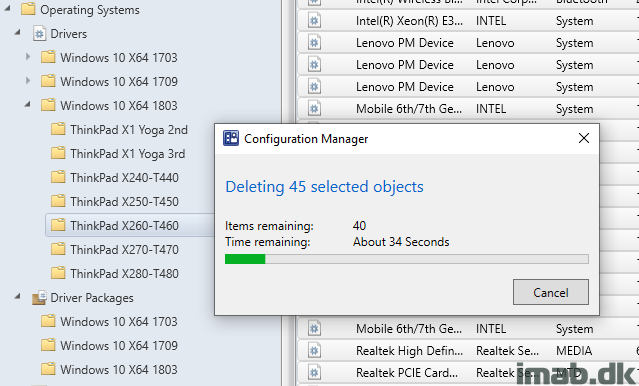
Not too long ago, I did this to my environment; I deleted each and every driver and driver package that existed within ConfigMgr.
Instead I moved into regular packages and never looked back. Everything is explained in details in the post I reference above.
Moving into WIM
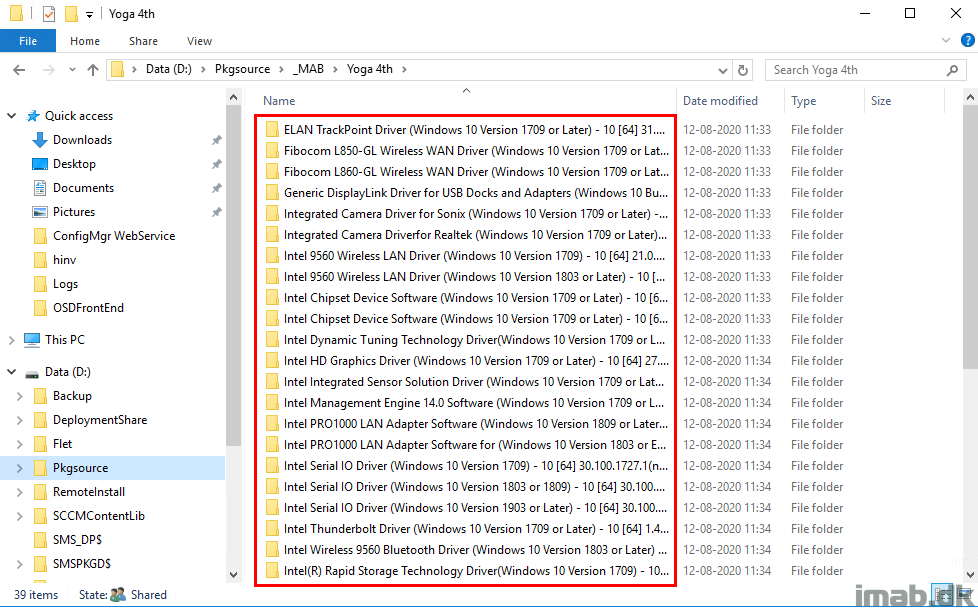
First step in this new journey, is to compress your driver binaries into WIM. Most people will already have the driver binaries logically sorted somewhere, so this is the easy part.
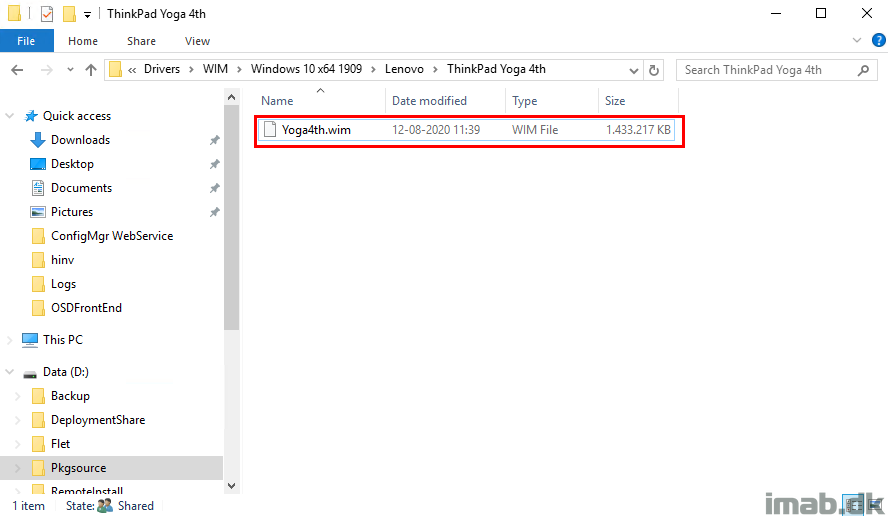
Below is an example, where I have exported all the drivers used by a Lenovo ThinkPad X1 Yoga 4th. You will have something similar I assume.
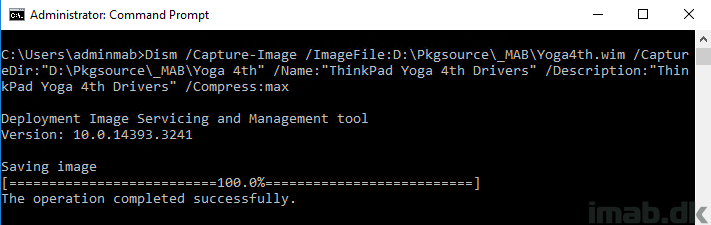
So in order for me to compress all of those files into WIM, I’m going to leverage DISM.exe. Whether you are leveraging dism.exe directly or the Powershell equivalents is your educated decision.
This is the dism.exe command I used specifically for the directory shown above:
- NOTE: /Compress:max is up to debate and you might be better off skipping that, if you are using deduplication. People more clever than me, can elaborate on that topic.
dism.exe /Capture-Image /ImageFile:D:\Pkgsource\_MAB\Yoga4th.wim /CaptureDir:"D:\Pkgsource\_MAB\Yoga 4th" /Name:"ThinkPad Yoga 4th Drivers" /Description:"ThinkPad Yoga 4th Drivers" /Compress:max
The dism-command running will yield a result similar to below example:
The final .wim file will be similar to my example below:
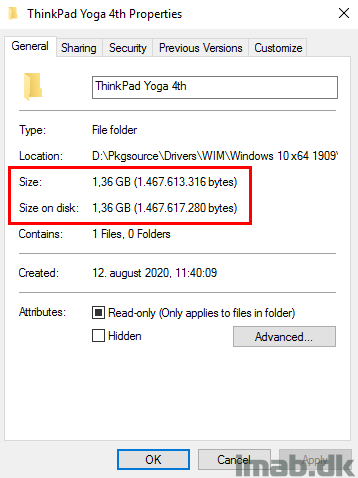
A quick before and after comparison of the compression with WIM. The disk space savings are quite significant if you ask me. 🙂

Packages and Task Sequences
So how do I use all of this witchcraft in my own environment?
- NOTE: I’ve chosen to take on the most simple approach I could think of. You can add whatever complexity is required, in order for proper error handling and more. For now this is just telling the ‘Drivers as WIM’-story.
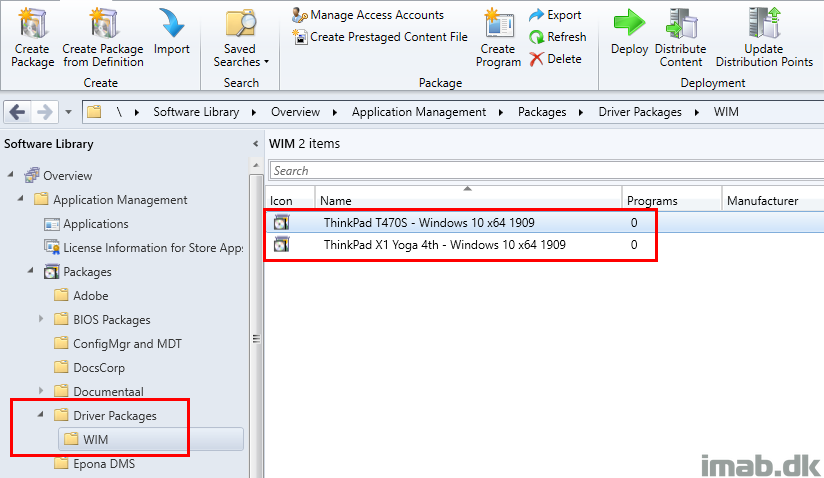
The newly created .wim file is used with regular packages as well. Everything standard ConfigMgr. Below an example of packages containing one .wim file each. No program is needed.
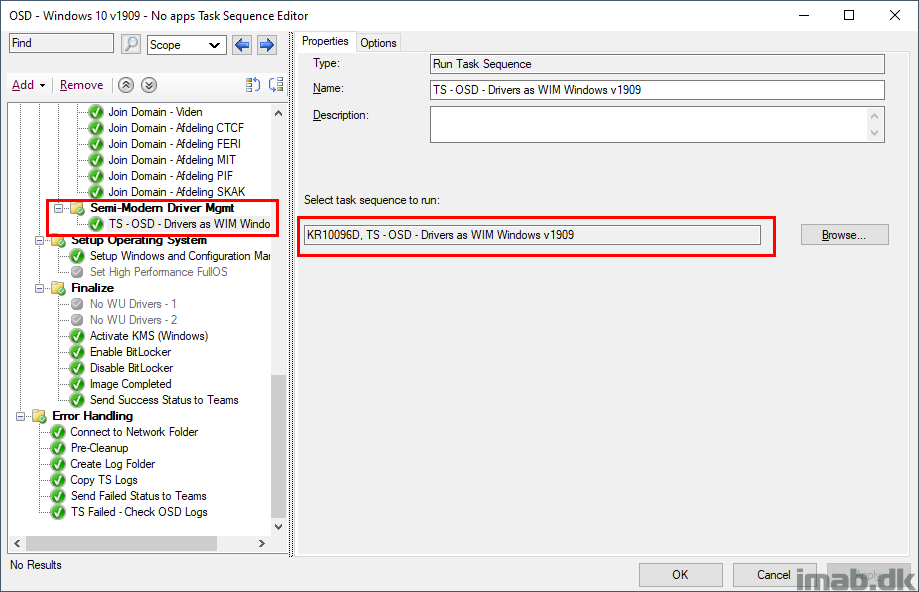
The main Task Sequence is referencing a nested task sequence.
Note that, this is still in WinPE and thus BEFORE Setup Windows and Configuration Manager.
Nested Task Sequence
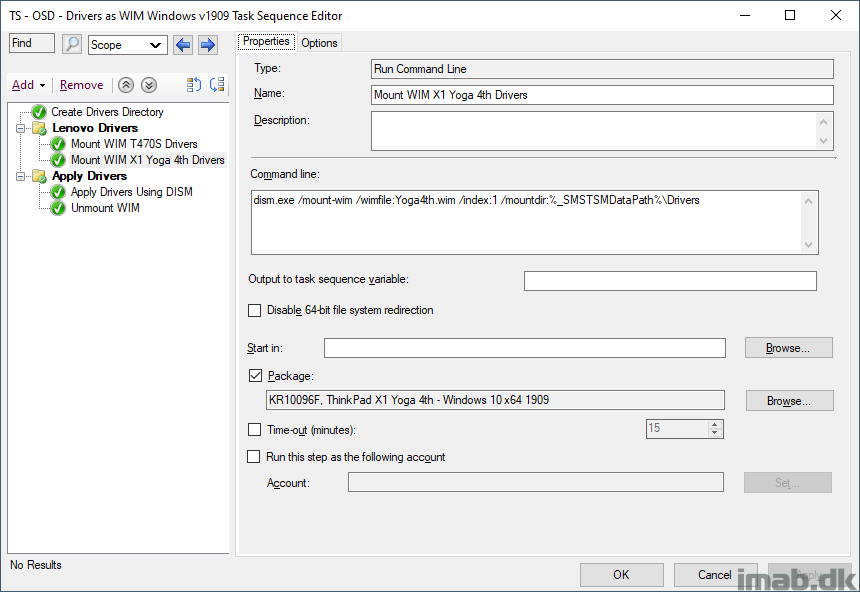
The nested task sequence is the interesting part, so this paragraph is broken down in each step.
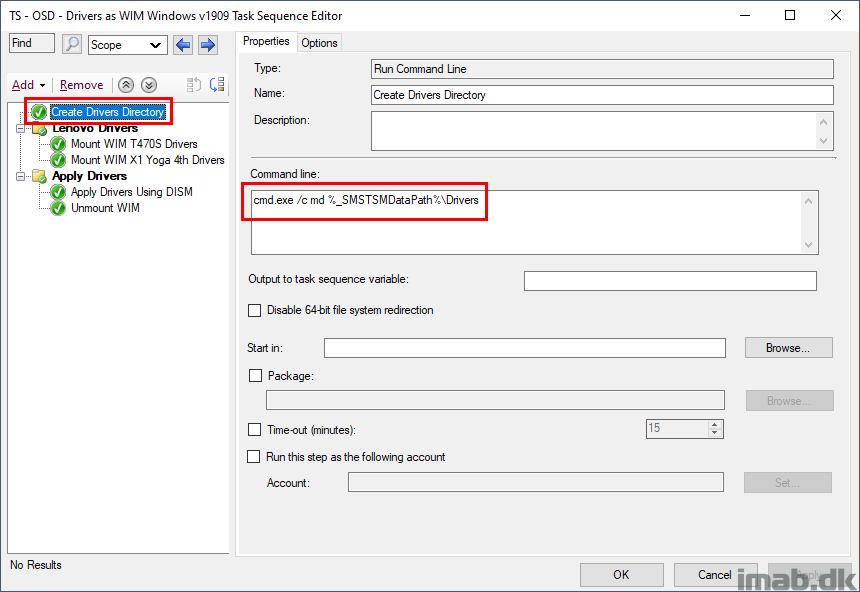
Create Driver Directory
This step is simply creating the directory, to where we are going to mount the .wim content. I create the directory within the task sequence cache directory.
cmd.exe /c md %_SMSTSMDataPath%\Drivers
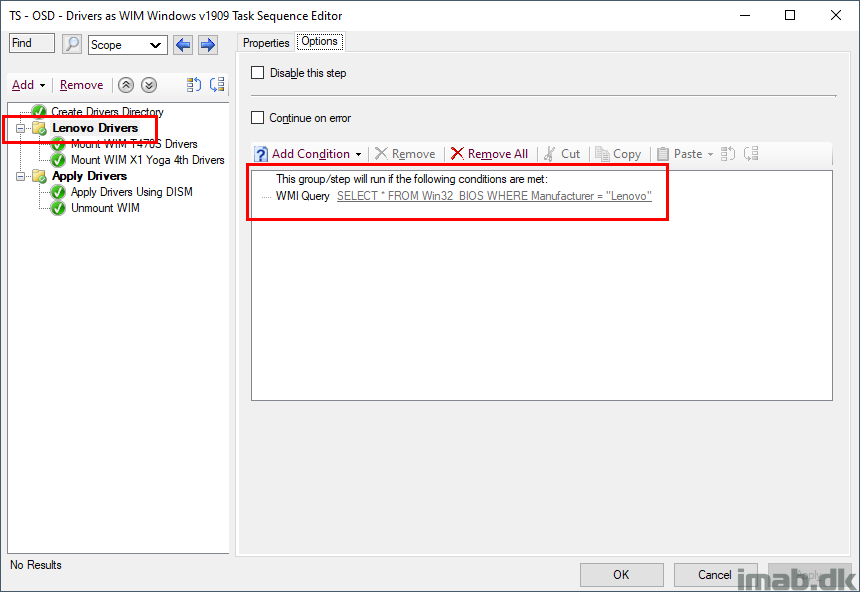
Lenovo Drivers
This step is just a new group, making sure the sub-steps is only carried out by Lenovo hardware.
SELECT * FROM Win32_ComputerSystemProduct WHERE Version = "ThinkPad T470S"
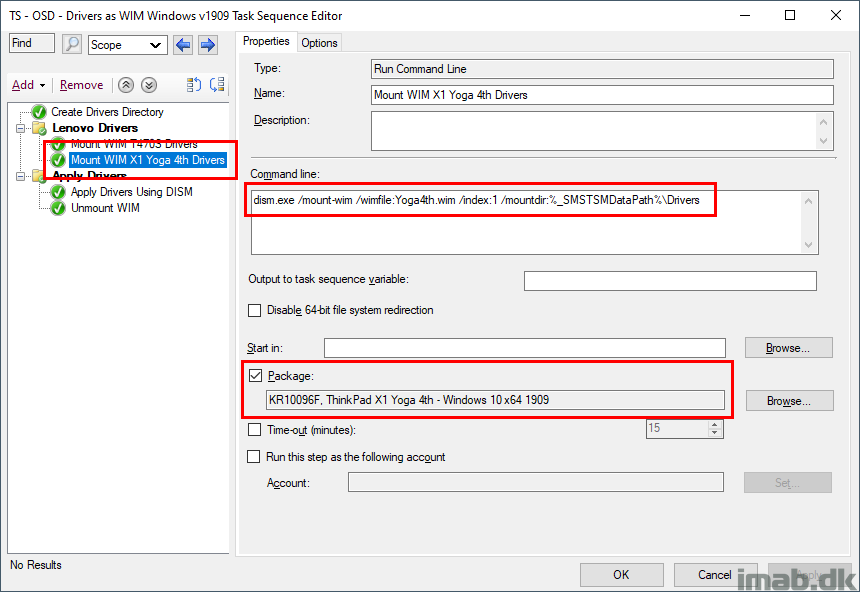
Mount WIM X1 Yoga 4th Drivers
This step is mounting the .wim file, and makes the content available in the directory we created in the first step.
dism.exe /mount-wim /wimfile:Yoga4th.wim /index:1 /mountdir:%_SMSTSMDataPath%\Drivers
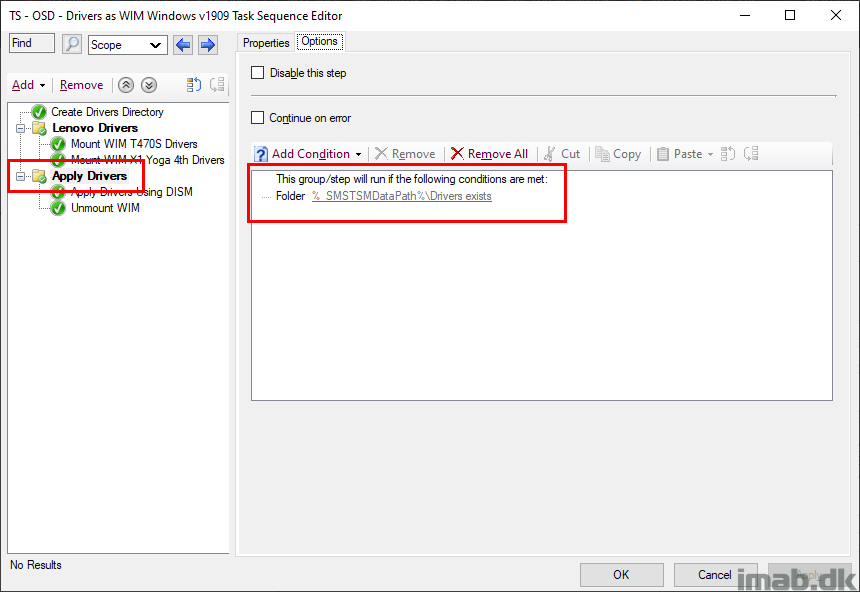
Apply Drivers
Another group, making sure that the sub-steps is only carried out if the drivers folder exists.
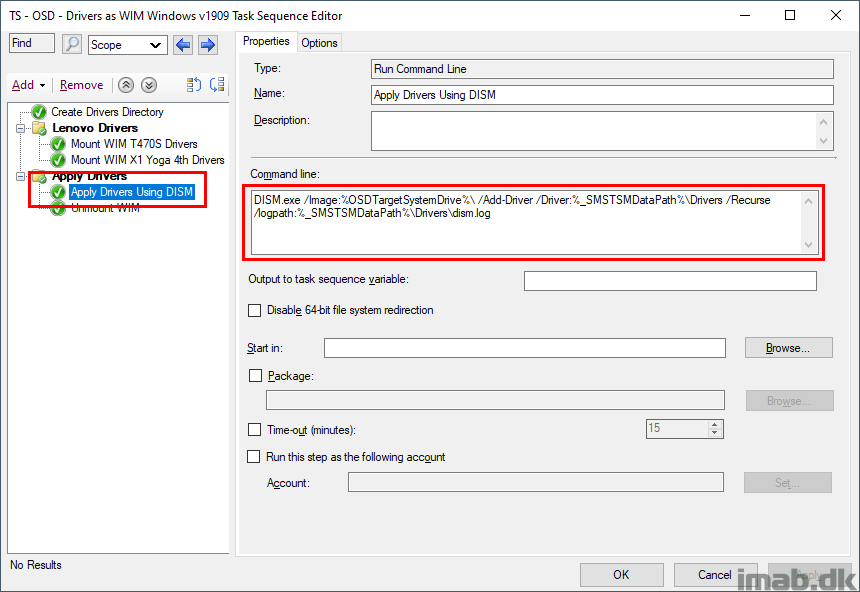
Apply Drivers Using DISM
This is where the drivers in the mounted WIM are being injected into the offline image. Delicious.
DISM.exe /Image:%OSDTargetSystemDrive%\ /Add-Driver /Driver:%_SMSTSMDataPath%\Drivers /Recurse /logpath:%_SMSTSMDataPath%\Drivers\dism.log
Unmount WIM
Unmount the WIM yet again and discard whatever is left. The drivers are no longer needed and this basically cleans itself up.
dism.exe /unmount-wim /mountdir:%_SMSTSMDataPath%\Drivers /discard

Conclusion
This will speed up OSD quite a bit, as well as save you some space on your hard drives.
Also, ZIP needs to be extracted. WIM does not. WIM only needs to be mounted. This means less space needed and less work in order to clean up.
ENJOY 🙂
Good one. I will do the same for Lenovo and Dell hardware. Do, I need to create multiple nested TS for Lenovo and Dell brands?
Thanks
Ram
Hi, I would just stick to a single nested TS with the proper conditions 🙂
Good Stuff !!
Thank you! 🙂
I just finished redoing all my driver by zipping them. I tested and this technique results in a smaller file size.
Great post Martin. I am testing this out, and ran into an issue in which I was getting “Error 1920” relating to signatures when attempting to apply the drivers. I resolved it by using the “/EA” (“Extended Attributes”) DISM parameter when capturing the driver WIM.
Great details. I’ll make a note of that. Thank you.
Hi Martin,
Just a quick question about creating the package.
I assume you choose “Dot not create program” when you create the package.
But how/when do you point out the .wim file then?
Cause if you just add the file share in the Data Source, how can SCCM know it’s the .wim file it shall use?
Hi, right, no program. I explicitly call the .wim file by name when I mount it. I’m not doing it exactly as decribed in the post, but close though. Would you be interested in having direct exported copies of my task sequences?
Hi Martin,
Yearh, that would be great!
I assume you have my e-mail 🙂
Hi Martin!
Following this guide I’ve manage to reduce the driver size from approx 30GB to 10GB+ , i’ve used the max compression as you setup, and i’ll give that a try.
Not so interested in saving storage on the site, its more that my customer needs the task sequence exported as standalone media aka booting for usb-drive on remote locations with slow network connections.
Love the site and your content – if you have the chance i would love to have a copy of your sequence for reference to my build up.
Hi Martin,
That would be awesome!
You can just send me a mail – I assume you already have it 🙂
I followed the instruction on this article but i cannot make it work.. could you send me a copy of the TS you’re using please?
I couldn’t get it to work either, as far as I can tell it fails at mounting the WIM file. I’ve tried everything, it’s just not working.
Does anyone have any information on the difference in performance between the two methods? Just curious.
Sune Thomsen did some comparisons on Twitter with WIM coming out slightly faster (and also better on the disk space): https://twitter.com/SuneThomsenDK/status/1293906541930659844
Hi Martin, great post. It really shaved off some good minutes from a time point of a view and a few good gigs from a size point of view.
I was wondering if you ever encountered this error, while trying to mount the wim file:
ProgramName = ‘dism.exe /mount-wim /wimfile:Drivers.wim /index:1 /mountdir:D:\_SMSTaskSequence\Drivers’
SwdAction = ‘0001’
ResolveSource flags: 0x00000000
SMSTSPersistContent: . The content for package xxxxxxxx will be persisted
Package location: _SMSTSxxxxxxx, file:VOL001:\SMS\PKG\xxxxxxx
Searching C:\ for Fullmedia content
Searching D:\ for Fullmedia content
Found Fullmedia content in drive D:\.
Resolved source to ‘D:\SMS\PKG\xxxxxxx’
Command line for extension .exe is “%1” %*
Set command line: Run command line
Working dir ‘D:\SMS\PKG\xxxxxxx’
Executing command line: Run command line with options (0, 4)
Process completed with exit code 3242328351
Deployment Image Servicing and Management tool
Version: 10.0.18362.1
Error: 0xc142011f
The volume of the specified mount path does not support reparse points. Please mount to a volume that supports reparse points.
Command line is being logged (‘OSDDoNotLogCommand’ is not set to ‘True’)
Command line dism.exe /mount-wim /wimfile:Drivers.wim /index:1 /mountdir:D:\_SMSTaskSequence\Drivers returned 3242328351
ReleaseSource() for D:\SMS\PKG\xxxxxx.
The user tries to release a source directory D:\SMS\PKG\xxxxxxxx that is either already released or we have not connected to it.
Process completed with exit code 3242328351
Failed to run the action: Mount WIM: Dell.Latitude.E7250/7250.A08. Error -1052638945
From what I understand is because the D drive is not NTFS formatted, but I cannot understand where D drive is getting formatted, as we only format C drive as the only drive, during the TS.
We encounter this error from time to time, different models of laptops.
Thank you
Hi Martin,
It’s working great! But do you have something similar (TS) to update bios on HP machines?
Thanks !
Hi! I’m afraid I do not. We don’t have any HP devices. 🙂
Great solution, thanks for sharing it ! The space saving is huge for my situation.
One question, we sometimes need to use Offline imaging in my company, and the drivers are not installed when using the same TS that works great with PXE.
Do you know a workaround to have drivers applied correctly with a standalone boot media using the same TS ?
Thanks
This worked beautifully! Time to convert all of my driver packages!
Thanks Martin 🙂
Works like a charm!
The one suggestion I might add to the process is to maybe use a different directory to store the ‘apply DISM’ log than the one that is being used to mount the WIM. This will make sure the DISM log is still accessible once the WIM is unmounted and also not error out if the unmount process is triggered while the DISM log is still open (if someone is actively reading the log or anything).
Thanks!
Are all the drivers inside the WIM applied to the OS or just the drivers the OS thinks it needs for the hardware? We like to use one driverpack to rule them all and with HP there are quite a few overlaps so no need to have a seperate driverpack for all the different types, buyt just wondering if Conexant audio drivers would be applied if a Realtek audio driver is needed
What about windows In place Update Scenario, has anyone managed to do with this approach?