Introduction
This is an extremely hot topic and I do know that we have some awesome OSD experts out there sharing their content already (Gary Blok, Mike Terrill etc.). Now, their content is way superior to mine and probably suit a lot of needs already, but I think that content around WaaS in particular is interesting and especially when sharing how one does Windows Servicing in details.
So, this is me doing just that – sharing my precaching and in-place upgrade task sequences – in details. This will be a lengthy post, so grab a good cup of coffee ?
Also, this is based on a mid-size company in Denmark and we don’t manage thousands and thousands of devices. WaaS is a small part of my daily job and I’m the only one doing it, so the time and effort put into this is reflecting the size of the company and the resources available, but is still done with an eye on the detail. With that being said, some of the stuff I do here is done with inspiration from how some of the mentioned people does it (credit where due during the posts). If you find yourself in similar position or just need some more inspiration – then this will be for you 🙂
In-Place Upgrade Task Sequence
This is where the actual upgrade takes place, following some other actions like flashing the BIOS, updating of applications etc. With my previous post, we made sure that all the content referenced by this very task sequence already exists in the CM cache. By doing so, we cut down the time the end user has to wait dramatically. Also, this enables us to allow the task sequence to be run from VPN, Direct Access or even over the Internet through our CMG without the need to download any content while being remote. Sweet! 🙂
As promised, this is my task sequence in details step-by-step. Some of the steps are explained in the PreCache post and some of them are self-explanatory. If they are, I’m not going to cover them again – apologies 🙂
The Task Sequence will also be available for download in the end of the post.
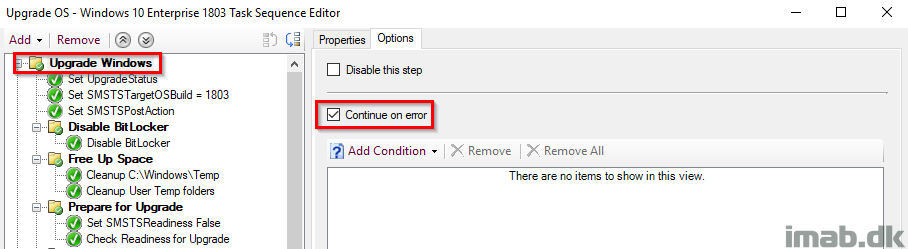
Upgrade Windows
This is the parent group for the entire IPU TS (In-Place Upgrade Task Sequence). This is configured with ‘Continue on error’, as error handling is done in the very end by ourselves.
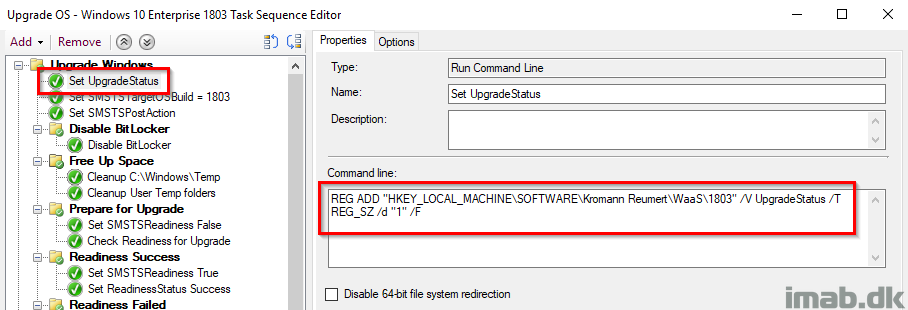
Set UpgradeStatus
This step sets the initial UpgradeStatus registry key to 1 indicating a failure. This is supposed to be overwritten later on when everything succeeds and we have verified that Windows 10 is now 1803 (or whatever version of Windows you are deploying). The idea is, that the upgrade is considered a failure until this key has been updated. More on this later on. Also, this is being picked up by hardware inventory for use with collections.
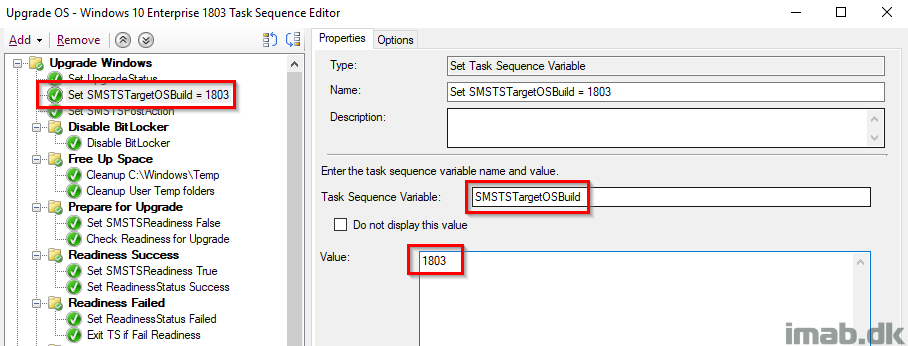
Set SMSTSTargetBuild
This sets the variable to the desired target build of Windows. This is used later on to fail the task sequence, in case Windows is NOT running 1803 in the very end. Also, this is done with inspiration from Gary Blok’s task sequence at garytown.com
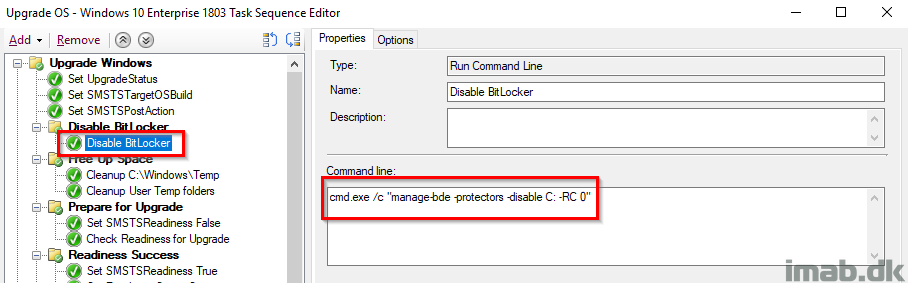
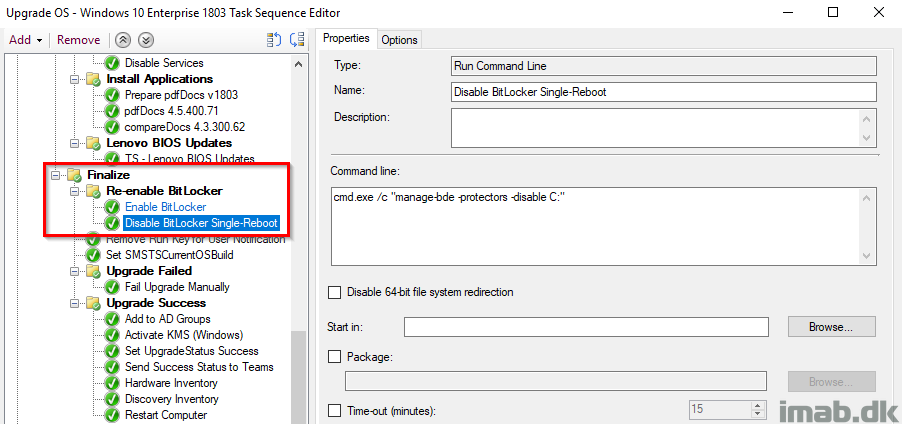
Disable BitLocker
This is probably controversial and some would argue it’s not required and that the Windows setup does this automatically, BUT I have still seen devices prompting for BitLocker PIN (Yes, we have devices with BL PINs 🙁 ) during the reboot, so I took the consequence of disabling BitLocker manually. Notice this is not done with the built-in step, but rather done with manage-bde and RC 0 (Restart Count) which disables BitLocker infinitely regardless of how many reboot.
Free Up Space, Prepare for Upgrade, Readiness Success
All of these steps are exactly identical to the steps in the PreCache Task Sequence with the exception of manually failing the TS if the Readiness Check is failing. I’ll elaborate further in the next section.

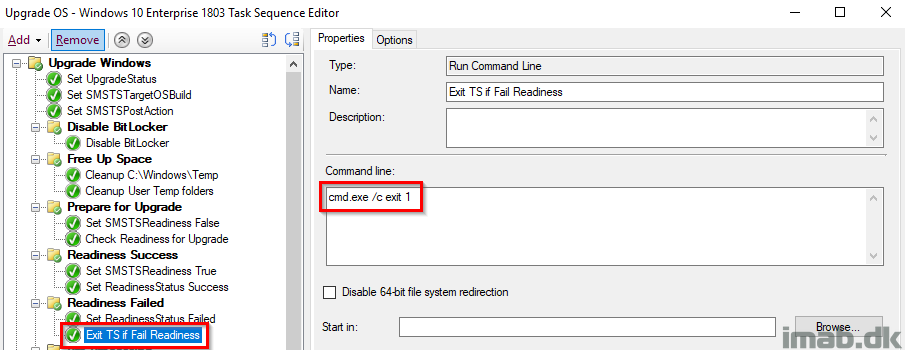
Readiness Failed
The group Prepare for Upgrade containing the actual Readiness Check has ‘Continue on error’ set as we want the TS to continue on to the next steps for proper registry tattooing for success or failure. That’s why we need to ‘manually’ fail the task sequence, forcing the TS to fail and move all the way to our error handling in the end.
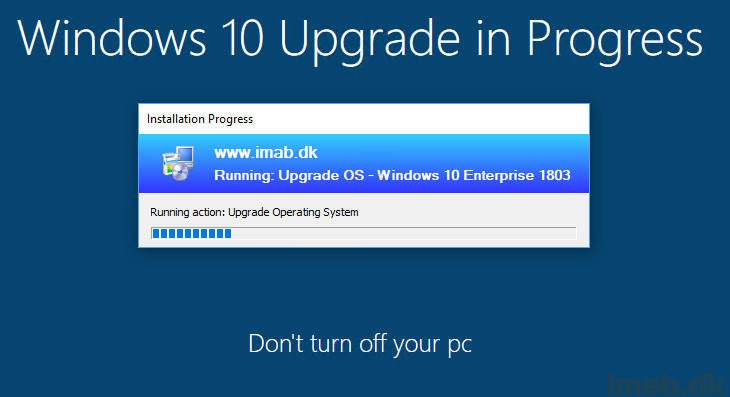
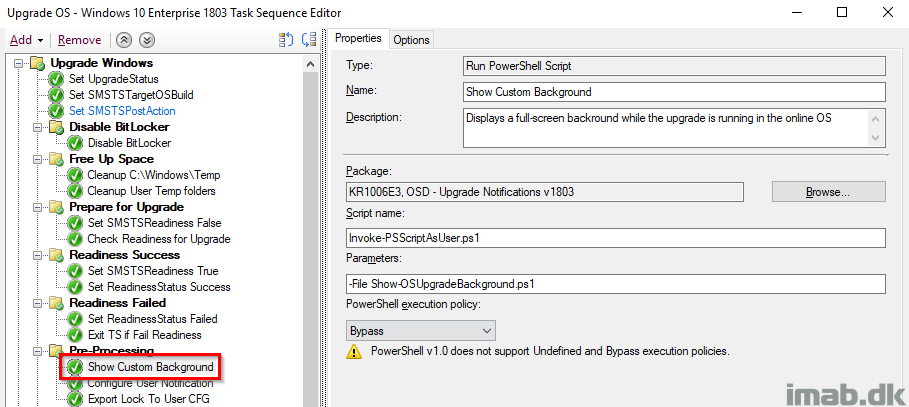
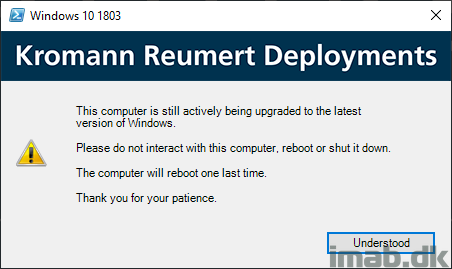
Show Custom Background
This is entirely Trevor Jones doing over at https://smsagent.blog/. This is creating a nice background, with some information for the user about what’s happening. Similar to how the native upgrade looks like at some stages. The script is running as the logged on user through another Powershell script.
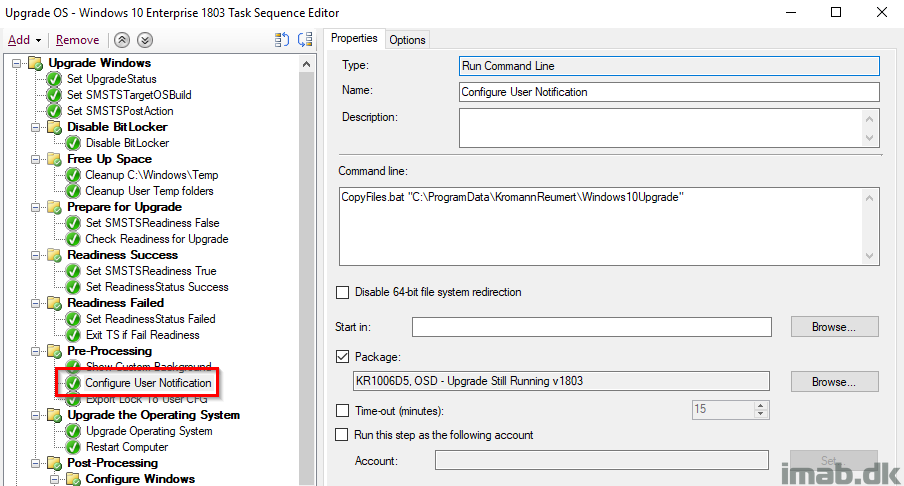
Configure User Notification
This step is essentially done with inspiration from Jason Sandy’s post on Per User Login Message: https://home.configmgrftw.com/per-user-login-message/. Difference is that I’m not using UI++, but Powershell App Deployment Toolkit for the notification. My users are used to seeing Powershell App Deployment Toolkit, so I figured I would use something they would easily recognize.
For your convenience, this is the message that is being displayed if the users logs on while the uprade is still running:
Post-Processing and Configure Windows
This is just me doing all sorts of configuring of Windows and updating of applications POST upgrade. This group only runs if _SMSTSSetupRollback equals False AND _SMSTSOSUpgradeActionReturnCode equals 0.
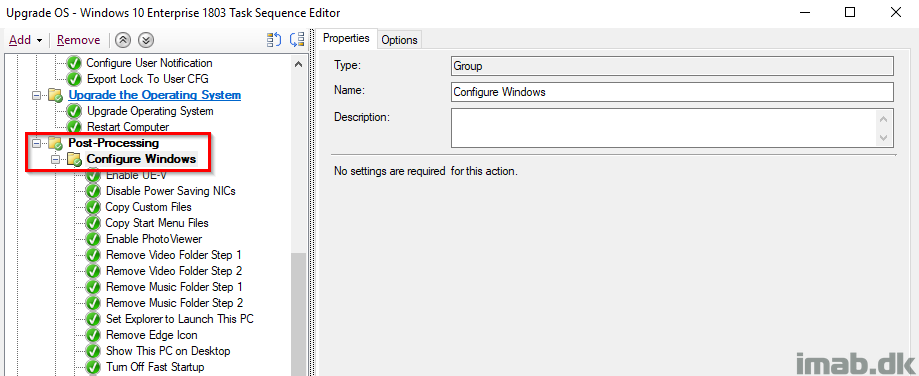
Finalize and Re-enable BitLocker
Finalize is a sub-group to Post-processing and thus only runs if everything supposedly ran without issues during the actual upgrade. I also re-enable BitLocker at this stage following the next reboot (I enable AND disable BitLocker but without -RC 0 which will enable BitLocker at next reboot).
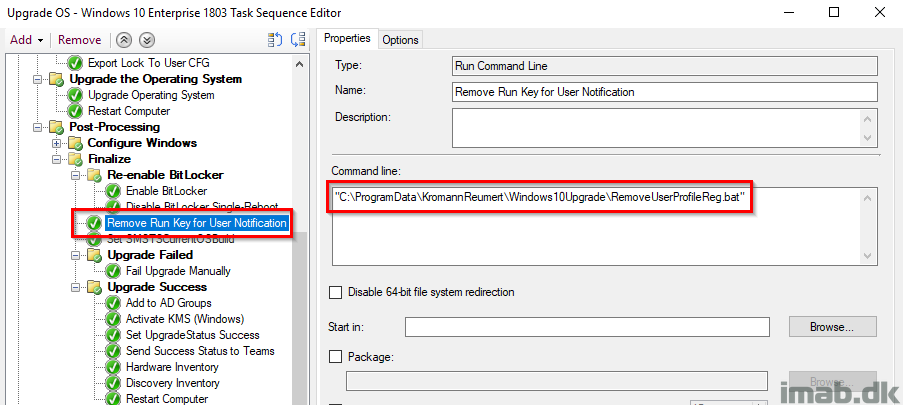
Remove Run Key for User Notification
Removing the run key once again for all user profiles so users no longer sees the message in Powershell App Deployment Toolkit.
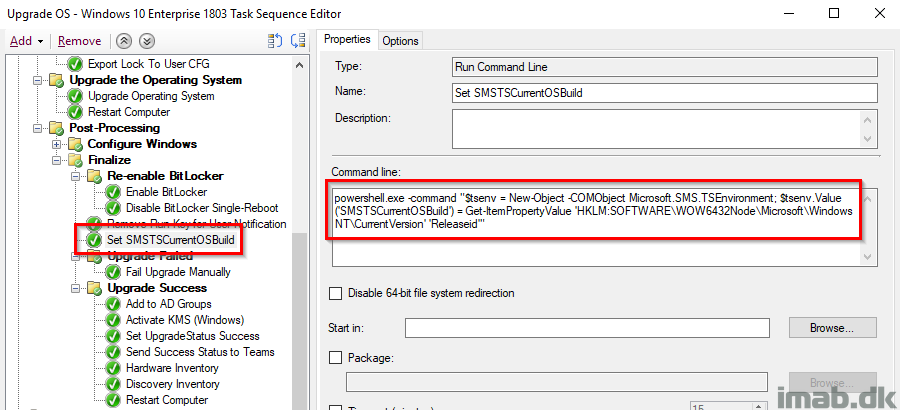
Set SMSTSCurrentOSBuild
Retrieving the actual Windows build number from the registry and store it into the SMSTSCurrentOSBuild variable. At this point we would expect this to be 1803 and can take actions accordingly based on that. Also, this is done with inspiration from Gary Blok’s task sequence at garytown.com
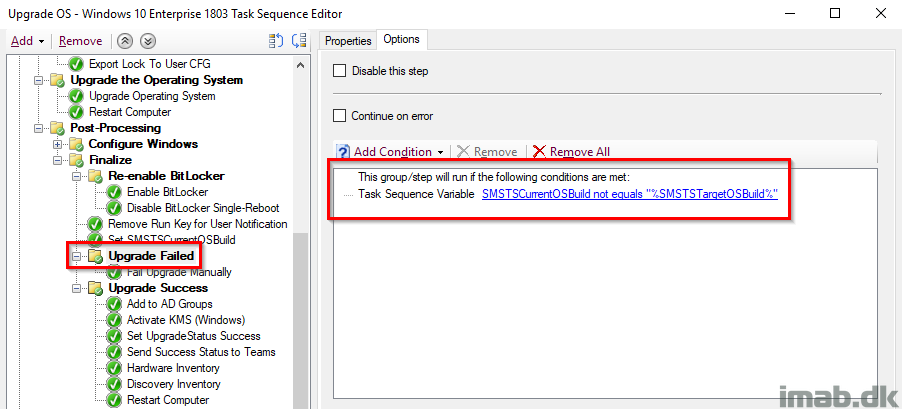
Upgrade Failed
This combined with the previous step is an additional check on whether the upgrade indeed was done and the build is now 1803. This group runs if the current OS build is NOT equal to what we initially set in the task sequence.
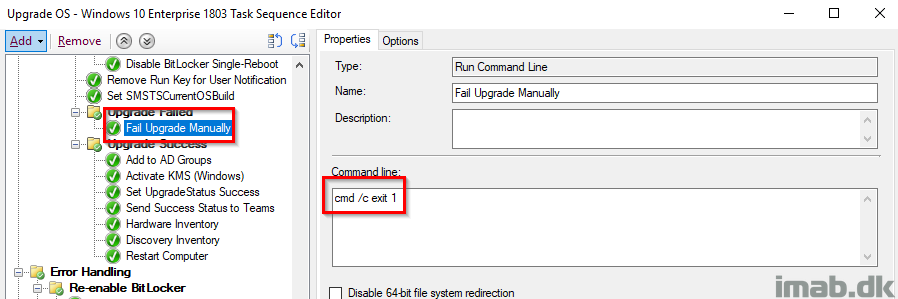
Fail Upgrade Manually
This step runs if the conditions on the group was met, which translates into that something is horribly wrong (the OS Upgrade seems to has run, but the Windows build is still not as expected)
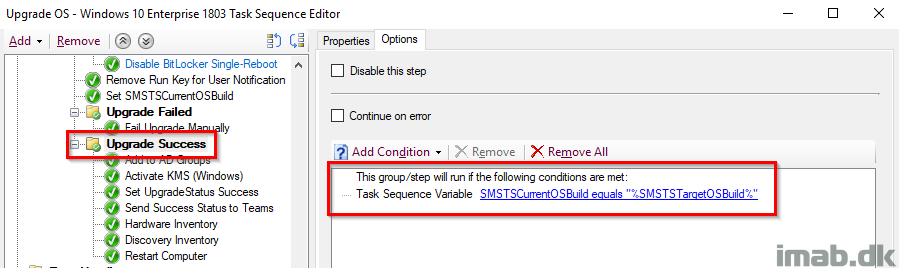
Upgrade Success
And on the contrary, this entire group runs if the Windows build turns out as expected and thus enables us to run some additional actions. This is paired with it’s parent group which together indicates both a SUCCESS on the actual upgrade AND the correct build number retrieved live from the registry.
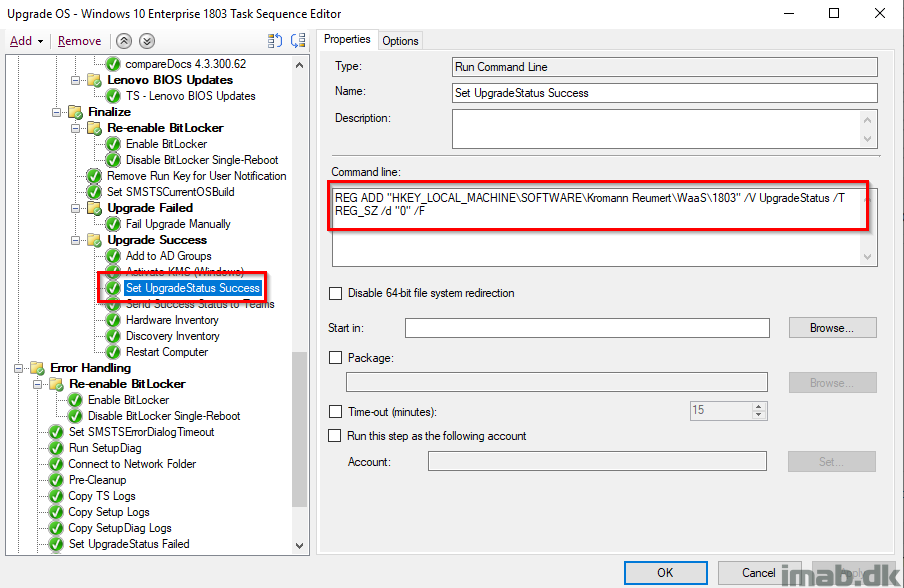
Set UpgradeStatus Success
At this stage we have verified that the _SMSTSOSUpgradeActionReturnCode returned 0 AND the actual Windows build is as expected, thus we tattoo and update the UpgradeStatus registry entry with 0 indicating a SUCCESS. This is still being picked up by hardware inventory.
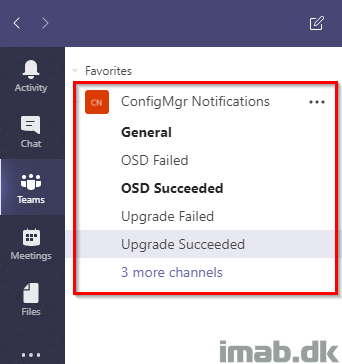
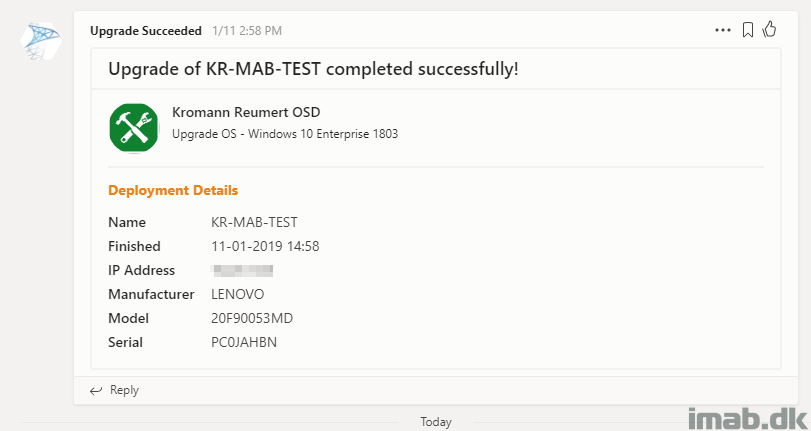
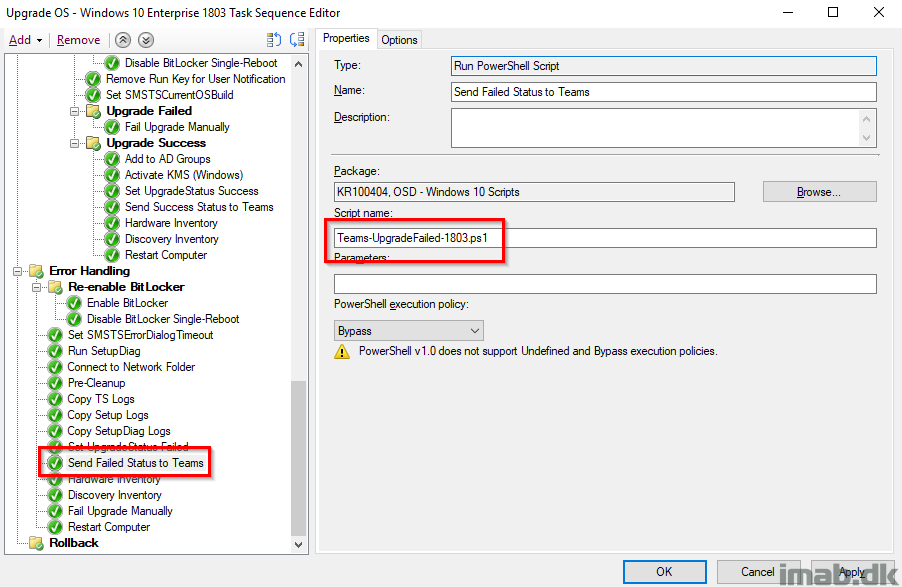
Send Success Status to Teams
This is Terence Beggs doing with this post: http://www.scconfigmgr.com/2017/10/06/configmgr-osd-notification-service-teams/. I’ve just extended this to be used with In-Place Upgrades, successes and failures, primarily with the intention of following the process from my mobile devices. I’m also adding some references to the log files in the message sent to Microsoft Teams.

For your inspiration and convenience, find some screenshots of the Microsoft Teams activity below as well as the different channels I have created for the purpose:
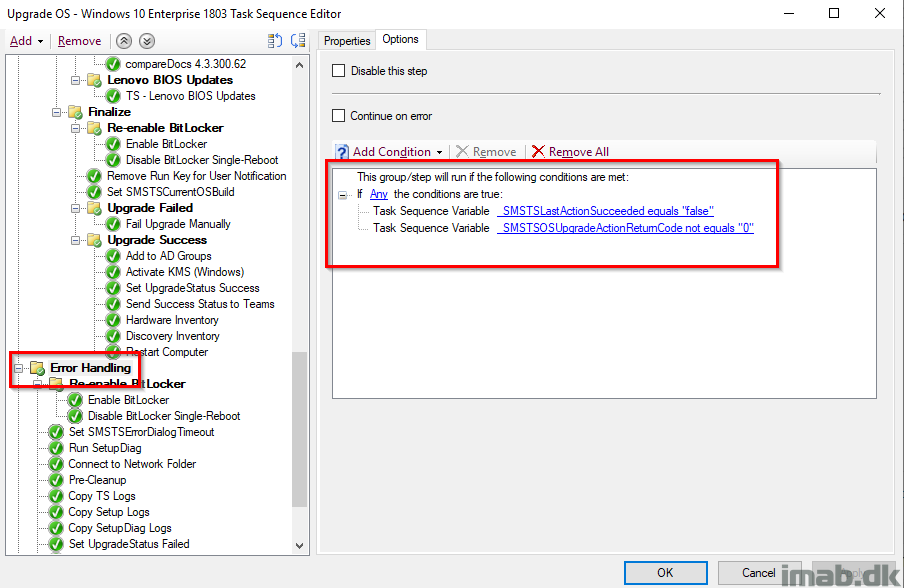
Error Handling
This is the part where we take care of errors. The entire group runs if _SMSTSLastActionSucceeded equals false OR _SMSTSOSUpgradeActionReturnCode not equals 0.
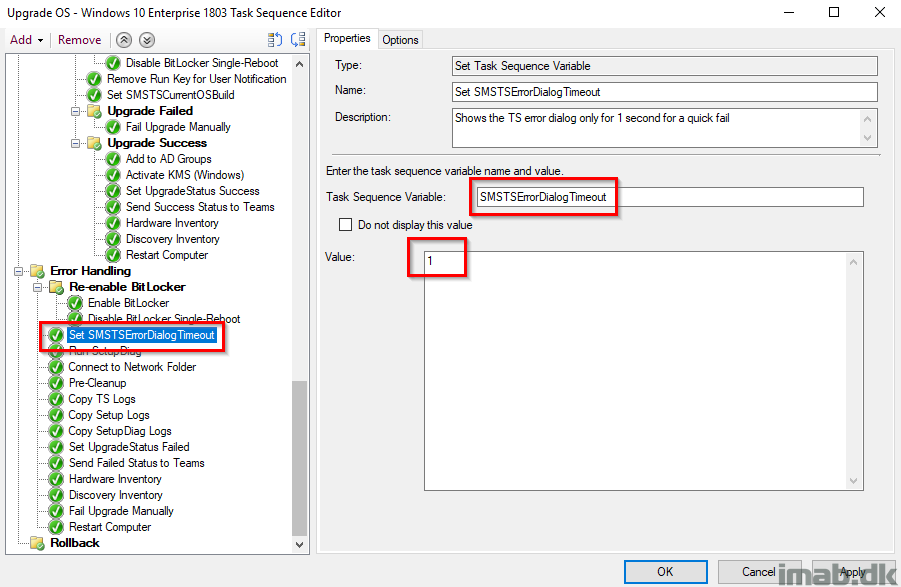
Set SMSTSErrorDialogTimeout
As the description says, this is set to have the task sequence to fail immediately without counting down from 15 minutes (If my memory serves me right, 15 minutes is the default here)
Run SetupDiag
This is running the diagnostic tool SetupDiag, which can be used to obtain additional details on why a Windows 10 upgrade failed. More about SetupDiag here: https://docs.microsoft.com/en-us/windows/deployment/upgrade/setupdiag
Note: I think some of this is done with inspiration from another post, but I’m not sure. I will make sure to update with proper credit when I know for sure.
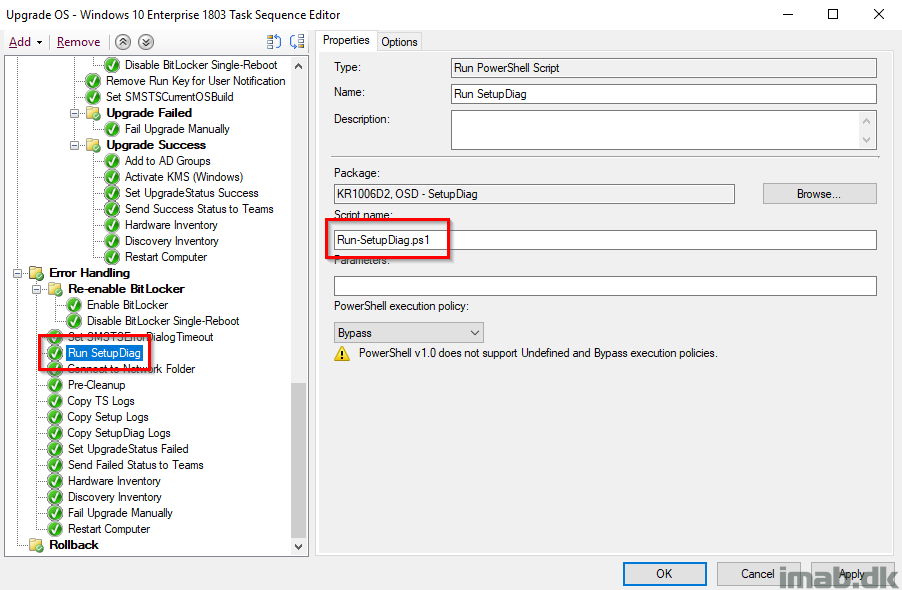
Run-SetupDiag.ps1
Here’s an example of a Powershell script running SetupDiag.exe storing the log files in the CCM log folder.
$LogLocation = Get-ItemProperty -Path "HKLM:\SOFTWARE\Microsoft\CCM\Logging\@Global" -Name LogDirectory | Select-Object -ExpandProperty LogDirectory

$ScriptPath = Split-Path $MyInvocation.MyCommand.Path -Parent

if (Get-ChildItem "HKLM:SOFTWARE\Microsoft\NET Framework Setup\NDP\v4\Full\" | Get-ItemPropertyValue -Name Release | ForEach-Object { $_ -ge 393295 })
{
    try
    {
        Start-Process -FilePath "$ScriptPath\SetupDiag.exe" -ArgumentList "/Output:$LogLocation\SetupDiagResults.log" -Wait -ErrorAction Stop
    }
    catch
    {
       "[ERROR] There was an error starting SetupDiag.exe: $_" | Out-file -FilePath "$LogLocation\SetupDiagResults.log" -Force
    }
}
else
{
    "[ERROR] .Net Framework 4.6 is required to run SetupDiag.exe" | Out-file -FilePath "$LogLocation\SetupDiagResults.log" -Force
}
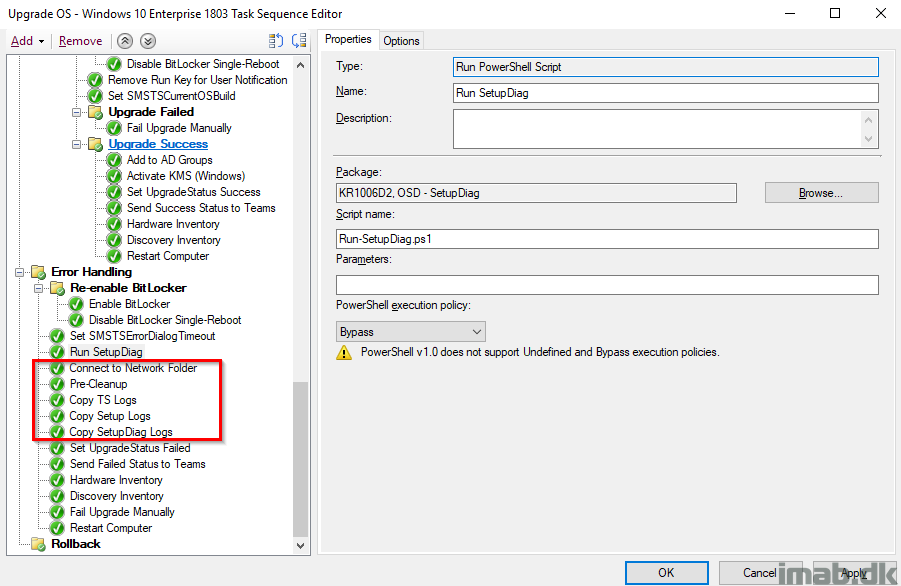
Connect to Network Folder and Copy Logs
This is almost identical to what is done in the PreCache Task Sequence, with the difference on copying SetupDiag logs as well.
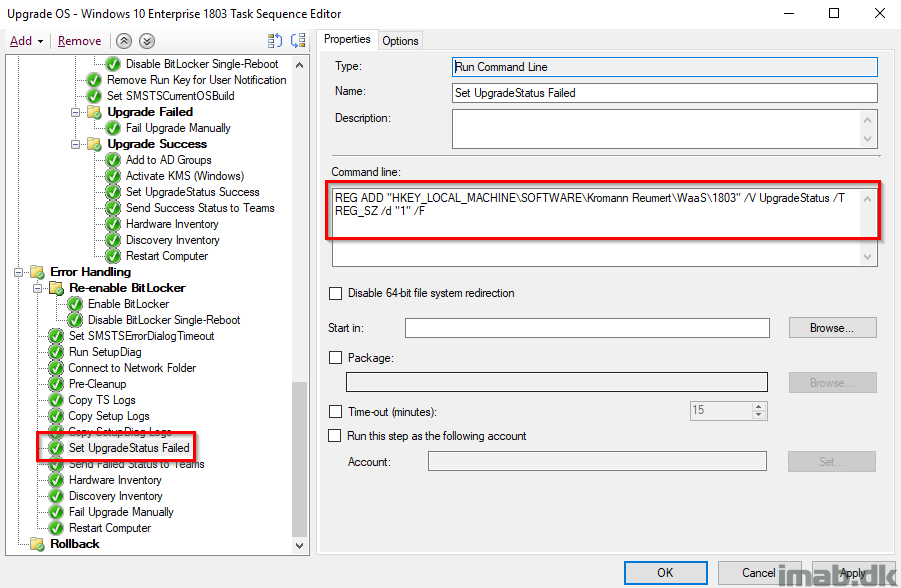
Set UpgradeStatus Failed
For good measures, I’m making sure that UpgradeStatus indeed is set to 1 indicating a failure. This is being picked up by hardware inventory.
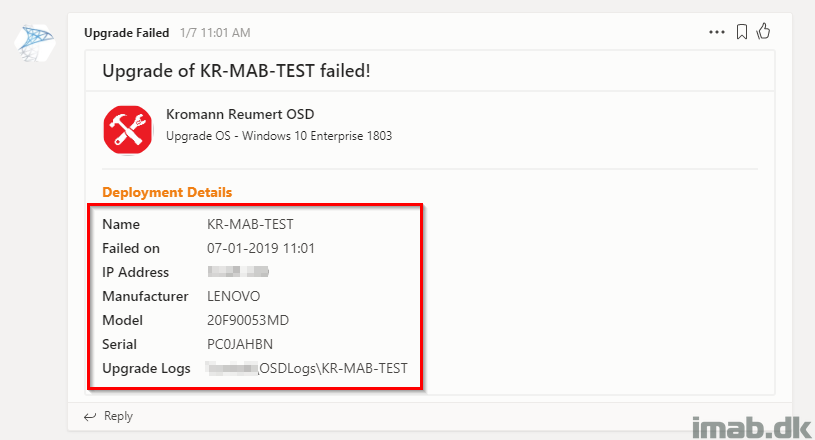
Send Failed Status to Teams
And again, sending the status to Microsoft Teams, this time with a message indicating a failure.
This time also including a link for the location of the log files:
More inspiration
In addition to the notifications in Microsoft Teams, the upgrade status is also written to the registry and picked up by hardware inventory and used with collections. (Note: It’s not picked up by default, you will have to extend hardware inventory to do that. Here’s an very old post of mine, sparingly describing how: https://www.imab.dk/extending-hardware-inventory-in-sccm2012/)
Deployment
Ideally and as I touched briefly in the PreCache post, the collection where ALL the checks has passed will be where you will deploy the actual IPU task sequence to. Another approach is obviously to create additional collections and then use this collection as a limiting collection. Everything as it suits your own environment.

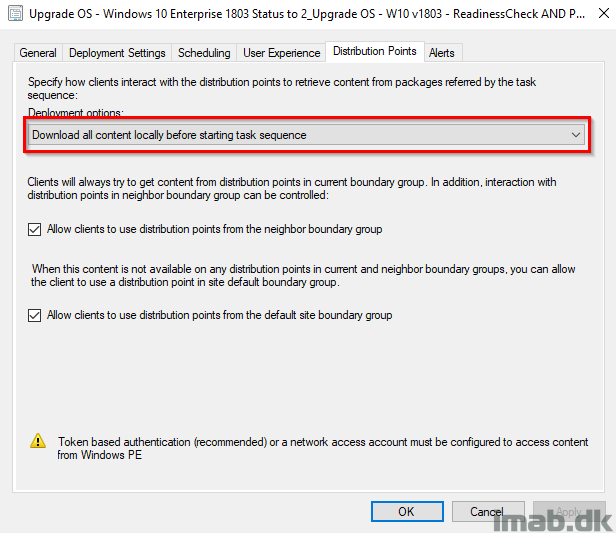
And when deploying the IPU task sequence, remember to deploy it with following deployment option: Download all content locally before starting task sequence. This will make sure that the content already in the CCM cache is used and that content is not downloaded yet again.
Download
Download my entire IPU Task Sequence here. Note that it’s exported without dependencies. I believe it’s the steps that are interesting here. Insert your own stuff where needed: imab.dk_IPUTS.zip (20071 downloads )
Let me know in the comment section below if you need anything elaborated or if anything is missing out. I will make sure to reply promptly 🙂
Enjoy 🙂
Really excellent tutorial
Thank you so much Andy 🙂
HI Martin, great stuff. SOme comments, but see them as positive comments 🙂 And stuff I added, changed
– OSUpgrade will only work on Dannish Locale. 🙂 SO I needed to fix that.
– I also ran into an issue where OSUpgrade failed due to a hardblock from CompatScan. (I know I should use your other Pre-Caching TS, and will do so) But since it failed, I was never notified due to the Show Custom Background from Trevor Jones. It simply kept on telling me “Windows 10 Upgrade in progress”. So I need to find a way to stop the Custom Background in the ErrorHandling Section. You have any idea what process to kill?
– I also disconnected the Z: drive after log copying. Otherwise you see this Z: drive still, its not persisten sure. BUt still 🙂
-You might want to copy the XMLs from the Compatscan as well. Logs don’t always show you the reason of the hardblock
– Seems that the smstslog copied is not always the latest. I miss the last minutes in the Logfile location. Cant figure out why.
– I also trigger WaaS Component Cleanup after an succesfull upgrade. TO free up space again.
schtasks.exe /Run /TN “\Microsoft\Windows\Servicing\StartComponentCleanup”
Hey, good ideas – I will probably update my stuff with some of it. The custom background can be killed simply by killing powershell.exe 🙂
Hi, thanks for this excellent guide. What about the trigger for hardware inventory? You set “SendSchedule {00000000-0000-0000-0000-000000000001}” but what sources do you need to launch this?
Hi Michael, this is the sendschedule tool which I’m also is referring to in the post 🙂 https://docs.microsoft.com/en-us/sccm/core/support/send-schedule-tool
You will need to create a package containing this tool 🙂
Thanks, i added the package
Other things as unneeded services and scheduled tasks? I see you only use few steps to disable those like the Remote Mobile Hotspot, WiFi Sense, XblGameSaveTask , …
And what’s inside your Set-Services-Disable.ps1 ?
I was thinking using a script like this https://github.com/W4RH4WK/Debloat-Windows-10/blob/master/scripts/disable-services.ps1 or something bigger like https://github.com/AdmiralTolwyn/Files/blob/master/Win10/ApplyWin10Optimizations/ApplyWin10Optimizations.ps1
I don’t think disabling almost everything is a good thing in a business environment when you encounter issues connecting to machine and you discover it’s one of those disabled services after hours of troubleshooting 🙂
Hey Michael, I disable services which we don’t want in an enterprise environment. Those are based on the recommendations from the Windows security baselines: https://docs.microsoft.com/en-us/windows/security/threat-protection/windows-security-baselines
It goes without saying, but this is obviously something you have to test yourself. Simply disabling everything is indeed a bad idea 🙂
*Publication test*
Beautiful, thanks for sharing.
Great Guide!
Do yo have an example of PowershellAppDeploymentToolkit you used for the “Configure User Notification” step in Pre Processing?
I do. It’s quite simple though. Can you reach out to me on twitter or similar? 🙂 it’s easier to just send you the entire PSADT content 🙂
Great guide!
Do you want to share PSADT with me also?
Absolutely, Drop me an email on mab@imab.dk 🙂
This is great, Martin! Would you mind sharing the PSADT content with me as well?
Hello, I’ve done the process with 3 TS’s & 4 or 5 collections. 1st TS downloads drivers silently, 2nd TS downloads OS (pre-cache) & runs Assessment scan silently (against dowloaded drivers) and 3rd TS executes only Upgrade, locally. TS’s has been deployed to 3 different collections and computers are moving forward automatically, based on “Installed Application” -reg key -value. Other collections are for limiting & successfull upgrade. The concept is modified and automated version of https://brookspeppin.com/blog/how-to-push-windows-10-in-place-upgrade-to-home-office-users , unfortunately the Post is not available anymore..
Great stuff. Thanks for sharing!
Thank you for taking the time to share this!
Hi Martin
I’ve downloaded your Task Sequence and tried to import it. But there is a error from the configuration manager.
The error say “Cannot validate a dependeny to Package KR100404”.
How is it possible to import the task seqence anyway?
Thank you for sharing your work.
Hi Martin
You can delete my comments. I’ve find out how to ignore the dependency.
Yeah, should be possible with the dropdown to import the TS anyways. Thanks 🙂
Hello,
I am keep getting Error 0x4005(16389). Any specific thing I need to look?
Internet says .Net, and some says application (PSADT) needs to be published as “run as 32bit on 64bit devices”.
Am I doing something wrong or missing something?
Also, the pre-cache (separate TS) not caching all the packages I have mentioned in the TS. I am running “Change-CacheSize.ps1” as the first step. And “Cleanup-Cache.ps1” as the 2nd step. No errors through out the Pre-Cache TS btw. In my environment, I have disabled some options that I don’t need.
Any help please?
Thanks in Advance
Jon
Hi Martin,
First of all thanks for sharing this, it has been a massive help getting our 1809 WaaS deployment up and running. One thing that we have noticed is that we are encountering a number of devices failing to upgrade and when we check the setupdiag logs we see the following error:
Warning: Setup was executed with a /Compat ScanOnly command line switch and exited with the appropriate exit code.
If you wish to update this system, remove the /Compat ScanOnly switch from the command line.
I have double checked the task sequence to ensure that the perform windows setup compat scan without start upgrade was unticked, which it was. Any ideas on what could be causing the task sequence to believe that its running the setup in compat mode as required in the precache TS?
Thank you for sharing your work and documenting it. I am in the process of trying to leverage these respective TS in my environment but after the Upgrade OS Step everything takes an extremely long period of time to run on the system.
The system is a Dell Laptop that has passed Readiness\PreCache and CompatScan, they are on VPN at the start of upgrade. Once the system restarts we continuously see Initializing the System Center Configuration Manager client…
Anyone else experience this on systems running Upgrade OS off network?
Seems like everything is working correctly but looking at DataTransferService.log, looks like the clients are downloading the os upgrade package again. I do have the second task sequence deployment set to “download all content locally before starting the task sequence”. Where should I start digging?
Isn’t this supposed to keep user profiles? After upgrade, user profiles are gone and as if they are logging in for the first time.
Hello Martin,
Following problem:
the point is not to listen to the user at work for as long as possible. That’s why TS1 is existing, so that problems can be screened out immediately.
The installation package for the upgrade is also downloaded in TS1.
I did not see the step in the second TS, how did you continue to work this package without loading it again?
It looks as if you are loaded it again briefly.
I’m stuck here …can you help?
Here is another way to remove the tool SendSchedule:
WMIC / Namespace: \\ root \ ccm path sms_client CALL TriggerSchedule “{00000000-0000-0000-0000-000000000001}” / NOINTERACTIVE
Hi,
I don’t understand why you do an enable and a disable?
“Finalize is a sub-group to Post-processing and thus only runs if everything supposedly ran without issues during the actual upgrade. I also re-enable BitLocker at this stage following the next reboot (I enable AND disable BitLocker but without -RC 0 which will enable BitLocker at next reboot).”
Hello! Great work! However, Remove Run Key for User Notification step doesn’t work with 1909 build. Do you have any workaround?
Hi Martin do have a copy of “Invoke-PSScriptAsUser.ps1” that could be shared as I am having some issues with one I have created from the published process.
regards
Adrian
Hey, I just uploaded it to GitHub: https://github.com/imabdk/Powershell/blob/master/Invoke-PSScriptAsUser.ps1
Many thanks martin and great script
Extraordinary tutorial
I implemented the same and TS working as expected with windows feature upgrade in the intranet machines.
For VPN (Work From Home) network machine getting below error message and Bit Locker is disabled.
Below is the error pop-up message.
“Kromann Reumert Deployment
This computer is still actively being upgraded to the latest version of windows.
Please do not interact with this computer, reboot or shut it down.”