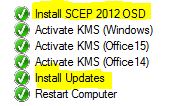
Some might claim that installing the SCEP client during OSD is an unnecessary step, but I’d claim otherwise.
Installing the SCEP (System Center Endpoint Protection) client as an step in your OSD task sequence, will provide instant protection against malware, whereas waiting for the automatic installation through the client policy, will leave the OS unprotected for the duration of the client policy polling interval + the time needed for the actual installation.
With that said, I’ll recommend to install the SCEP client during OSD. You can do that by separating the scepinstall.exe from the SCCM client installation folder (\\SITESERVER\SMS_<SITECODE>\Client\) and create a standard package and program running following command: scepinstall.exe /s /q /NoSigsUpdateAtInitialExp
Distribute the package to your distribution points, and add the step to your OSD Task Sequence as any other package.
/NoSigsUpdateAtInitialExp will prevent the installation to reach out to Microsoft.com for definitions updates, and therefore limit the WAN usage, which is considered good practice. Definitions should be installed from your Software Update Point:
