Switch default browser the enterprise way using the Software Center in SCCM (System Center Configuration Manager) and Powershell

Introduction

In this post I will talk about Windows 10, file associations and how you can let the user in an enterprise switch default browser through the Software Center in SCCM (System Center Configuration Manager). All of this is done in an environment where file associations are tightly managed and locked through group policies (as they should be in an enterprise) on computers running Windows 10. Curious on the topic? Read on 🙂

Read more…

Enable password reset on the login screen of a Hybrid Azure AD joined Windows 10 1803 device

Introduction

More Windows 10 1803! Password reset directly from the login screen of Windows 10 has been possible since Windows 10 1709, but only in a cloud-only scenario. This changed with 1803, and users having a hybrid Azure AD environment, are now able to offer this service to their users as well. (assuming they roll on the latest and greatest Windows 10 version). This guide explains what’s required in a Hybrid environment and how to leverage Configuration Manager to apply the proper configuration on the client.

For this to work, there are a few prerequisites:

  • Windows 10 1803 or newer
  • Password writeback enabled in Azure AD Connect
    • Proper permissions in on-premise AD for the AAD Connect account
  • Password reset enabled in Azure AD
  • Enable password reset on the 1803 clients (in this scenario through ConfigMgr)

Read more…

How can I deploy RSAT (Remote Server Administration Tools) for Windows 10 1803 using SCCM (System Center Configuration Manager)

Introduction

Continuing on the Windows 10 1803 journey from last week. RSAT (Remote Server Administration Tools) is available as well. This is a quick guide on how you can deploy RSAT for Windows 10 1803 using an application in the Software Center of Configuration Manager. RSAT is available for download following this link: https://www.microsoft.com/en-us/download/details.aspx?id=45520

The files available for download includes following. Select the one appropriate for your running OS.

  • WindowsTH-RSAT_WS_1803-x64.msu
  • WindowsTH-RSAT_WS_1803-x86.msu
  • WindowsTH-RSAT_WS2016-x64.msu
  • WindowsTH-RSAT_WS2016-x86.msu

Read more…

How can I in-place upgrade to Windows 10 1803 using Powershell App Deployment Toolkit and SCCM (System Center Configuration Manager)

Introduction

Update July 26, 2018: I have made an update to below content. Please find the new post on the link below. Note that the content in this post is still relevant.

Windows 10 1803 is out (old news I know). Nevertheless, its always a good idea to be ahead and start thinking and planning the upgrade of your environment. Configuration Manager offers a lot of flexibility in terms of servicing plans and the use of task sequences.

Task sequences is the preferred method in our environment, and I thought I’d share how you can deploy the Windows 10 1803 upgrade through the Powershell App Deployment Toolkit, some custom Powershell script and an application in the Configuration Manager Software Center. Curious? Read on. 🙂

Read more…

Deploy a forced installation of the Windows Defender Google Chrome extension using SCCM (System Center Configuration Manager)

Introduction

A few days ago Microsoft released a new extension for the Google Chrome browser. More specifically, they released the Windows Defender Browser Protection extension, which leverages the same security technologies used by Microsoft’s own browser; Edge. Microsoft describes their new extension with following words:

The Windows Defender Browser Protection extension helps protect you against online threats, such as links in phishing emails and websites designed to trick you into downloading and installing malicious software that can harm your computer.

With that in mind, why not make that a permanent part of securing your environment and do so by forcing an automatic installation and thus render the users unable to disable or remove the extension. Read on, this is how you can do that using Configuration Manager.

Read more…

Converting from BIOS to UEFI with Powershell (During OSD using SCCM on Lenovo laptops)

Following my previous post, this is an quick example on how to use my Powershell script to convert from BIOS to UEFI in a bare metal scenario. (Again, only Lenovo laptops is working with this script)

Most of the magic lies within the Task Sequence itself, so I will break it down in pieces:

  • Create a group in your Task Sequence called “Prepare Computer (BIOS)” with the condition _SMSTSBootUEFI not equals true (This will make sure the content of the group only runs if UEFI is not enabled already)

  • Next step, format the disk with following settings (Step: Format and Partition Disk (BIOS))
    • Disk type: Standard (MBR)
    • Partition type: Primary
    • 100% remaining disk
    • File system: NTFS

  • Next step, create a new group called Config Lenovo BIOS with following condition: SELECT * FROM Win32_BIOS WHERE Manufacturer = “Lenovo” (This will make sure the step only runs on a Lenovo computer)

  • Next step, run my Powershell script directly from a package like shown below. The parameter -EnableSecureBoot will also enforce UEFI to be enabled.

  • Next step, format the disk with following settings (Step: Format and Partition Disk (BIOS to UEFI))
    • Disk type: GPT
    • Partition type: Primary
    • Size: 600Mb
    • File System: FAT32
    • Variable: TSUEFIDrive
  • Add another partition:
    • Partition type: Primary
    • Size: 100% of remaining space
    • File system: NTFS
    • Variable: None

  • Next step, one final reboot to the boot image currently assigned to this task sequence. When the task sequence returns from the reboot, the Lenovo BIOS will be set to SecureBoot AND UEFI and Windows will continue installing.

Ultimately, you can have 2 steps to take care of when the computer is coming with either BIOS setting or UEFI, and act accordingly. Se below snippet for inspiration.

Enjoy! 🙂


Powershell: Enable virtualization and Credential Guard in an instant (Lenovo laptops)

Windows 10 Credential Guard is currently another hot topic considering cyber security. Credential Guard is a new feature in Windows 10 (Enterprise and Education edition) that helps to protect your credentials on a machine from threats such as pass the hash.

To be able to enable Credential Guard in Windows, you need to have virtualization enabled on the CPU in the BIOS. Virtualization is rarely enabled by default, and as such you will need to enable it manually (F1, enter BIOS, modify the setting) or better yet, find a solution to do so remotely and automatically.

I have created following script in Powershell, that initially enables virtualization in the BIOS (Note: We only use Lenovo laptops, hence this is made for Lenovo laptops only) and then apply the registry-keys to enable Credential Guard. All steps are logged into c:\Windows\EnableCredentialGuard.log

The script can be targeted to the proper Windows 10 versions through SCCM collections (I this example I only target W10 1607 and 1703, as these Windows 10 versions no longer require the Isolated User Mode feature when enabling Credential Guard, as it’s now embedded into the Hypervisor)

When deploying powershell script from SCCM, remember to create the program with a command line like this: powershell.exe -ExecutionPolicy Bypass -NoLogo -NonInteractive -NoProfile -WindowStyle Hidden -File .\CredentialGuard\Enable-VirtualizationCredentialGuard.ps1

<#
.SYNOPSIS
    Enable virtualization in Lenovo Bios and enable Credential Guard in Windows 10
.DESCRIPTION
    This script will only run on Lenovo computers. If run on Lenovo computer, the script will check if virtualization is enabled in BIOS. 
    If not, virtualization will be enabled in the process of enabling CredentialGuard.
    Also appends actions to logfile: EnableCredentialGuard.log
 
.NOTES
    FileName:    Enable-VirtualizationCredentialGuard.ps1
    Author:      Martin Bengtsson
    Created:     19-07-2017
#>

$Logfile = "C:\Windows\EnableCredentialGuard.log"

#Create LogWrite function
Function LogWrite
{
   Param ([string]$Logstring)

   Add-Content $Logfile -Value $Logstring
}

#Get computermanufacturer
$Lenovo = Get-WmiObject Win32_ComputerSystemProduct | Select-Object Vendor

#If not a Lenovo laptop, write to log and exit script
If ($Lenovo.Vendor -ne "Lenovo"){
    
    LogWrite "Not a Lenovo laptop - exiting script"
    Write-Warning -Message "Not a Lenovo laptop - exiting script" ; exit 1
}

Else {
    
    Write-Host -ForegroundColor Yellow "Collecting Lenovo_BiosSetting information" ; LogWrite "Collecting Lenovo_BiosSetting information"
    $VirtEnabled = Get-WmiObject -Class Lenovo_BiosSetting -Namespace root\WMI | Where-Object {$_.CurrentSetting -match "Virtualization*"} | Select-Object CurrentSetting

If ($VirtEnabled.CurrentSetting -eq "VirtualizationTechnology,Disable"){
    
    Write-Host -ForegroundColor Cyan "Virtualization disabled - trying to enable virtualization" ; LogWrite "Virtualization disabled - trying to enable virtualization"
    Try {
        (Get-WmiObject -Class Lenovo_SetBiosSetting -Namespace root\wmi).SetBiosSetting("VirtualizationTechnology,Enable")
        (Get-WmiObject -Class Lenovo_SaveBiosSettings -Namespace root\wmi).SaveBiosSettings()

    }
    Catch {
        Write-Host -ForegroundColor Cyan "An error occured when enabling virtualization in the BIOS" ; LogWrite "An error occured when enabling virtualization in the BIOS" ; exit 1
    }
    cls
    Write-Host -ForegroundColor Cyan "Virtualization Successfully enabled" ; LogWrite "Virtualization Successfully enabled"
    
}

#Add required registry key for Credential Guard
$RegistryKeyPath = "HKLM:\SYSTEM\CurrentControlSet\Control\DeviceGuard"
    If (-not(Test-Path -Path $RegistryKeyPath)) {
        Write-Host -ForegroundColor Yellow "Creating HKEY_LOCAL_MACHINE\SYSTEM\CurrentControlSet\Control\DeviceGuard registry key" ; LogWrite "Creating HKEY_LOCAL_MACHINE\SYSTEM\CurrentControlSet\Control\DeviceGuard registry key"
        New-Item -Path $RegistryKeyPath -ItemType Directory -Force
    }
    #Add registry key: RequirePlatformSecurityFeatures - 1 for Secure Boot only, 3 for Secure Boot and DMA Protection
    New-ItemProperty -Path $RegistryKeyPath -Name RequirePlatformSecurityFeatures -PropertyType DWORD -Value 1
    Write-Host -ForegroundColor Yellow "Successfully added RequirePlatformSecurityFeatures regkey" ; LogWrite "Successfully added RequirePlatformSecurityFeatures regkey"
    
    #Add registry key: EnableVirtualizationBasedSecurity - 1 for Enabled, 0 for Disabled
    New-ItemProperty -Path $RegistryKeyPath -Name EnableVirtualizationBasedSecurity -PropertyType DWORD -Value 1
    Write-Host -ForegroundColor Yellow "Successfully added EnableVirtualizationBasedSecurity regkey" ; LogWrite "Successfully added EnableVirtualizationBasedSecurity regkey"
    
    #Add registry key: LsaCfgFlags - 1 enables Credential Guard with UEFI lock, 2 enables Credential Guard without lock, 0 for Disabled
    New-ItemProperty -Path HKLM:\SYSTEM\CurrentControlSet\Control\Lsa -Name LsaCfgFlags -PropertyType DWORD -Value 2
    Write-Host -ForegroundColor Yellow "Successfully added LsaCfgFlags regkey" ; LogWrite "Successfully added LsaCfgFlags regkey"
    
    Write-Host -ForegroundColor Yellow "Successfully enabled Credential Guard - please reboot the computer" ; LogWrite "Successfully enabled Credential Guard - please reboot the computer"
    
}   

Snip of the logfile when everything succeeds:

How to flash BIOS with SCCM during OSD (Lenovo ThinkPad laptop)

Note: June 3 2018: This post will be updated as soon as possible with some minor changes and reflect how I do this today 🙂

In this blog post I will go into details about how I flash the BIOS of our Lenovo ThinkPad series during OSD using ConfigMgr.

First off you obviously need to download the latest BIOS from the Lenovo support site: http://support.lenovo.com/dk/en/. In this example I’m flashing the BIOS of a ThinkPad T450s.

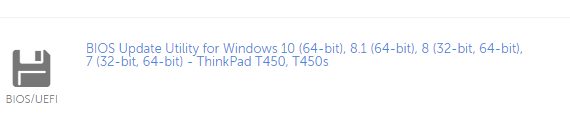
Go ahead and locate and download the BIOS Update Utility for Windows. The most recent version as of now for T450s is 1.21:

T450BIOS

When downloaded, extract the content to your source file library. In this case I have a folder structure equal to this: D:\Pkgsource\Applications\Lenovo\BIOS\T450S\1.21

The content of the 1.21 folder should be looking like this:

T450BIOS2

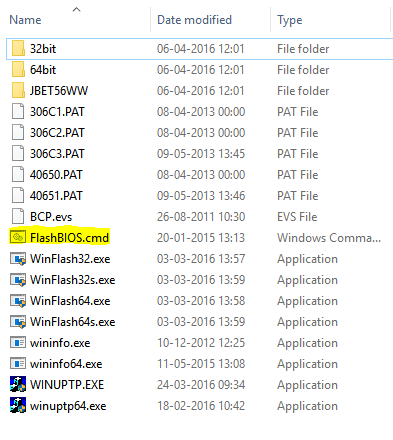
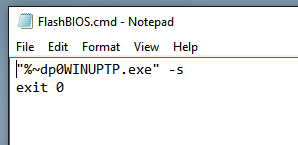
Next, mind the highlighted file: FlashBIOS.cmd. Create this file manually with following content (I exit the script with exitcode 0, as the BIOS update itself might return exitcodes seen as failures. Some might dislike this approach, but you can also translate the actual exitcode into zero using whatever method you prefer):

“%~dp0WINUPTP.exe” -s
exit 0

T450BIOS3

With this in place, go ahead and create a package in ConfigMgr with above content and distribute the package to your distribution points (I’m not going into details on this one, as this is pretty standard).

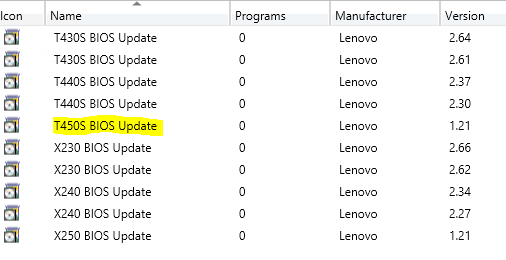
My packages in ConfigMgr looks like this (I have highlighted the package used in this example):

T450BIOS4

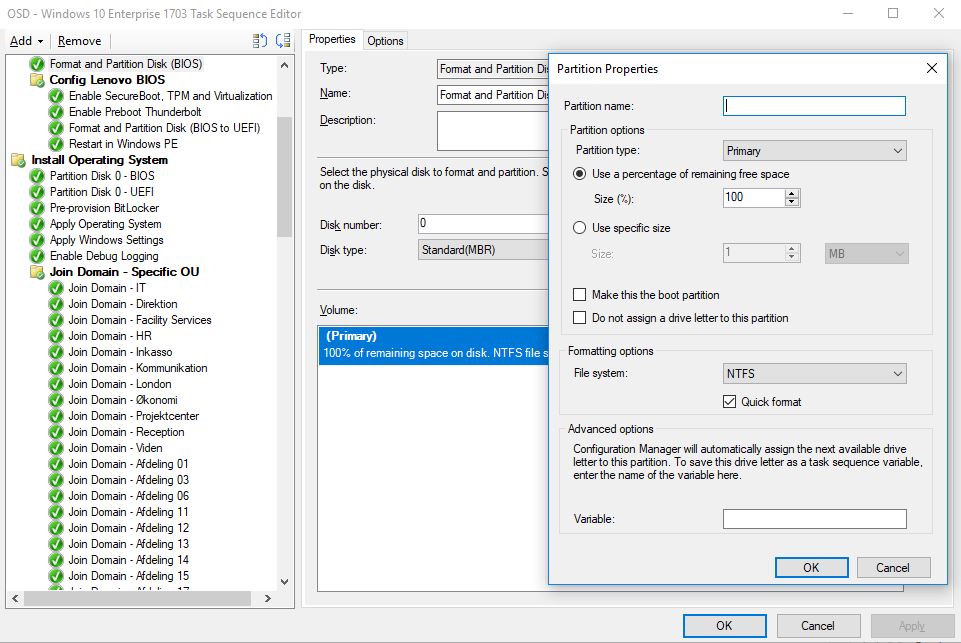
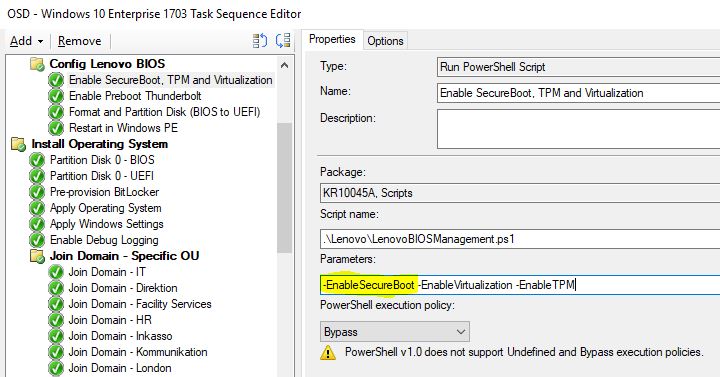
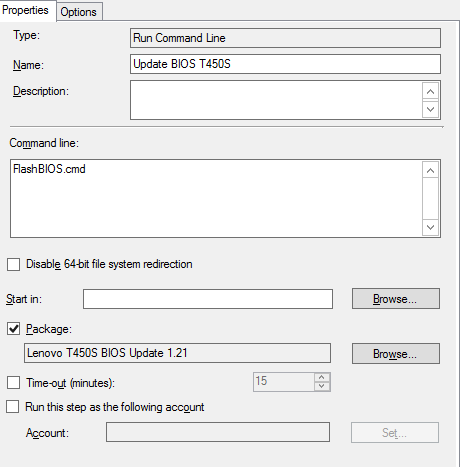
Next we will be using the package in our task sequence in a step of Run Command line. This is done somewhere after the step of Setup Windows and Configuration Manager like this (I put BIOS updates in the end of my task sequence as they require reboots):

T450BIOS5

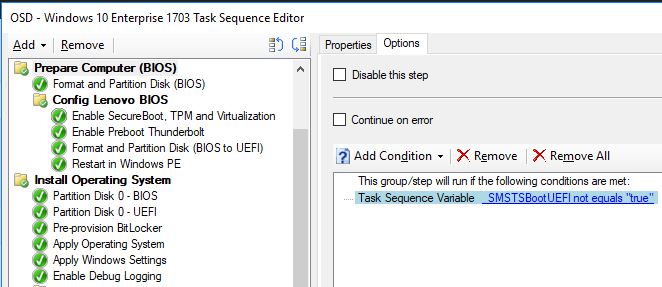
As updating the BIOS to this specific version is a onetime operation, you would want to add following conditions to the Options tab:

T450BIOS6

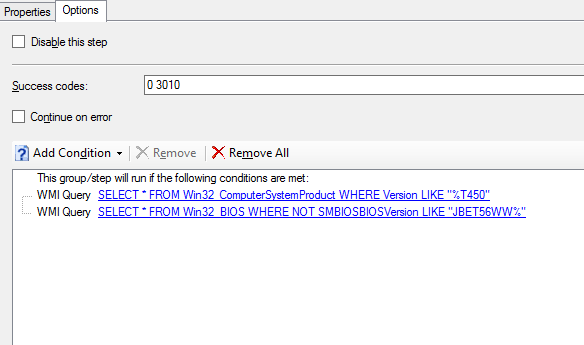
This will make sure that the step is only run when a Lenovo Thinkpad T450 is being deployed AND when the BIOS is not already the most recent version (no need to run the step again, if the same laptop should be reinstalled in a near future)

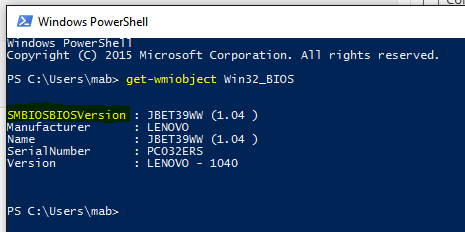
You can run following powershell commands to display the computermodel and what BIOS version that currently is installed:

Get-WmiObject Win32_Computersystem

Get-WmiObject Win32_BIOS

T450BIOS7

Enjoy 🙂

ConfigMgr 1511 – Notes from the field

I just updated my ConfigMgr environment to 1511 (CurrentBranch) and while the installation itself went safe and sound, following is to be noted:

  • The new Software Center never got installed properly with a shortcut in the start menu (%ProgramData%\Microsoft\Windows\Start Menu\Programs\Microsoft System Center\Configuration Manager)
    I had to re-enable the setting in my Client Settings (Disable the feature, OK, Enable the feature, OK and do another policy refresh)

ClientSettings

  • None of the new Windows 10 1511 software updates was synced into SCCM. I checked WSUS manually, and the classification Upgrades was not selected regardless of the Upgrades being indeed selected in SCCM. To solve this, I had to de-select all classifications in SCCM and select them again on the Software Update point. When I checked the chosen classifications in WSUS again, the proper selections was inherited from SCCM as expected and the next sync downloaded the Windows 10 Upgrades.

Classifications

Activate Windows 10 clients with KMS

Looking to activate your shiny new Windows 10 clients with your KMS? This is what you need to do.

1) Install following update on your KMS host: https://support.microsoft.com/en-us/kb/3058168 (Select the OS of your KMS. Reboot is required.)

2) While we are waiting for  Windows Server 2016, MS has created an unique KMS key for the use of activating Windows 10 clients with a Server 2012 R2 key. Browsing your licensing site, you will find a key named like this: Windows Srv 2012R2 DataCtr/Std KMS for Windows 10

3) Install the new key with the usual command: slmgr.vbs /ipk NEWKEYGOESHERE

4) Activate the key using: slmgr.vbs /ato

5) Lean back and watch your W10 clients being activated by your KMS.